Showing posts with label collaborate art project. Show all posts

Monday, March 27, 2023

Wall Mural

The school mural wall has been a hotter, harder, more rewarding art project than my students and I had anticipated. It took us two weeks to paint, with three hot work days, and two rainy recovery days in each week.
The first week we did the entire underpainting. You need no vision to use a paint roller on a cement wall. Students would pair up and one would do the edging while the other would work the roller. I'd come along behind with a paintbrush to blend large masses of color so that there was a gradual shift over the panels of concrete.

Students and I worked together to determine which words and which order to put them in. We decided to use verbs: command statements and tried to think of the most appropriate background colors and patterns would make the most sense with each word and how to create contrast the background with the foreground. It was the perfect way to learn and apply design principles.


We didn't have all of our ideas completely solidified when we started painting, and so we used chalk to lay in some of the wall.  We "erased" any of the patterns or words that we didn't end up using with paint brushes and water. I was impressed that some students with no vision could still draw without any tactile drawing tools.


I added Braille dots after the print words, to help fill up space and reinforce the Braille code.Students were looking for ways to include the rest of the school. I suggested that they each offer their handprint, but then there was a discussion on how the handprints could be arranged. We came up with the idea of a garden where the handprints were the flowers. We grow as individuals and we grow together.


I painted a pair of wings during a planning period. One student wants us to do a whole series of wings on the opposite side of the wall that we painted, but I think we'll save it for next year. In the meantime, I've been so pleased at the number of people who tell me they feel happier each day as they come to work and see the wall. Everyone deserves an environment that is makes them feel good.


Friday, December 10, 2021

Bottle Cap Mosaics & 3X5 Card Mobiles

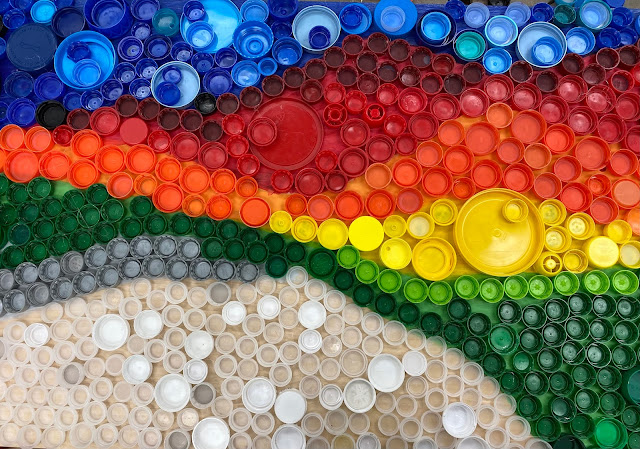
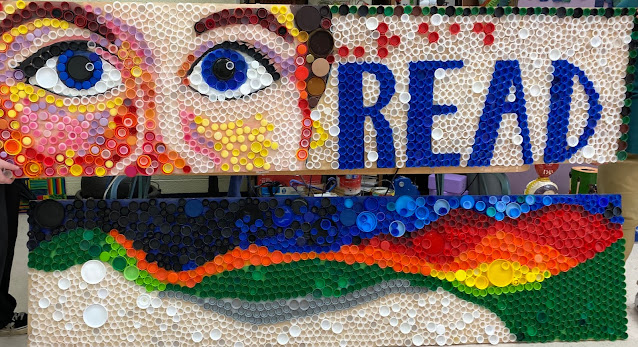
 Our school's Media Center had a major face lift at the beginning of the year with book shelves rearranged, new flooring and new furniture. I figured it needed some new art too.

People from the school and community donated thousands of bottle caps for the project. We're using more water bottles since the water fountains are shut down during COVID,  and this creates a lot of waste. Our Art class wanted to make use of some of that plastic. Students submitted ideas.  

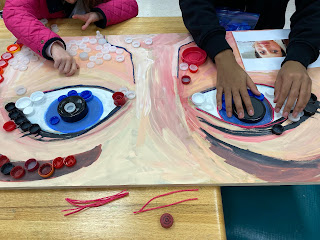
One new student, on his first day at our school, made a drawing of a face. He's totally blind, so I have him a a Tactile Doodle and we ended up using his idea to do part of a face, at least a set of eyes. A couple of other students made marker drawings of sunsets, so that's the idea we used for our second.


We spent a day playing with the caps on the board to make pictures and see how much of each color we had to work with. Later, most of the two boards were painted in the colors of the caps so we would know where to put them. Then the caps were hot glued to the surface.

I was given the 3D letters GAB to represent Georgia Academy for the Blind. We painted them before attaching the bottle caps.


Saturday, November 6, 2021

Festival of Trees Clay Ornaments: Peace, Love and Braille


Claymation is as natural a segue into ceramics, as a school-wide event is to a community event. So my art students went from having our mini animation film fest to the festival of trees. This is our 3rd year to participate in the Festival of Trees exhibit at Macon Georgia's Museum of Art and Science. It is a way for us to have a presence in the community, support the museum's fundraiser, and to subtly advocate and inform. We titled this tree: Peace, Love, and Braille.

Most terracotta ornaments were dry brushed with paint, while most porcelain were glazed 


My students love working in clay because it is such a tactile experience. For this tree, they rolled slabs, cut shapes, pressed textures, and stamped words into the clay ornaments. If we didn't have cookie cutters or cups to cut the shapes we wanted, we made our own templates out of Braille book cover plastic. 

 Many of the students at the school read Braille, which is a code created by Louis Braille in France about 200 years ago, using raised dots to represent letters. Other students have some vision and can read print if it is large enough. Peace, Love Hope, andJoy are the words represented in many of the ornaments (in print and/or Braille) because that is what we wish for each of you this holiday season, and always.

While at the museum decorating the tree, we explored what the museum had to offer: mini zoo, art galleries, bat cave, artist's loft, and science floor. We met the museum's director and the director of education, who is hopeful about working with us at some point in the future. We topped off the trip by stopping for ice cream on the way back to the school. 
Whether in Large Print or Braille, what better way to usher in the holiday season than with peace, love, hope, joy, and a morning to explore  the museum?


Friday, May 28, 2021

Bead Board Upcycling Project

After my family finished a home improvement project, we had strips of left over bead board. I cut many of them into small enough pieces to ship in a large envelop to my distance learning students along with a fat sharpie marker, and the rest I used for the students in my classroom to work together to create a large wall piece of art for the school. They decided to use light blue and peach to create a complimentary color scheme, so they painted the strips in the wood, before creating patterns and zentangle designs with sharpies: variations on spirals, checker board, weaving, zig zags etc. Once the individual boards were nearly full of pattern, we finished the exposed edges with white tape and then screwed the strips together going horizontally and vertically. Basically, we ended up with a fun, 6 foot piece of art that everyone could contribute to and be proud of while celebrating Earth Day!
Students paint large pieces

Personal pieces were made from small pieces

A virtual student shares her finished art from home


Wednesday, April 21, 2021

Value Lesson: Tints and Shades


Monochromatic is one of the easiest color schemes to teach. Take a color and add black and you got a shade of the color. Take a color and add white and you got a tint. It's that easy.

I've been wanting to start an Upcycling unit for a little while and when someone left a pile of discarded 3.5 foot strips of chipboard at my classroom door, I decided that painting the strips and  making a chain from them would be an easy way to create something sculptural from something that would otherwise be garbage... all while teaching how to mix paint to create a variety of values.
My elementary school and multiple complex needs students painted green on one side of each strip and blue on the other side of each strip.  We lined up the strips from dark to light and rather than keep just the green or just the blue on the outside, we alternated blue on the outside and green on  the outside, which makes the chain look one color from one point of view and another from a few steps to the side.

I glued the links using hot glue with enough overlap to make the loop slightly bigger than a foot in diameter. It took twelve links to stretch from floor to ceiling.

And then today, on Earth Day Eve, I hung the chain from the ceiling in the hallway outside my room using the colors of the blue seas and green lands that cover mother Earth. It was a great way to discuss the use of value in color and the way we can value the planet that sustains us. It was a great way to talk about reusing materials that would otherwise be thrown away. It was also a great way to build a classroom community discussing how we are each a link the class and world chains and can do our part to solve problems. Happy E-ART-H Day everyone!


Sunday, October 7, 2018

Warm and Cool Cardboard Assemblage

My self-contained classes have been learning about warm colors vs. cool colors. One week, each student painted a piece of cardboard with warm colors and the next week they did the same thing with cool colors. I strung fishing wire through the corrugations and ended up with some nice hanging collaborate art pieces to brighten the walls of the school.

Thursday, August 24, 2017

Hip to Be Square: Josef Albers Art Project

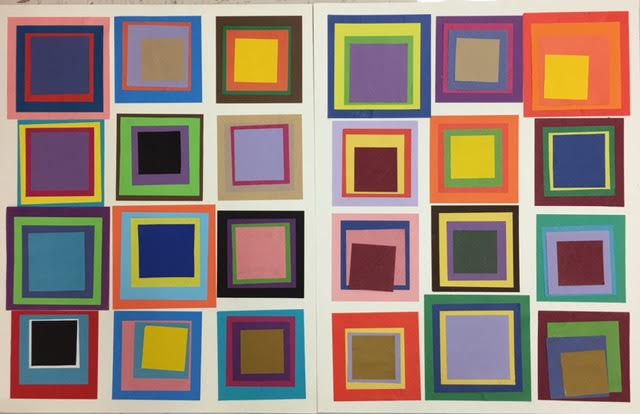
Josef Albers was one of the talented German artists who taught at the The Bauhaus School until the Nazis put pressure on the school to shut down in 1933. Hitler hated modern art.  Albers immigrated to The U.S. and went on to teach at the then new Black Mountain Art School. He is most famous for his "Homage to the Square" series, which consisted of hundreds of paintings, each of several squares nestled inside one another.  He was very interested in color relationships. A green may look blue-green next to a yellow, but yellow-green next to a blue.  A warm color will look like it's coming towards you, but a cool color looks like it's receding in space. This week, my elementary students studied Josef Albers.

Color relationships are an interesting thing to try to teach students who are color blind, or completely blind. We've been reading the picture book about Esref Amarmagan, the blind artist from Turkey, who had to keep his colored pencils laid out int he same order, and memorized the color of objects, so he could recreate them in paint in a way that made sense to future viewers.


When I asked one class,"What color is a watermelon?" A couple girls, with some vision, answered, "Green!" But when I followed up by asking about the color of the inside of a watermelon, a boy, with no vision, eagerly said, "Green!" The only way for kids like him to know the colors of things is to be told.
So we talked about the color of things, and then we worked collaboratively to make a giant collage of hundreds of 1 inch squares of color.  First, I used Elmer's glue to trace the giant chart paper grid. After it dried, students felt the squares and were able to independently glue and  place their pre-cut 1" squares or origami paper. 

To avoid gluing the color side down or having to tell each student the color of each square they picked up, I gave them a tool to tell them the color of things, It's the APH Color Test, and you just press it against something and push the button and it will tell you what it is (as shown in the video below). Everyone got a kick out of testing their skin color. Apparently mine is "murky gray beige" or "gray pink" so that information will come in handy next time I buy make up.

Each child also made his/her own, "Homage to 'Homage to the Square'" piece gluing various colored squares together and trying to explain why they thought their combination was working.


Extra time meant gridding another giant piece of graph paper with glue and having students use dot makers to make color clusters and patterns. What a corful way to start the school year!