Friday, May 24, 2024

History of Architecture Totem Pole

The sensory garden at the Academy for the Blind is a place where "orientation and mobility" training can take place, as students have to navigate paths that go from brick to pebbles, to mulch. There are wind chimes, and the smells of pine and rosemary. But there wasn't much to touch there until a four years ago, when my students each made a part of our Georgia totem pole, displaying the state bird, flower, fish, reptile , motto, map, and more!


Two years ago, we added a school spirit pole, complete with braille I LOVE GAB, a Perkins Brailler, white canes, our school mascot, and glasses. We even had an un-vailing ceremony with drummers, cheerleaders, a speech about the symbolism of the piece.

This year, my students were studying architecture and each one picked a famous building from art history to write about. Then they creatd a 3D version in clay, with a clay cylinder through the center of each sculpture. These were then strung on a metal pole in the ground, filled with Great Stuff, that foams and hardens. We piped caulk between each layer to keep moisture and bugs out.

I've spotted students feeling the pole and trying to guess the name of each famous building: From the pyramids to the Guggenheim.


Aloha! A Luau themed Prom


I feel like this years prom was lots of fun, with a  Beach (specificially Hawain) themed decorations. As soon as the D.J. walked in he vowed to play some Beach Boys and the theme song from Hawaii 5-0.

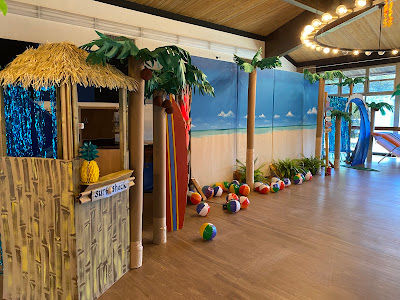
My goal is to always transform the cafeteria into a place that makes students feel transported to a more special venue then the place they ate tator-tots a few hours earlier. In order to do this, I have to essentially create a wall to hide the lunch line. a beach scene on painted on vinyl and stretched on 4X8 foot boards helps cover most of the heating trays and salad bar area.

The tray drop off window had a screen placed in front of it, and the refreshments were served on a table decorated with pineapple palm trees and more pineapples wearing sunglasses. 


Our surf shop and tiki head area were a great place to have photo shoots. There were 18 palm trees scattered throughout the room. Only once did a tree get knocked over and it was caught before it hit anyone or toppled more. It was a prom-night miracle considering that all of our students are legally blind.

Beachballs and leis hung from the light fixtures above. And more beachballs were scattered on the floor, hiding the uplights. Ferns hid the set stands.


The surfboard out of foam was reversible to match moods and clothing: serious and sporty on one side, playful and floral on the other.

I made a second, reversible surfboard out of cardboard, which we could stand on, without fear of ruining it with our feet & weight.
I taped a cardboard pole between a tree and a set to hold up blue, tinsel streamers. The air vent on the wall behind it was blowing like crazy, so I needed to add hang turquoise fabric from the same pole, behind the tinsel. I taped the stand behind the foam wave to the floor so that it wouldn't be knocked over. I'm always happy when I can figure out last minute installation logistics, whether it be for this surfing photo booth, or how to string the beachballs and hang them from above in a seamless way.


Towards the end of the evening, my paraprofessional and I lit up some foam glow sticks and handed them out to students. Even students with no vision loved waving them around. I love how this picture shows the Cheshire Cat on the back of our tiki head from our Alice in Wonderland Prom two years ago.  I spent almost no money on prom decorations since almost all of it was made from discarded cardboard, hangers, and wall paper. I wish I could share pictures and videos of the students. Everyone had a great time!

Tuesday, May 7, 2024

How to Make a Surf Shack Photo Booth

If I have to replace a washing machine, you can bet that I'm going to want to keep the box it came in. And I didn't just use the box...the other parts of the packing ended up making a roof for a tiki bar or surf shop for a beach themed party. Other than hot glue and paint, the only thing I needed was part of a grass skirt .

first step (after cutting out one side of the box, was painting the box a medium brown...it was actually almost the same color as the cardboard, but I needed to cover all of the words. Then I took a darker brown to make bamboo marks. This is done by pressing down on the brush to make a wide, horizontal mark, before slightly lifting it and lightly dragging it down before making another pause and pressing to make another horizontal end of the vertical line. Leave a little gap between the next segment in the bamboo under that.....and they thought I'd never use what I learned in that .5 credit Chinese Calligraphy class I took in college!  After it was all dry, I went back over with a light yellow, dry brushing, and letting enough of the brown show through to create some highlights and shadows.

For the roof I did have to smooth it out with by hot-gluing a couple pieces to the top of a piece of packing that almost looked like a pyramid. You could just create a little roof shape with a small triangle at either end or even just a slanted roof going down towards the front. I did a little underpainting to fill in some of the thatching on the roof. Then I took some double sided tape, pealing off one side and stuck to the bottom of a grass table-skirt, about 4-6 inches from the bottom. I cut the grass just above the tape before pealing off the other side of the tape and tacking it to the bottom of the roof. Then I continued the process, trimming the grass skirt from the bottom and taping it above the last layer, until the roof was covered. There were bald spots, but there were also lots of bits of grass that could be used to fill in with a little glue.

I had to lie the box on it's side to hot glue the poles on the inside and then stand it up to glue the roof to the poles. I used big gorilla glue sticks and it worked really well.

If I had made the roof a little higher, I would have hung a shingle, but I wanted to make sure the thatched roof was in the photos so it was already a low 6 foot ceiling. I just put the sign in front of the window. It was a fun project and I'm happy to have another photo op for luau themed prom goers this year.


Luau Themed Sign Post Decoration

 I love to use sign posts as decorations. I had street signs (Broadway, Fifth Ave., etc.) for a New York themed prom, and a sign post using curved arrows (This way, That way, etc.) for an Alice in Wonderland prom. This year's luau theme, called for a colorful signs. Cardboard can look like weathered wood if it is painted with pastel colors that are dry brushed to let some of the cardboard show through.

I point to the food with a luau arrow and the dance floor with the beach backdrop with another. The surf photo booth also gets an arrow. Everything else is made up. It's not a bad idea to make the signs a little extra long so they can be cut down afterwards to center and corners cut to make arrows go the directions you want after you figure that part out.

If is a more generic themed beach party, you can name beaches all over the world and write the miles from your venue to that city. I put a piece of bamboo in a painted #10 can filled with rocks to stand it up, and tacked each sign on the bamboo with hot glue. The entire project was done in less than an hour. Fingers crossed that it help create a luau vibe.

Beach Scene Party Backdrop


This year's "Luau" themed prom is being held in the cafeteria. I want to transform the space so it didn't feel like the same place my students stood with lunch trays a few hours earlier, but in order to do that, I have to hide the serving area where those trays are pushed in front of each course of their meal. Four 8 foot X 4 foot panels are enough to do the trick. This year, I didn't have much time to really spend on a detailed painting, so I just took the vinyl that I used last year to paint black and white movie star images on the white side, and flipped it over to the side people would use for wall paper. I stapled it to the sides of my wooden panels, stretching it a little as I went. The color was the same pale tan that I saw in so many beach scenes, that it was just a matter of making a horizon line of painter's tape across the middle of each panel and having students roll "sky blue" paint across the top, while I followed behind blending white paint with a brush, along the horizon, and darker blue along the top. 
A small turquoise ocean with a little white foam on the edges, followed by scrubbing rounded fluffs of white, mixed with some blue to create clouds and viola! We've got a very simple backdrop to a lot of other, fun, beach themed decorations. It only took a couple of hours to make, but I think looking at the beach every day, leading up to prom has helped me feel a little happier and more relaxed.


Friday, May 3, 2024

DYI Paper Maché Tiki Head Decoration


In preparation for our Luau themed prom, I wanted to make a giant Tiki mask. Tiki masks have been carved out of wood since ancient Polynesia . While there may have originally been some connection with diety, since the 190's and '40's, these masks have been associated with tiki culture in movies and restaurants with themes inspired by South Pacific. 
I started the project with a seven foot piece of cardboard and drew a face on top using chalk. I drew inspiration on a wooden mask I bought at market in Tonga.  Then I took a bunch or large pieces of foam that had been used in packing some sort of appliance. (I didn't ask when the procurement person for our school dropped it off for me to make something with.  I used a box cutter to cut out the parts of a face, which I then hot glued to the surface, on top of the chalk lines. Other than a few bucks I spent in the laundry aile at 
Then came the tricky part of papier maché. I taught students how to tear newspaper top-to-bottom (with the grain) in 3 inch strips. My technique is to hold the end with my right thumb and pointer finger and lower it close to the surface of liquid starch in a bowl. Then I take two left fingers (pointer and middle fingers) to push the strip just below the surface, while raising the pinched end, allowing the entire surface (except for the tip) to be drudged through the liquid. Then I take the 2 fingers that had gotten wet, and use them like scissors to squeegie both sides of the strip, from top to bottom, dripping the access into the bowl.  Everyone wants to use their thumb and finger to do this because it feels naturally, but five or six attempts to evenly distribute the liquid and squeegie excess, don't work as effectively as one time with the two long fingers, gently squeezing downward. Sounds fussy, but you want to be efficient when making  something this size, and you want to use good craftsmanship no matter what size.

The foam was shiny and slick, which made it hard for the wet newspaper to stick to. We did the best we could and when it dried, I tucked some edges and corners to the foam and board with a hot glue gun, before adding more layers of maché.

Students painted the entire head with brown paint, and once it dried I added highlights with (mixing the underpainting brown with white) and shadows (mixing the brown with black). This made it feel a lot more dimensional and woodlike than the molded chocolate painted version. I think my students learned some good skills by helping me with this project, and I hope they get some good pictures at the upcoming dance, as well.