Monday, November 28, 2022

Cross Contour Portraits


You would think that students automatically know that our bodies are three dimensional and not flat. But when they draw portraits and figures they always start off with a flatness. I tried to help them get a sense of space by having them draw cross contour lines on flat images, pretending that the person was wrapped in string or had lines projected onto them. This is far less intimidating then doing a cross contour drawing of someone on a blank piece of paper. It's a quick and easy exercise with hopefully lasting results when it comes to creating the illusion of dimension on a piece of paper.


Turkey Crafts

As much as I steer clear from crafty projects with little variation in my Art classroom, I can't help but think that every childhood requires at least some of the holiday staples, like the timeless Thanksgiving turkey crafts.

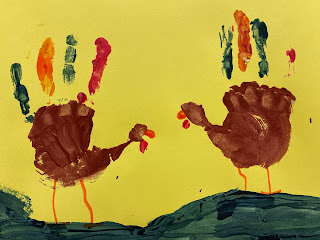
The painted turkey handprints are a classic. Little hand sizes are fun to document and it's a five minute way to teach children that they can look at one thing (like a hand) and see an entirely different thing (like a turkey). It's about making connections and seeing potential.


For pinecone turkeys, students had a choice of leaves, paper or foam, or real feathers to tuck into the cone. They could cut out foam bodies to glue to the wide bottom of the pinecone that is laid on it's side, or just a foam neck that can be tucked into the pinecone in front of the feathers. Eyes were made from buttons, wood, foam circles or google eyes. Craft foam beaks and legs are glued on to bring out the bird-ness of the thing. Allowing variations in size, shape, and materials helps for students to exercise a little creativity within safe perimeters and allow them to make a quick.


Friday, November 11, 2022

Autumn Tree Tissue Paper Collage


To go along with our autumn leaf rubbings and prints, we decided to make a tree from tissue paper. It's easy to make a brown piece of tissue paper much larger than a glued trunk shape and push it into the glued tree to make the illusion of bark. Students tore tissue paper into small pieces: yellow, red, oranges, and greens, before gluing them into the branches. Some choose only one color while some chose many. Some students had leaves falling from the limbs, or on the ground, while others kept them neatly in the tree tops. This is a quick crafty lesson about fall and there's enough wiggle room that each child's finished product can look different from their neighbor's. Happy Fall y'all!


Fauve Faces

Matisse, was lucky enough to have a mother buy him an art kit during a bout of appendicitis, which caused him to abandon his pathway to becoming a lawyer and step on the pathway to become an artist. Andy Warhol and Frida Kahlo are other famous artists whose careers were born from illness and injury. Matisse and other Fauvist painters weren't actually part of an organized movement, but more of a group of people whose style overlapped for a brief painting that allowed their strong brushstrokes and arbitrary color choices be given the name, "Fauves" meaning "Wild Beasts."

I encouraged students to work large for their Matisse style portrait assignment. They were to use the correct proportions for drawing a face as the starting point, and then try to find a way to use color in an unexpected way. Faces were divided into areas of greens, oranges, purples and yellows. Most of the time it was two main colors on the face, and then the shirt, hair and background were to use contrasting primary or secondary colors.

Students who are totally blind can still participate by drawing with Wiki Stix and choosing colors. I try to encourage all my students to use a lose brush for this assignment. Some want to create smooth, flat shapes of color, but by adding a drop of one color and a dash of another every couple brush strokes, it creates an energy and allows students to try a gestural approach. I'm happy when students try something that pushes them outside their comfort zone and introduces them to a new way of thinking...even if that way of thinking is 115 years old.


Printmaking and Leaves

Autumn is the perfect time to do a cross curriculum lesson by marrying printmaking and leaves.  I began the lesson with a 5 minute video about why leaves fall from the trees as the days get shorter in the fall (hint, it has to do with chlorophyll and photosynthesis). Then we took a hike around campus, touching bark, identifying the trees and collecting leaves and pinecones as we went.  

Our first art assignment, used the leaves we collected to make rubbings. The students would arrange their leaf or leaves with the vein sides up, lay a piece of copy paper or newsprint on top and rub the paper with the side of a crayon to reveal the texture and shape of the leaf. Rubbings are a simple form of printmaking and most households have all the supplies on hand. 
The second project was to make leaf prints by painting with tempera or acrylic on the vein side of leaves and then turn the leaf upside down and rolling it with a brayer or rolling pin. You have to be careful not to get uneven pressure through things like finger prints and it helps to place a piece of paper on top of the leaf as well to keep the roller clean. The same leaf can be used multiple times, although if more paint needs to be applied, use it sparingly so as not to fill in all of the gaps between the veins.


Finally we used stencils of various leaf shapes. Students placed a sponge in yellow paint to pat lightly, covering the exposed shapes. A sponge with blue paint dabbed around the edges creates green, and red paint sponged on the wet yellow creates orange. So students are learning leaf identification (biology), mixing of primary colors to create a secondary, (color theory), shape and texture (elements of design), and three different printmaking techniques (techniques and processes), in 3 hours of Art class.
Help the children in your life slow down and enjoy their fall through art making!


Saturday, November 5, 2022

Modifying Portrait Lesson for the Blind

Tactile Doodle and Wiki Stix make it possible for my students with no vision to do the same portrait assignment as my students with low vision. For this project students take an oval, draw the line of symmetry, and divide it into fractions to make sure the face is proportional. Some students have enough vision to see up close or with magnification devices, but for those who need the art to be tactile, Wiki Stix are the easiest thing to find. The downside is that they don't always stay on the paper permanently, and they may need to be cut into smaller pieces for smaller features. The Tactile Doodle is perfect for students with sensory issues and you can draw small lines with immediate results. The drawback is that you can't color or paint on the plastic sheet that you need to make the raised lines, and the sheets are expensive.


Wednesday, November 2, 2022

Monster Mash Project


 Shape, Color, Size are all design elements to consider when creating a monster collage. Elementary and Middle School students were able to use their imaginations to come up with their own original monster.