Wednesday, March 2, 2022

Melted Crayon Project


"I'm not in the mood to do anything today," one tired high school student said today. So I scrapped the plan, and made her an offer she couldn't refuse. "Let's melt crayons."


It's an easy, one day project. You arrange crayons, with or without paper, vertically along the top of a canvas and hot glue them into place. prop the canvas up at an angle and hit it with a heat gun. Hair dryers work too, but they can be a little messy.

While placing the crayons in the order of the color spectrum is a popular thing to do, I think it's better to mix it up a little bit. Change the order of the colors or the placement on the canvas. And don't turn your nose up at neutral colors, such as grays, tans, black and white.


Of course white helps the colors show bright, but you can use any color for some richer under tones. We had mat board in a variety of colors.


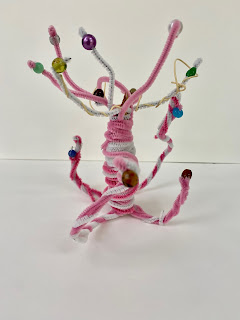
Ruth Asawa Project


A student's peppermint tree
Ruth Asawa is an artist whom I knew almost nothing about before teaching my Wonder Women of Art unit. She was a Japanese American who was held in an Internment Camp during World War II. (Dorothea Lange and Ansel Adams from our fall Photography unity documented these camps). She was a student in the historic art hot spot: Black Mountain College where she learned form and worked beside greats such as Josef Albers and Buckminster Fuller. One day in Mexico, Ruth saw a man making wire baskets in the market place, and asked him to show her how. She'd spend the rest of her life making sculptures, many of which were made from the crocheted wire technique. She settled in San Fransisco with her architect-husband and their six children, there are many sculptures that she designed from folded paper that was later cast in bronze. I wish I had kept my eyes peeled for her sculptures when I was in San Fran last summer. I also love how Ruth was a passionate educator and community advocate for the arts.

My students had the task of using any kind of wire they wanted to use. I got bags of Twistees and rolls of copper and aluminum wire, but most students used fuzzy craft sticks (pipe cleaners). They made pumpkins, candles, stars, and water fountains by bending the wire and making something linear into three demential forms.


Wire Quilt Squares Project


Our Wonder Women of Art unit has taken us to the Germany in the 1600's with Maria Sibylla Merian, to Mexico in the 1900's with Frida Kahlo, to the ladies living a state away in Alabama: The Quilters of Gees Bend. Self taught artists are still artists, and functional art is still art. This project is leading into a craft unit and we'll have to talk about the difference and overlap between art and craft. The Quilters in Gees bend are neighbors, family, and friends who made quilts out of necessity before they were discovered and made famous. Their fabric arrangements of colors and shapes hold their own in galleries of modernist paintings. So after watching videos and having discussions about the purpose and aesthetic of these famous quilts, we began to make our own squares. I offered my students wire, Twistees, pipe cleaners, beads, upholstery fabric, wall paper, buttons, wood and clay mosaic tiles.

Instead of making a large class quilt, students bound four of their own squares to make small 8"X8" wall hangings. One student (in the tradition of quilt making) made one for her future niece, who will be for next month. I love seeing how students use a variety of materials to fill an empty square.

Tuesday, March 1, 2022

Yarn drawings


My art students at the Academy for the Blind moved beyond Wiki Stix for tactile drawing when we used the quilling technique, but using yarn or string to create drawings is more permanent than Wiki Stix and more immediate than quilling individual coils to create an image.  Students were open in terms of subject matter. Some students chose to make something abstract with squiggles and spirals. The important thing is for them to realize that they can make images that can be appreciated as a visual piece of art for those with vision and as a tactile piece of art for those without. It's a great project to teach types of lines, and weight of line as they choose thick or thin yarn (or both).


And for my student who recently discovered that art class can be used to make mazes, he could make them a variety of ways. It was fun to hear him laughing each time he figured out how to make a dead end to trick one of his class mates.

Quilling

"Quilling is my favorite because it’s something I can do by myself and I’m proud of that. When people go on tours of the school they say, ‘That kid is working by himself and that is amazing!’ And the more people who compliment us the better we get until we’re the best school in the country!" He wasn't the only visually impaired student who I won over last week with my quilling project. There is a 10 year old who has alway come to Art class grumpy. It's amazing to me because I am almost always right in my assumption that kids love art. Not this one. He always lets me know right off the bat that he doesn't want to make anything. Quilling, however, was a game changer.

Quilling is taking thin strips of paper and wrapping them around something thin like a quilling needle or a tooth pick. We used thin paint brush handles. Then You let it spring back, just a little bit to form a spiral before gluing the end so it keeps its desired size of circle. You can pinch it on one side to make a tear drop, a pinch on either side for an almond shape, three pinches for a triangle or 4 for a square. These shapes in various colors can then be used to pictures. Teach shapes can become petals on a flower or wings on a bug, for example. These can be glued to paper to make a card, or glued to each other for jewelry or an ornament. Our quilling projects were mounted on paper.

"Can I make a maze?" my non-art appreciator said.

"You can make anything you want to make," was my reply. And he was off and running. He didn't even use a paintbrush or toothpick to roll his paper because he thought it would slow him down. While everyone else was finishing up he was only half way through, but that didn't stop him from picking up where he left off. We pushed buttons through the maze at the end of class to see if it worked, and sure enough, he made something he was so happy with that he came in the door the following week with a smile on his face.

White Cane Painting

 While waiting outside a bathroom for a student, another student started "drawing" on the floor with the tip of his white cane and having me guess the picture. (A white cane is a mobility device used by people who are blind).

"It's a circle...oh it has two dots. Are you drawing a face?" A teacher passed by and suggested we make our game into permanent art by using paint when we got back to the classroom, which is exactly what we did. I helped him dip the tip of his cane into the paint (because neither of us wanted to clean up a bunch of spilled paint from the floor) and then he rolled the tip back and forth on the paper in a few colors. It ended up being abstract and tactile and once we cleaned off the cane, both of our Orientation and Mobility teachers loved it. Not every representation of the type of cane my blind students use has to be the image of the cane itself, it can be the arch and the rolled motion the cane makes as it sweeps back and forth on the floors of our school.