Wednesday, April 21, 2021

Make Your Own Scratch Boards

Scratch boards are easy to make if you have paper, crayons, acrylic and something to scratch with.  My students started the process by filling a piece of paper with patches of color. Some did it in thick stripes, some in simple checkered patterns and others in random patches. The trick is to use a heavy hand when coloring for this project; you want to make a waxy surface.
Once the drawing was done, we painted black acrylic on top of the drawings. It is a strange feeling taking something so beautiful and colorful and covering it with darkness. But it is all part of the process. Once the paint dried, we used bamboo skewers and sharp plastic foil tooling tools to scratch a drawing.
This project is a great way to talk with students about the difference between shapes that are formed with areas of color, and shapes that are formed by lines. It's a way to teach hatching and cross hatching. Sometimes you want color to be bold and dominant, other times you want to use restraint and just let it peak through. Learning the process of making scratch boards is a great way to offer choices for students in the future.



 

Art Students and Popsicle Sticks


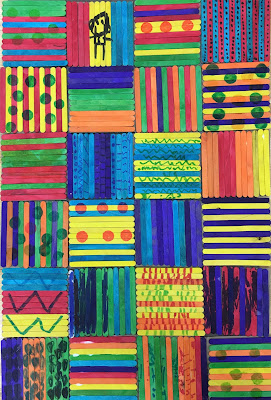
There are so many things you can do with popsicle sticks and the more options you give your students the better. Some of my students made boxes out of them, while others painted them before arranging them and gluing them to painted cardboard, but one of the favorite projects from popstick week was a class quilt. Each student was given a 4.5" X 4.5" square of chipboard. They were to pick out 12 sticks. It helps to limit the color choices between 2 or 3 to make patterns. This was a chance to touch on the vocabulary of color relationships and help them feel good about their choices., "Oh, you  are using secondary colors.", "Yellow and purple are opposite on the color wheel. They are complimentary colors." or "All of your colors are warm."  Some students drew lines, dots or zigzags on individual sticks with marker before gluing them down one at a time, while others glued them into place before adding a simple image or circles form dot makers. Since my students are all blind or visually impaired it is nice that they can feel the sticks and the verticle-horizontal pattern of the squares. Those with some vision, could help me arrange them making sure that the blues were spread evenly, and there were at least two squares with yellow in each row. It's a great way to touch on unity, variety, horizontal, vertical, color schemes, and collage, while letting children make their own choices.


Value Lesson: Tints and Shades


Monochromatic is one of the easiest color schemes to teach. Take a color and add black and you got a shade of the color. Take a color and add white and you got a tint. It's that easy.

I've been wanting to start an Upcycling unit for a little while and when someone left a pile of discarded 3.5 foot strips of chipboard at my classroom door, I decided that painting the strips and  making a chain from them would be an easy way to create something sculptural from something that would otherwise be garbage... all while teaching how to mix paint to create a variety of values.
My elementary school and multiple complex needs students painted green on one side of each strip and blue on the other side of each strip.  We lined up the strips from dark to light and rather than keep just the green or just the blue on the outside, we alternated blue on the outside and green on  the outside, which makes the chain look one color from one point of view and another from a few steps to the side.

I glued the links using hot glue with enough overlap to make the loop slightly bigger than a foot in diameter. It took twelve links to stretch from floor to ceiling.

And then today, on Earth Day Eve, I hung the chain from the ceiling in the hallway outside my room using the colors of the blue seas and green lands that cover mother Earth. It was a great way to discuss the use of value in color and the way we can value the planet that sustains us. It was a great way to talk about reusing materials that would otherwise be thrown away. It was also a great way to build a classroom community discussing how we are each a link the class and world chains and can do our part to solve problems. Happy E-ART-H Day everyone!


Saturday, April 17, 2021

Ceramic Dish project


Pressing objects into a clay surface is an easy and fun way for kids to create texture. If you take it a step or two further, that experimenting can be made to a completed project by cutting that slab of clay into a circle, square, or rectangle and curving into a soap dish. Of course my students don't care about soap dishes very much,  so I branded it as a dish to keep their earbuds, keys, or jewelry. Each student added a foot to the bottom, a coil of clay in a circle was an easy way to give a round dish some lift. Some students added 3 balls of clay or taller legs on the bottom of their dish, and rectangular tray shapes, usually had two long coils for stability. Glazing takes the surface up a notch and makes it so that it really can be used for fancy guest soaps. 


Friday, April 16, 2021

Clay Napkin Rings


Clay napkin rings are an easy project and a great way to introduce some important ceramic processes to young children. I had them roll out a thick coil before rolling it with a rolling pin. Edges can be trimmed before or after pressing items into the clay to create texture and pattern. If you wrap each ring around a cardboard toilet paper or paper towel cardboard roll, then they will all be the same size.  They shrink has they dry so I removed the rolls early on in the drying process.

After firing the clay in the kiln, Students painted their rings a solid color and then dry brushed a second coat with a contrasting value or color. It was a fun and quick activity that allowed for a lot of experimentation and resulted in them having functional and charming ceramic pieces to keep.


Thursday, April 15, 2021

Haniwa Project


In preparing for my art lesson on the terracotta warriors of China, I came across other ancient cultures that put ceramic sculptures at their burial sites.  In Japan, these pieces are called "haniwa" which means ceramic cylinder, which was how they began. Later, ghost-like figures, soldiers, animal and house forms were made.
My distance learning students used Sculpy oven-bake clay to create animal or house sculptures. My students who were physically present in class could work on larger pieces to be fired in the kiln. Some students choose to paint their final pieces, while others left the terracotta color. It was a lot of fun to work with the slab roller and use hand building techniques and everyone took a lot of pride in their finished piece.


Ancient Pot Project


Much of the world's ancient pottery was made using a coil technique. This was a pretty easy process for most of my students to learn. They rolled each snake-like coil of clay out on the table, stacked it into the place before blending it into the wall. It is important to push the coil down into the outside and the inside of the pot. It is OK to see finger marks as you are blending.
The pot can be embellished by adding a foot or arms. When it gets leather hard, students were even able to carve into the surface. This was a great lesson to review the our Ancient Greece notes from months ago. Students could choose from traditional forms, learn what that specific type of vase or pot was used for, and review the names of the parts of the pot. The technique of hand building by using coils was the main learning objective, but there's so much more to this lesson. And getting to have a nice flower vase in time for Mother's Day is a bonus.