Thursday, January 28, 2021

Ancient Greece Art Lesson

Because all of my students were distance learning during this peak COVID time, I wasn't able to do the ceramic ancient pottery assignment I'd hoped to give. But students were still able to create their own pottery design. Here is one using Geometric Period style figures (some of the borders are from the Classical or Hellenistic period for fun). It tells the story of distance learning on laptops and being sick in bed with the famous virus.  This teaches students stylization, story telling, decorative borders, and shapes/uses of ancient vases. It was also the perfect time to learn the parts of a vase: the foot, body, shoulders, neck, mouth, lip, and arms. Students began by choosing their favorite ancient vase shape, folding a piece of paper in half, drawing half the vase along the folded edge, and cutting it out. 

Drawn, traditional borders decorate the top and bottom as well as break up the space. And then the body is used to illustrate a scene from daily life, political event, or ancient mythology.

Turns out the internet has dozens of great (and short) videos about Ancient Greece, which came in handy with our K-W-L chart. Day one, each student said what they knew and what they wanted to learn. They each had to come up with a list of facts to add to the L (What they learned) section of their chart. It's a great interdisciplinary experience that helps students relate how art fits into the story of humankind. Advanced students learned the golden ratio and how math was used to make the Parthenon so beautiful. Ultimately, art makes more sense when taught in context of ones life and one's world.


 

Thursday, January 21, 2021

African Mask Project

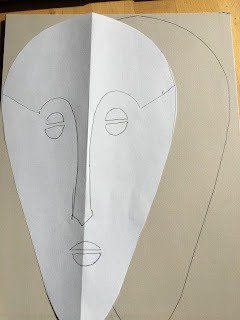
After studying various purposes and types of masks found in West Africa, my art students were given the assignment to make a mask of their own. All of my classes were online this week, so students used the mat board and cardboard that I sent them, but cardboard from a cereal box would have worked fine too.

The first step is to make three sketches of masks. These should play with shapes and proportions. Once the student chooses their favorite idea, they reproduce it on a piece of paper. Symmetry is of the requirements of the assignment and so starting with a piece of paper folded in half helps achieve that purpose. Half the mask shape is drawn and cut from the non-fold side of the paper, and then this shape can be used to redraw the facial features before using it as a pattern to cut out cardboard.

Facial features such as eyes, eyebrows, nose, and mouth can then be cut from cardboard and arranged on the face shape. It's a good idea to try out different shapes to see if you can't improve on your original design. Large almond shaped eyes and long noses are typical of African masks.


For a rounded, 3D effect, dampen the board with a water sprayer or wet wash cloth. You don't want it to be soggy, just damp enough to bend the edges and dry with a hair dryer. This process only takes a couple of minutes but it pays off in the end.
 
Then glue the facial features into place before painting the mask.  

Above you can see a screen shot of a student and I painting our masks in tandem via video and talking through our color and value choices.

Most African masks are earth tones: black and browns, but there are some that have colorful beads or painted patterns. Start with a base coat, then add pattern with thinly painted lines and dots. Markers, especially Sharpies might be easier for this kind of mark making if the base is a light value. Any other embellishments such as feathers, beads, or yarn can be added for extra texture and color. 

Here is a student waits for her mask to dry before adding pattern.

Whether you decide to make a wall mask or wearable mask, enjoy the process. Ending up with a product that you love for just pennies worth of glue and paint is worth a little effort.


Appliqué Assignment

When I was twelve, a youth leader took me to see the musical Quilters at the local opera house and I was immediately sold on the idea of quilting: the aesthetics, the history, the symbolism--I loved it all! My mom taught me how to use the zig zag feature on my sewing machine to appliqué dark blue fabric hearts onto light blue squares, which I later pieced together to make my first quilt.


I introduced my art class to appliqué technique and history as our final part of the textile unit, by introducing them to Harriet Powers, a freed slave who was born in 1837 and grew up near Athens, Georgia. She and her husband eventually bought land and started a family cotton farm near Atlanta. Powers never learned to read or write, but she knew the Bible stories and illustrated those stories in quilt squares (see above). During hard times, she reluctantly sold the quilt for $5. She asked for $10, but the patron was an art teacher and didn't have ten. The Bible quilt was later exhibited and Powers was commissioned for a second quilt. These two quilts now hang in the Smithsonian and the Boston Museum of Art. The thing that is so wonderful about this quilt is the stories it tells: Adam and Eve, Cain slaying Able, Jacobs Ladder. But the fabrics themselves tell stories too. Blue figures may have been part of a dress worn by a family member. The cut shapes of animals that Powers probably never saw (this was before the days of internet), so she ends up with a lion that looks more like a goat. There's also story telling in the technique. Appliqué is a technique that is used in West African textiles. My sister brought me a fabric picture of a bird from Benin where she was studying as an African art historian. So the fact that this Georgia woman was stitching cut fabric shapes to tell stories on quilt squares says something about her African lineage as a slave, and how mothers passed these skills down from generation to generation.

For my project assignment, I began by asking students to illustrate a story with a drawing in marker. This is just a warm up and an introduction them to the idea of illustration. Then I had them pick a story, either from their own life, a famous story, or from the article I read them about the real "Lord of the Flies" boys from Tonga who were ship wrecked for 15 months. (I always try to go back and review topics from previous weeks). Second they drew the key elements from the story they chose with simplified shapes that fill the page. These shapes can be cut from paper to be used as fabric patterns. Ultimately, they were required to use at least five shapes of fabric to illustrate their story. My students used glue to "collage" their fabric pieces rather than stitch them. This image os of the Tortoise and the Hare.


One student (work shown above) created an image of the day when he had to leave school early. Another, (work shown below) illustrated her story of Christmas morning, when she opened her gifts and got a purse from her aunt. 


Thinking skills improve when students make connections, when they compare and contrast aesthetics  qualities and techniques of various textiles we studied. Having them help organize the information into a Venn Diagram is a way to assess that they're actually learning something. 


Textiles such as clothes, towels, blankets, are often taken for granted. It's important to stop and think about the people who designed and made the things we use and step back to see things in a global and cultural perspective.