Saturday, May 28, 2016

Animal Zentangle

There's room for originality, even when there's lots of boundaries. For example, this art assignment seems to limit subject matter to animals (but there are thousands of different kinds of animals), color (you are free to choose any color you like, you just need to stick to it), and requires the use of pattern (but there are an infinite number of patterns that can be created).


To warm up, each student started by dividing a sheet of paper into at least 8 organically shaped spaces, and then they filled each space with a different pattern. This gets the juices flowing on possibilities.

To create the animal drawing, these students picked an animal image from the internet, and transferred it to a piece of paper. They did this by either tracing it on a light box or coloring the back of the print out with pencil and then tracing the front of the print out so that the graphite would be deposited onto the paper under it. For those who were blind, I traced an image for them and outlined it with hot glue. Then they could draw their pattern within a tactile space.

It's not a ground breaking, soul searching kind of assignment, but it does help students see that pattern makes things a little more interesting, and they can incorporate that into future projects.

Sunday, May 22, 2016

The Sets Take Center Stage

This month, my school performed the musical, "You're a Good Man, Charlie Brown!' which was perfect since there are only 6 parts and we have a very small school.

The sets were ambitious since we only had a few people working on them. Linus and Lucy's big sofa was built with a wooden frame, and long "D" shaped cardboard tubes for the "ears". We covered it felt.

An extra tall Charlie Brown meant needing an extra tall mailbox.


Snoopy sang some songs from the top of his dog house.
And of course, Lucy draped herself over Schroeder's piano for her big solo.
It was fun to see the final show and know that our sets helped make it all a success.


Student Spring Art Shows


Art is meant to be shared and students make better art if they know there's a chance each piece will have an audience. Besides, it is an art standard for students to learn how to display their work. I start putting the best work from each student aside, at the beginning of the school year, so that I there is always enough to put together a show or enter student work in competitions. In the past we had an annual student art exhibit, but this year, we had three shows, two in the Spring:  March….


...and May. Rather than buying frames, I reuse the frames around the school that have been holding the same student work as long as anyone can remember (including people who have been there for 15 years).
I am trying to swap out 1/3 of the frames each year so that every 3 years there is a fresh body of work by current students. I think it's important for current students to feel that they are a part of the school with contributions to make. 


Monday, May 9, 2016

Accordion Book Project


Book binding is a love of mine and I think the book arts are under-rated in terms of art lesson plans. To me, book making is the perfect way to marry language arts and visual arts for an interdisciplinary lesson. After a slide show of all of the exciting things going on in the book-art world, and reviewing parts of book (case, text block, head, foot, front, back, spine), I demonstrated how to make an accordion book. This is an easy method that doesn't require any stitching. Paper, board, glue and scissors are all you need.


To make an accordion book, we cut 18"X 12" paper in half length wise to make 2-6" tall pieces. Each of these were folded in half.

We folded the ends back towards the first crease, one side, and then the second. This should zig-zag like the letter "W."


We repeated the process on a second piece,
 and then run a glue stick a cut edge,
 before stacking another cut edge against it so that it ends up making two "w"s attached at the middle edge. You may double the number of pages by folding and gluing more strips of the same sized paper. This should make a double"W".
 Cut two pieces of book board, mat board, or cardboard that are slightly larger than the text block.
Cut decorative paper or construction paper that is about 3/4" bigger than the boards. Cover the board with glue. We used a glue stick. Flip it upside down onto the paper, than flip it back so you can rub the paper down on the board.

  Cut the corners off at a 45 degree angle. You want to get close to the board, but not too close, about a board's width worth of paper left to cover that corner.

Run glue along each edge, and fold it over, onto the back of the board.
 When attaching the end pages, place a piece of paper between the end paper and the rest of the book, to keep the glue where it should be. Glue the page with glue stick, going the whole way to the edges. Center the text block to the board, and then open it and rub the end page to the board to make sure it is attached completely. Do the same for the other end, and you are finished binding the book.


My students filled their pages with content before attaching the boards. One did a book of dessert recipes, another made a "How to Rap" book, written with rhyme and rhythm. Some did lists of favorite things or favorite foods. A couple did simple auto-biography. There were quote books that ranged from themes of love to money. And one student made a "Baby's first ABC" book for a teacher's newborn son.

About half my students wrote their books in Braille, and for some of them, I glued a print translation. They illustrated the pages with whatever worked for them (several blind students used stencils, one used Wiki Sticks).

There's something to be said about spending time to combined personal interests, words, and images in a unified way. There's something to be said about gaining skills and learning a craft. And there's something extra nice about being able to carry a piece of art in your hand or your back pack to share with friends.


Saturday, May 7, 2016

School Mural

This year we, on the school media committee, decided to do several school-wide media festivals, each under the theme "Georgia On My Mind" and so we had a couple Georgia authors, such as Carmen Deedy come to work some story telling magic one day; another day we had a character parade and presentations on the people of Georgia. I had my students talk about the natives who lived on what is currently the Ocmulgee Indian Mounds, and make the coil pots in the same style and using the same techniques of people 10,000 years ago. For our final big hoorah, I worked with a couple of students, to create a mural of some favorite landmarks from various spots in Georgia:  Macon, Savannah, Atlanta, St. Simon's Island, and Cumberland Island.

I painted the outlines of the mural in chalk and traced them in bold black so my visually impaired students could see. One had the task of painting large areas like the sky and sand, while the other did small areas of under-painting, like the Indian Mound, or a tree.

By three Friday classes, we had most of the painting finished, but I realized that some of the buildings looked a little crooked, so I came in some afternoons on my own and ended up completing the whole thing myself, although my helpers feel good about their ownership in the piece.


With every mistake, one of my students kept saying, "Oops. That's OK, you'll just paint over it."  I loved that she wasn't beating herself up, but I finally asked why she thinks that I'm supposed to step in and fix every mistake, and so she changed her mantra to: "Oops. That's OK, I'll just paint over it." And that realization, that it's just paint and any mistakes can be fixed with more paint, is exactly what is needed to have the courage to do a big project like this. The four large stage sets we did during the course of the year, was perfect preparation for me to try to make my mistakes in public (in the cafeteria lobby rather than my own classroom). Lots of people had opinions about what landmarks I should be adding, but I would tell them to feel free to use their great ideas when they do their mural.

Here are some details so you can see my how large and loose brush strokes can work from a distance.


Monday, May 2, 2016

Cinco de Mayo Tissue Paper Flowers


Now's the time to get in fiesta prep-mode for the Cinco de Mayo. This holiday commemorates the Battle of Puebla in 1862, when the French army was defeated, despite the fact that they were better equiped and outnumbered the Mexican resisters three to one. The win was a real a boost to morale and today Mexican Americans celebrate their heritage on the 5th of May. 

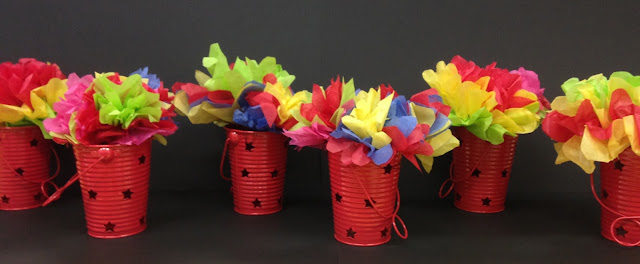
My school's prom happens to fall on May 5th this year, which is why the theme is Cinco de Mayo. My students and I are making tissue paper flowers for decorations.  Large flowers require 4-6 pieces of tissue paper (we're using 20 inch squares for most of them). Three half sheets make a medium sized flower.
The tissue is stacked and folded like a fan (or accordion). Then small notches are cut for the wire or string to tie the pieces together. Petals can be formed by cutting the ends round or pointed.


 Slide thumbs deeply between two sheets of tissue and gently pull in opposite directions, to fluff each layer.


This very large table holds flowers made from about 70 sheets of tissue paper, so you can get a lot of bang for you buck when it comes to decorating. Small flowers, like the ones seen near the top of this page, are made from 1/4 or 1/6 of sheet of tissue, and are nice for table toppers.

Enjoy your Cinco de Mayo in style this year!