Friday, April 11, 2025

Making Pinwheels


 I consider making pinwheels as a requirement for childhood, along with making paper snowflakes and cootie catchers/ fortune tellers. It only takes a couple minutes and makes such a spring decoration or springboard for discussions about wind and weather.

To make, you just start with a square piece of paper: five or six inches seems to be a good size. Origami paper works really well. You fold a corner to it's opposite corner to make a triangle and then open it to do the same with the remaining two corners, making a folded X. Cut along each fold towards the center, stopping half way. Than take every other point and glue it to the center. Once the glue dries, use a thumbtack or hat pin and push it through the center of the paper into the eraser of a pencil, or into the end of a plastic straw. It's that easy!

Thursday, April 10, 2025

Paper Spinners


While studying Art related careers such as fashion, costume design, and set design, I decided that toy design would be something my students could actually use or give to a sibling or younger student to use for play. Toy making is much like learning to cook, you start with learning recipes that you can use as a springboard for creativity. You alter things until after time you come up with something totally unique. 


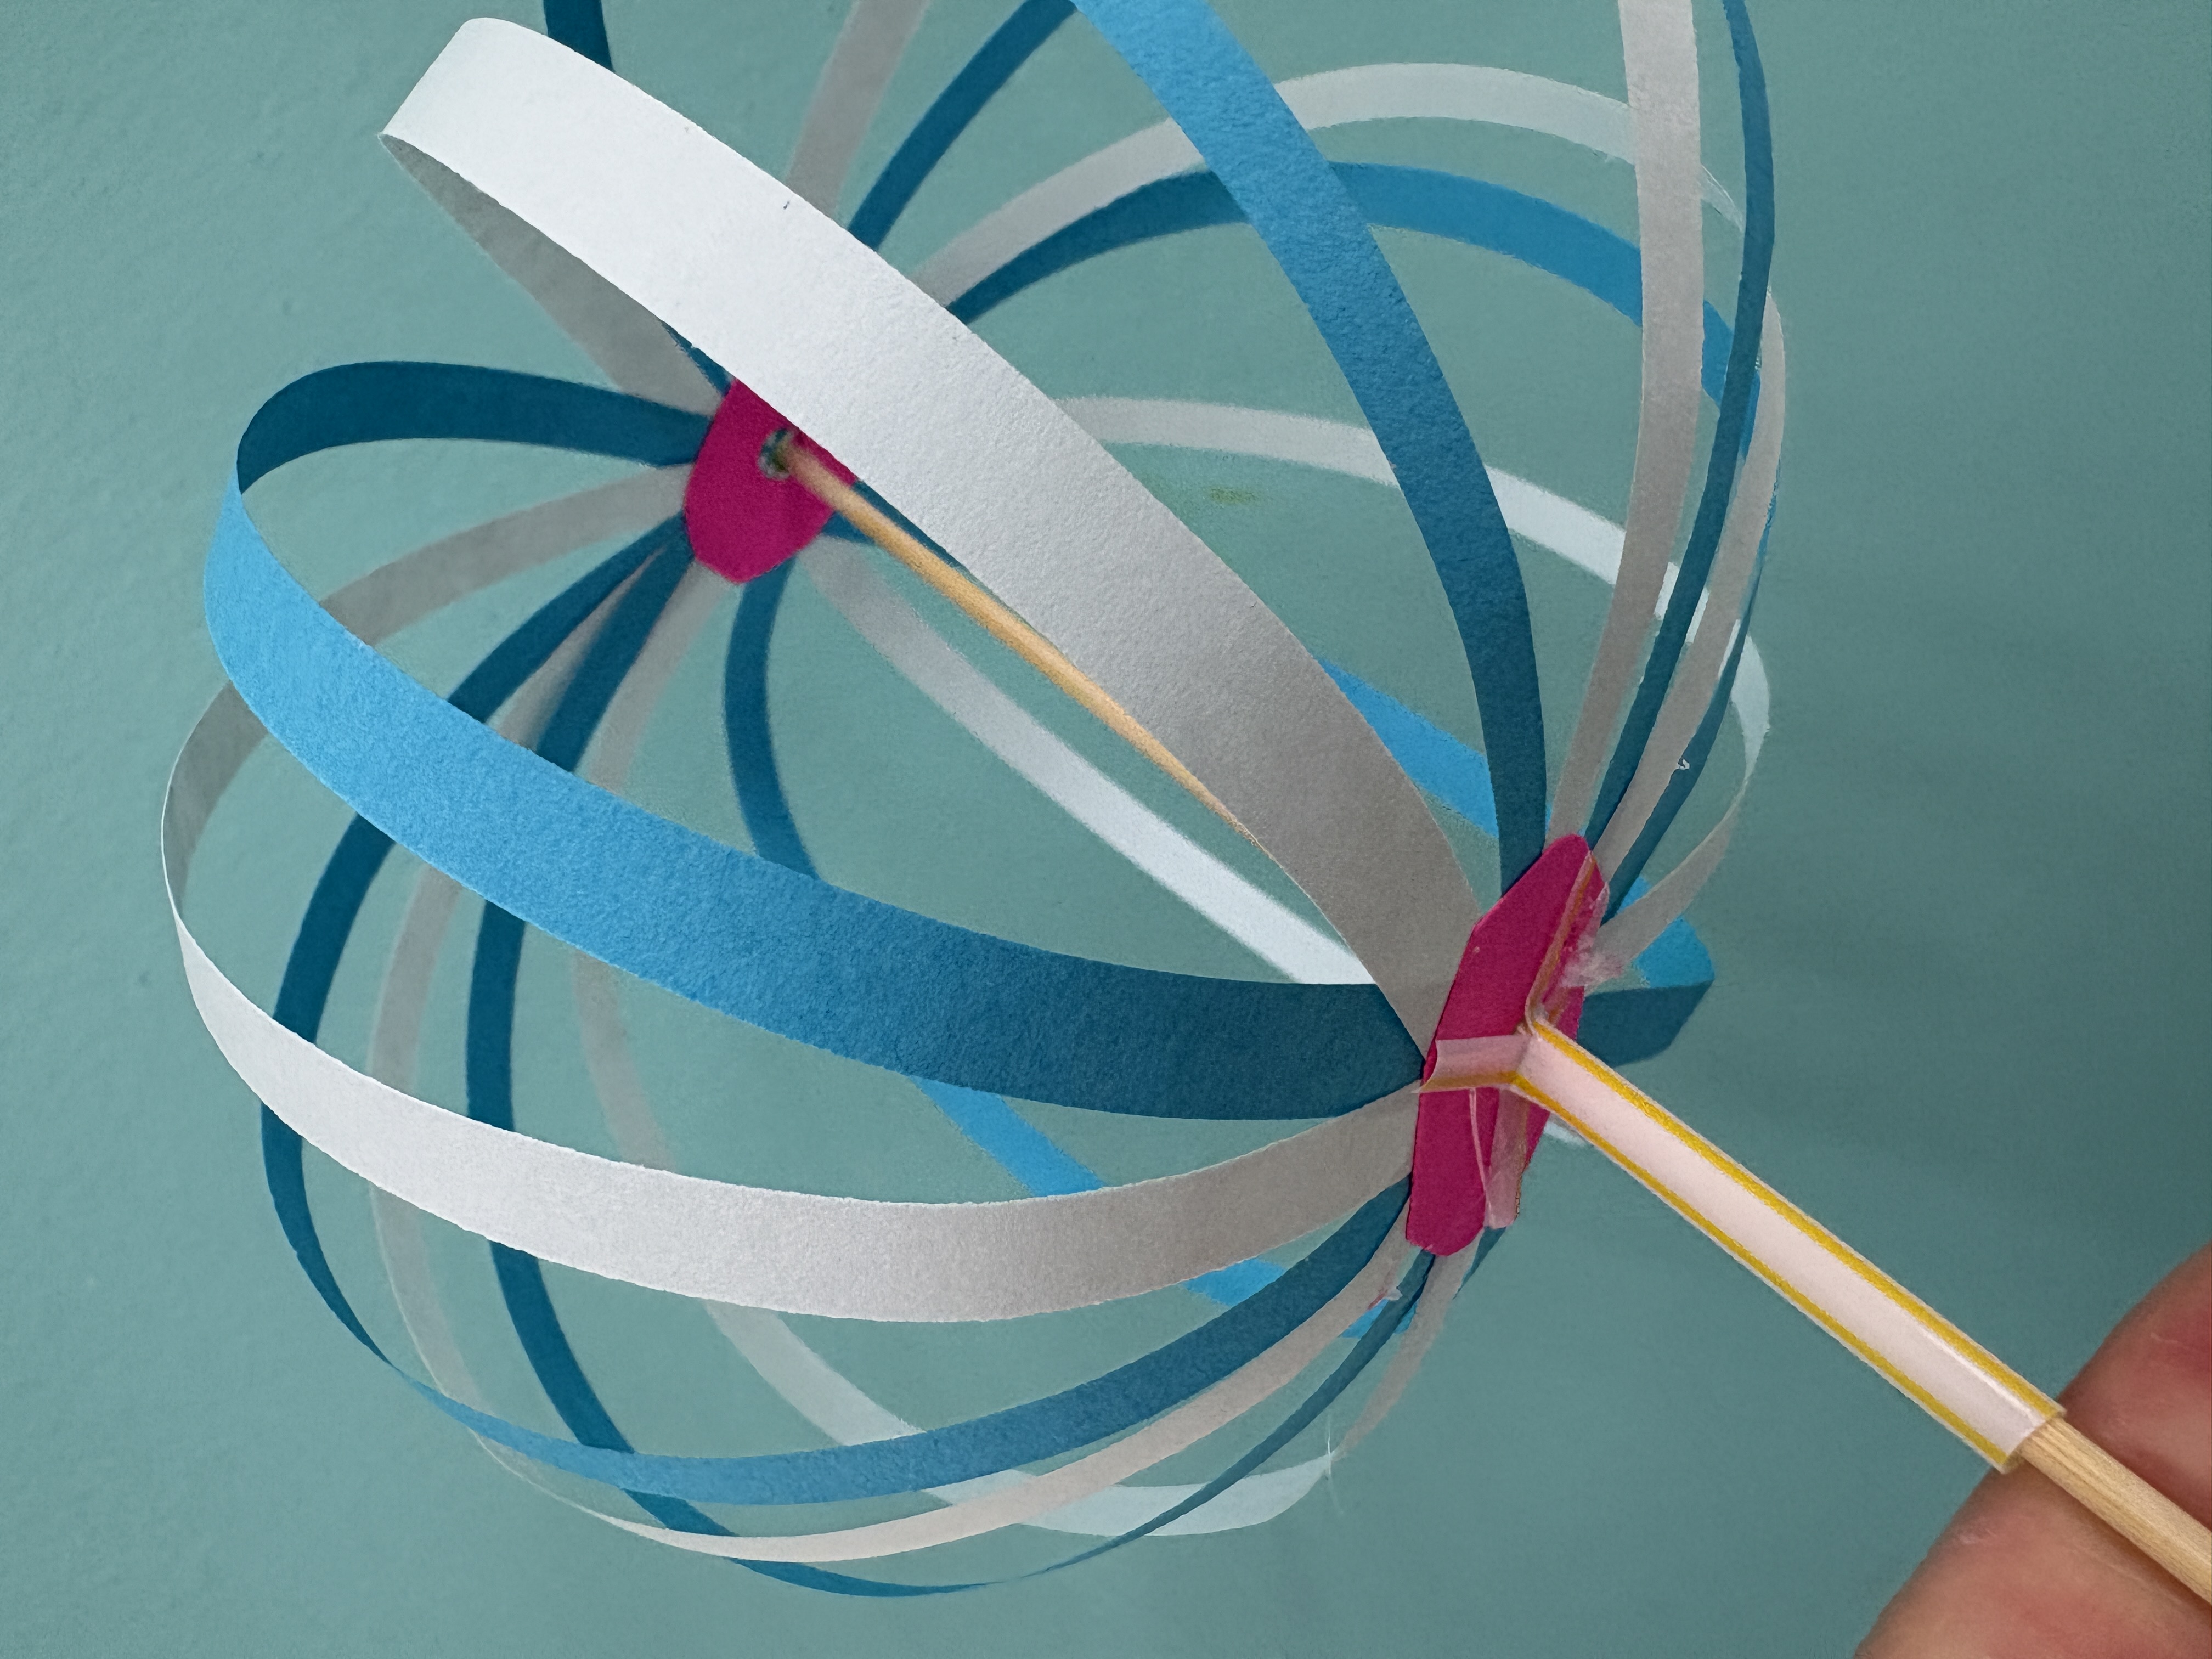
This spinning toy, I saw online and felt it was a perfect craft for my students who bring figits to class every day to deal with their stimming behavior. To make this, you will need: 16 strips of paper that were 8.5 inches by 1/4 inches. 4- 1 inch paper circles with a hole in the middle made with a hole punch, a bamboo skewer, a bead, and 1.5 inch piece of straw.  You'll also need liquid glue and maybe hot glue for the finishing touches. 


Start by putting glue on one of your donut shaped circles of paper and attaching the strips of 4 strips to make a plus sign, and then four more to make a multiplication sign. Then you can fill in every other space, to ensure that all 16 strips of paper are evenly distributed. Glue another "donut" to the top of the ends of the strips so that they are covered and more secure. Then put glue on a 3rd "donut" and turn the ends of each strip like the page of a book to glue it one by one to the top of  the "donut" near the hole. Top with the last paper donut shape.


Slide the skewer through the bottom and top holes like you are stringing a bead. Then glue a bead or two to the top with hot glue. Be sure it attaches to the paper "donut" and doesn't spin around.

The piece of plastic straw should have four slits made with a pair of scissors at the top and then spread out each prong like petals of a flower opening or a banana being pealed. Slide the straw, spread out but at the top, and glue each prong with hot glue to the bottom "donut" on the sphere. Careful! use the small glue gun with low heat so as not to melt the straw or burn yourself!


Once the glue is dry and cool you can spin the skewer between your fingers or hands. You can also spin the skewer between a finger and thumb of one hand while holing the straw with your other hand and twist the strips in both directions. Students found ways to play with these that I hadn't imagined, and loved hearing their laughter as they figured out new ideas.


Spring Art Show Color and Fashion


The last quarter has flown by, but we managed to fit our Spring Art Exhibition be March . Everyone who entered the room commented on how colorful the student work was, which means our color theory unit was a success. 


The exhibit was a nice way to wrap up our fashion unit as well. It's hard for blind students to enjoy arts shows, when so much of the work is two-dimensional, but we made sure the hats and masks were out for students to feel and try on. High Schoolers always show up to support each other at art show openings.


I love involving students in the selection process. I used to pick one maybe two pieces from each child to put on a couple 6 foot tables, but now that I found a room to use for a gallery, I can have class critiques that allow students to pick the best four pieces from each portfolio. We tried  to get a smattering from each project and then worked together during the hanging to arrange things in a way that would give a sense of balance over-all.

When placing the colorwheels on the way, we turned them to create hidden squares of color. Only a few people saw how all the yellows or all the blues for example faced in towards each other in a group of four circles. It's always nice to have "easter eggs" for people who take the time to find them.


Our primary and secondary relief sculptures hung on opposite walls. 


And the costume designs were a big hit as students explained their concepts to teachers and peers at the show.  It's so important for students to learn the curating process and help with hanging a show. They do better work when they know that their assignments aren't just made for a grade, but made to share.


Thursday, March 27, 2025

Mask Making from Every Day Objects


Designing dresses, hats, and masks was a fun way to get students to see how every day objects can be made into costumes for theater. It's an exercise in creativity to look at one thing and see something else. It's that kind of ability that made a butter container and roll on deodorant into the first computer mouse. Some of my students saw faces in paper bags, cardboard boxes, or pie pans. Mask making wrapped our our costume design month and I think most of the students were pleased with their work. It's hard to tell how they really were feeling though, because of the masks. 


Costume Design Project: The Hundred Dresses

Food inspired one student's dress designs: mochi, banana splits, onigiri, candy apples etc.

 To incorporate literature and career education into our art project, I read my students a book from 1944 called "The Hundred Dresses" by Eleanor Estes. It's a Newberry honor book and top 100 teachers pick to read aloud. This sweet story tells of an impoverished girl who was bullied for saying she had 100 dresses, and after she moved they saw that she had 100 amazing drawings of dresses. My students and I made a goal to create 100 dress designs for our next exhibit.

One students obsession with architecture was his fashion line inspiration

Each student was to pick a theme for their designs. Some students were inspired by food, animals, seasons, or architecture. They could base their designs on a color pallet, a culture, or a decade. It's a great chance for each kid to explore their interests and express themselves. 

From celestial orbs to seasons of the year, there was lots of ideas for fashion themes.

Netflix has an amazing series called "Abstract," so we watched the episode about costume designer Ruth Carter (minus a few minutes with bad language). It gives a great look into the process and the career of costume design. Most art students have no idea how much research professional artists and designers put into their job.

animals can have always inspired fashion: zebra, peacock, clown fish and mantis shrimp

David Byrne's cult classic "True Stories" has a scene of a fantastic fashion show. I show that 4 minute clip to my students for inspiration, and then a behind the scenes documentary which is only 5 minutes. A quick discussion helps students generate ideas and push boundaries. When it comes to costume ideas, creativity counts.


P.S. This project was modified to accommodate students with no vision. Some made their drawings with Wiki Stix, while others mixed and matched heads, torsos and legs to create images using Fashion Plates. I want to give a shout out to my sister, Carolyn, for sending me this favorite childhood toy (she bought a new one for me). It's a perfect tactile solution for blind students to participate in the project independently.

Costume Design Unit: Hats!


It's one thing to draw your ideas for a fashion or costume design, it's another thing to actually make that idea into something wearable. The beautiful part of our recent art project was that it teaches problem solving skills. The challenge I presented to my Art students to was to create something they could wear on their head. A hat or a wig for example. They were welcome to rummage through any supplies and and figure out how to make their vision a reality. Sometimes visions changed based on certain items not sticking together, or the colors of spray paints available. 


Hot glue may melt thin plastic, staples may break brittle materials. Balloons shrivel overnight. It's important to play around with the process of assembling things. What will look like sprinkles on frosting or whipped cream? Beads, bits of foam, or cut up pipe cleaners? How can I get this thing to stay on my head?


This project is the perfect example of differentiation, when it comes to ability level and interest. There was no one example, no cookie cutter process. Some students wanted to make top hats while others made sun hats. Some made helmets and others made crowns. No two were alike. It was exhausting as a teacher to have to help each student think through their set backs and find what they were looking for, but the pay off was worth it when it came time for our photo shoot.


The cherry on top 

Was it worth saving that box of toilet paper rolls for 10 years? You be the judge.

A sunflower sun hat

Several students made crowns
My Dr. Who fan had a tartus on his mind


Friday, February 28, 2025

Muted Color Relief Sculpture

Last week, my students helped to create boxy, relief sculpture using saturated colors. This week they helped make a relief sculpture using curvy shapes and muted colors.

A color can only be as bright as it is when you buy it in the bottle. You can however make the color more dull by essentially contaminating it. There are two ways to mute a color: by adding gray or by adding its opposite color and the color wheel (its complement). If you want to make a bright orange into a rust color, add a little blue. A bright yellow can become a brown mustard with a little purple mixed in. 

Every student chose a color to mute and then paint on curved cardboard shapes. I didn't limit them to part of the palette like last week when it was just pink or colors with lots of yellow. The fact that all the colors are moving towards grays and browns means they have the intensity in common, and that's enough to look good tother.