Showing posts with label crafts for kids. Show all posts

Sunday, April 5, 2026

Indonesia Inspired Batik Project


Batik is the art of making images on fabric and it is so important in Indonesia that they have a National Holiday celebrating it: October 2nd. UNESCO recognizes batik as a world heritage of humanity. Wax is melted and than used in a special tube pen to draw on fabric, or metal images are dipped in wax and stamped onto fabric. The wax acts as a stop out when the fabric is being dyed.  I had large blocks of wax for my students to feel, but we didn't want to mess with trying to keep it at the right temperature all day for a week, much less worry about burns on hot plates, so we went even more low tech: Glue.


Some of my students with no vision opted to use stencils, rather than try to make a free-hand drawing. The trick with this is to use a sponge brush, dip it in Elmer's glue, and then dab up and down, rather than making strokes that might go under the edges of the stencils. Getting enough glue on the fabric is also important.

Other students drew pictures or patterns with the bottle of glue. The fabric was transparent enough to trace marker drawings on a light box, but some choose to just wing it.
The next day, when the glue was dry, students painted their images with acrylic. I think it worked best when they worked within the lines, but if the glue was thick enough to start with, it was OK to cover the entire thing in a couple of colors. The underside of the fabric, generally maintained the stop out. The paint has to dry completely before trying to rinse the fabric, for obvious reasons.


Day three, is when we soaked the entire piece for at least 5-10 minutes in water before rubbing and rinsing the rest of the glue out.

There was a little magic in the reveal, that their original lines never left, they were just covered and then revealed.


a low vision student uses a digital magnifier to paint his glue spirals with spring colors


Saturday, February 28, 2026

Monster Mania


If you want students to learn how to think creatively, the secret is giving set boundaries, and lots of tools for students to explore possibilities within those boundaries. For my monster assignment, students had access to bins and bins of supplies: pipe cleaners, yarn, feathers, wood, cardboard, and more. 

Too many options feels overwhelming and can lead to paralysis, so it's best to walk them through the process. You can dig through supplies that lead to inspiration. I  might find a discarded nest ornament, and say, I wonder if this could be used as a baby carriage since eggs are basically eggs. What do we have that could make wheels? What would a birdlike monster look like? Does it have to have wings? What would help us hint at a bird without it becoming a bird?  It's also good to start with the idea first: I want a skate boarding cyclops. I'm going to sketch it out and then try to find the materials needed to make it. Give each creature a name and personality.
For little kids and for those starting out, a basic form is all it takes to get going. A toilet paper tube, or a dixie cup, might be the basis for some legless creature. Think about colors and surface textures: foam, felt, tape, or tissue paper can all help transform the household item to the point where students want to add tentacles or antennae. You know you are doing something right when lots of laughter is part of the process. This project was just the beginning, but it was a great way to start on our film making experience.


Tuesday, November 18, 2025

Origami Trees and Diamonds


It's nice that basic folds in origami are the jumping off point for lots of different projects. Paper Christmas trees and diamonds start the same way as the classic fortune teller. 

You begin with folding a square piece of paper in half to make a vertical rectangle and than open and fold it in half to make a horizontal rectangle. Opening to leave a plus sign in the middle of the square. Flip the paper upside down.

Next you fold it in half in diagonaly to make a triangle, first in one direction, than the other, to make a multiplication sign. 

With the right side up, push in on opposite diagonals until a square (1/4th of the paper size) is formed and push down. Keep the open side pointed towards you on the table. 


Bring the right folded side to the center line, making sure the top stays pointed. Than do it on the left side. Flip to do the right and left side on the back. It should be shaped like a kite.


Slide your finger up from the inside to open up one of the flaps, moving the inner fold to the opposide sides to open it up and make the triangle span the whole width of the kite shape. Do the same thing on each of the 3 remaining flaps. From the top point, the folds should be going in and out and in and out, 8 times, the whole way around. Than you'll make 4 slits on each side. Each tree bough is formed and held into place by folding the upper corner down and in to make a point on the lower outside of the branch. You'll do it 4 times for each of the 8 sides. I tried to always do it on the right half for radial symmetry. These can stand on their own or they can have a ribbon or hook attached and used as an ornament.

Now if you want a diamond shaped ornament you'll need to do this on a second piece of paper with a contrasting color or pattern.

You'll flip one upside down so the opening is going up while the other is going on. You'll tuck each of the long pieces into a short piece of it's partner. It helps to use a drop of glue to keep it from coming undone as you move to the other parts. I like a drop of hot glue or two at the beginning and then maybe one or two at the end of the process. No scissors needed.

Tuesday, September 9, 2025

Yarn Collage Images


Younger kids and multiple complex needs students make a lot of art using only lines. I started the school year teaching about vertical and horizontal lines. We then moved onto to diagonal lines, and finally curvy lines that show movement. Because my students are blind, it is always a good idea to end with a tactile image. Students chose a the color of their piece of paper, and the color of the yearn they wanted to make a curvy line from one edge of their paper to another. Then it was a matter of picking the next color of yarn to push against it. The end results are soft, fuzzy Op Art. 


Saturday, April 12, 2025

Folded Paper Slinky Snakes


As a kid I used to fold metallic gum wrappers into chains for fun, and it seemed like a perfect hour long activity to include in our toy making mini-unit for my Art class. These paper slinkies can be scrunched up to let boing along the table or straight up and down. Children may glue paper shake heads to wiggle around. Four of them can be used as arms and legs for a puppet or paper monster. They can be used to make bracelets, or decorations. Small versions make perfect mechanism in pop up cards. Kids can come with with more ideas, so it's good to leave the purpose of these paper slinkies opened ended. 

To make, cut long strips of paper. I cut 18" X 12" paper lengthwise into 12-one inch strips. I limited the colors to primary colors and each student chose two of those colors. The ends of two contrasting strips were glued together at a right angle. One color should face up and one to the left. If the blue is facing up and the yellow on the side start with the one on the bottom. If the yellow is on the bottom that you'd fold it over to the left like you're turning the pages of a book and crease lightly before turning the top strip down to cover that color. The pattern is: side-down-side-up-side-down-side, etc. When you get to the end of the strip glue another one of the same color to extend the length of each. You can make it as long or short as you'd like. 

All of my totally-blind students figured it out enough to work independently, which meant I could read my class a chapter or two from a fun book. One student said, "I finally found something I'm good at!"


Thursday, April 10, 2025

Paper Spinners


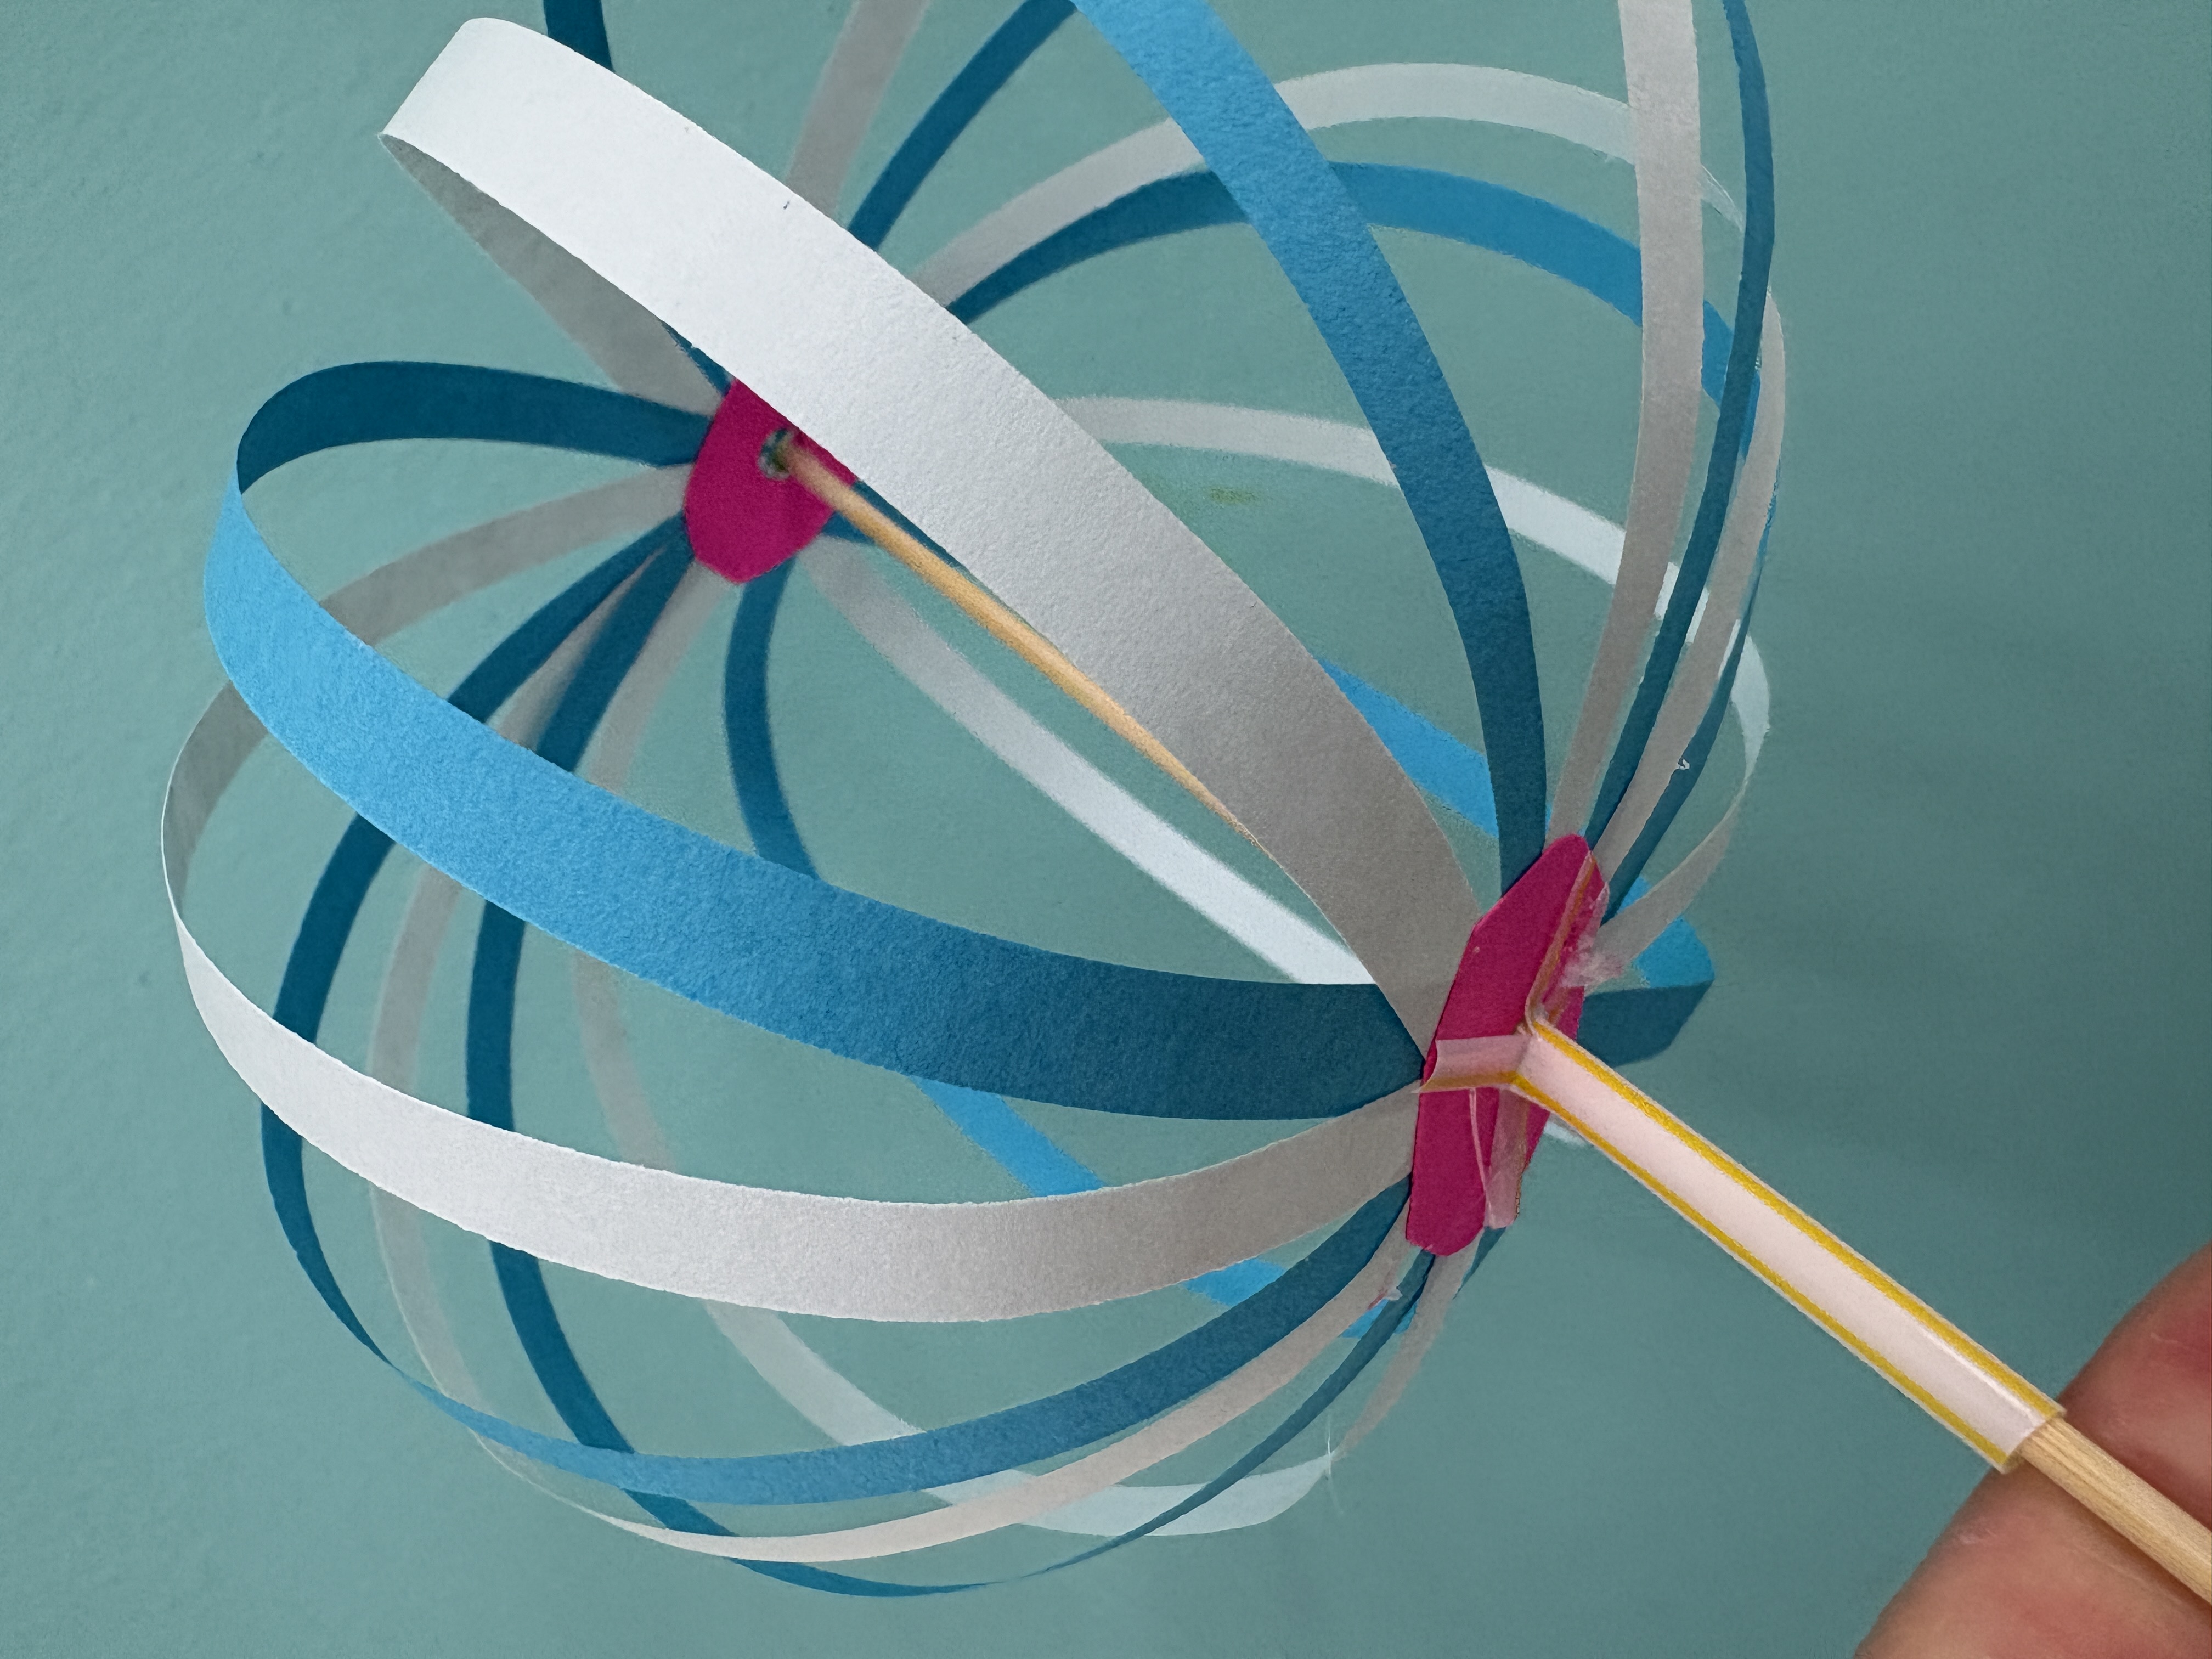
While studying Art related careers such as fashion, costume design, and set design, I decided that toy design would be something my students could actually use or give to a sibling or younger student to use for play. Toy making is much like learning to cook, you start with learning recipes that you can use as a springboard for creativity. You alter things until after time you come up with something totally unique. 


This spinning toy, I saw online and felt it was a perfect craft for my students who bring figits to class every day to deal with their stimming behavior. To make this, you will need: 16 strips of paper that were 8.5 inches by 1/4 inches. 4- 1 inch paper circles with a hole in the middle made with a hole punch, a bamboo skewer, a bead, and 1.5 inch piece of straw.  You'll also need liquid glue and maybe hot glue for the finishing touches. 


Start by putting glue on one of your donut shaped circles of paper and attaching the strips of 4 strips to make a plus sign, and then four more to make a multiplication sign. Then you can fill in every other space, to ensure that all 16 strips of paper are evenly distributed. Glue another "donut" to the top of the ends of the strips so that they are covered and more secure. Then put glue on a 3rd "donut" and turn the ends of each strip like the page of a book to glue it one by one to the top of  the "donut" near the hole. Top with the last paper donut shape.


Slide the skewer through the bottom and top holes like you are stringing a bead. Then glue a bead or two to the top with hot glue. Be sure it attaches to the paper "donut" and doesn't spin around.

The piece of plastic straw should have four slits made with a pair of scissors at the top and then spread out each prong like petals of a flower opening or a banana being pealed. Slide the straw, spread out but at the top, and glue each prong with hot glue to the bottom "donut" on the sphere. Careful! use the small glue gun with low heat so as not to melt the straw or burn yourself!


Once the glue is dry and cool you can spin the skewer between your fingers or hands. You can also spin the skewer between a finger and thumb of one hand while holing the straw with your other hand and twist the strips in both directions. Students found ways to play with these that I hadn't imagined, and loved hearing their laughter as they figured out new ideas.


Saturday, December 3, 2022

Tactile Ornaments


It's easy to make tactile Christmas tree ornaments with young children with dried beans and pasta. My elementary school art students with visual impairments loved making something tactile that they can hang on their family tree. I offered them a piece of mat board cut in the shape of their choice, and then it was a matter of them choosing from bowls of dried foods to glue into place. Some made turtles from pecan shells and beans, others made flowers from pasta shells, but they each ended up with something they could feel and remember for years to come. These can be spray painted silver or gold, or left with the natural colors contrasting with the board. Make the next snow day a craft day and try this simple ornament idea with your kiddos!


Friday, September 9, 2022

String Art

My students love string art. Stitching yarn in a board is therapeutic and the end product is a tactile image, something that they appreciate, since they are visually impaired.


Students place shapes on the back of a piece of matboard, and then went around the shapes using a thumb tack. The wholes were too small for our big plastic needles, so they placed the mat on a wooden bored and punched each hole with a hammer and nail. This was a great chance to practice using the world's favorite building tool.

Even elementary school students, or students with cognitive disabilities, who were totally blind, enjoyed stitching yarn into cardboard. They each picked a stencil of a simple shape, and we poked holes within the stencil. Once the needle was threaded and the end of the yarn taped to the back, they were happy to find the holes and push or pull the needle through each one.  


Monday, December 21, 2015

Wax Paper Stain Glass


Stained glass window crafts are always a winner with kids. I've had my students sandwich colored tissue between two pieces of clear contact paper or color with sharpies on scraps of laminator plastic, but this time I took the melted crayon craft from my childhood.

I always start my lessons talking about how this project fits into the art world. There are beautiful stained glass windows in the European cathedrals of the 13th and 14th century that are still bathing its viewers with intense colors. Tiffany lamps illuminate front he inside out. Frank Lloyd Wright windows with geometric shapes to go in his buildings.
With real stained glass, some of the coloring is anti-intuitive. copper oxide produces a turquoise and gold makes the glass red. When it comes to melting crayons however, what you see is what you get.


We used a hand-held pencil sharpener to sharpen crayons. The colored shavings were arranged on a piece of wax paper, and then covered with another piece of wax paper. It's important not to get the shavings too close to the edges or the crayon may leak out. 


We discuss how crayons melt in hot cars and dryers, but this can can work to our advantage if we want to them to change their state to create an image with a technique other than coloring. An old towel or sheet can be placed under and over the wax paper-crayon sandwich, and rubbed gently with an iron. I used a medium setting. The fabric did get stained quite a bit.


After the colors melt, we created contraction paper frame. This was done by putting two pieces of paper together, folding them in half, and cutting out half a shape starting and ending on the fold side. The edges can be cut to the desired shape as well. The "glass" part is glued between the front and back of the paper frame and taped to a window to let the light shine through. This can also have a ribbon added and hang from a branch of a Christmas tree. As long as there is a light source it will glow. Color can't exist without light after all. And art can't exist without someone making it…so what are you waiting for?


Friday, January 16, 2015

Toilet Paper Roll Crafts

Empty toilet paper tubes are easily accessible and accumulate quickly with the help of school custodians and parents. Here are a few projects we did in my art class recently, using those tubes.


Relief Art

We cut each cardboard tube into 4 or 5 rings. Then we painted, arranged and hot glued them together to form several pieces of wall art. From a distance it looks like metal. I was more involved with this project since most of my students can't use a hot glue gun safely, but everyone kept busy with our collaborative projects and a few made their own ornaments and wreathes.


Tube Owls

These owls took about 30 minutes to make. I offered googly eyes and feathers, but most students chose to use markers and construction paper, with charming results.

Pattern Prints

The ends of tubes can be dipped in paint and stamped on paper to create circles. If those ends are cut with slits or triangles and fanned out, flower or star shapes are created. Tubes can be folded into triangles or squares as well. Since the tubes were free, there's nothing to loose with a little experimenting. Stamping is a form of printmaking and pattern/repetition is a principle of design, so we're covering the art standards in a way that is fun.