Friday, December 20, 2024

Wonderful Wall of Wings Mural project


I recently finally got around to reading The Tipping Point. Part of the book talks about how disgusting NYC subways were in the 80's. They were riddled with crime and the transformation into making it a happier safer place started with cleaning up the graffiti on the trains. Making the space look nicer was a step in helping people feel nicer. People act like rats when they feel they're trapped in a rat hole. My school has a lovely campus with trees and playgrounds, but there are some ugly walls that needed a little help if we wanted our workspace to feel like it was a more positive environment.

The parking lot was resurfaced and the wall was power washed: a blank canvas for our paint.

We mixed paint colors and loaded rollers. Even my students who are totally blind could work a roller on a wall. It was almost impossible to do it wrong. Some students worked with brushes to go along the bottom and in the cracks, and the teamwork made for a major transformation in a few hours. Every student was assigned the task of sketching out three ideas for wings: We had bat wings, butterfly wings, steampunk wings, dragon fly wings, and more. When we looked at all of the sketches together students voted on their favorite ideas. Several people did peacock wings and several did dragon wings, so that helped tip the scales in their favor.

We drew the wings on walls with chalk first. I'd worried about weekend rain washing it awan, and so I spray painted a few simple outlines for some of the drawings. And then we painted each pair of wings with appropriate colors. This took longer than I expected because there were so many days of rain and freezing temperatures. Luckily the last week before our Winter Break, we had a few pleasant days when we could knock out the paintings to make a wing wall (between hanging our art show and putting the last parts of our student sale together). I can hardly wait to see students use the wall for a photo op and hopefully be inspired to improve themselves, as we have worked to improve our learning environment. 


Student Art Show: People, Places and Things!


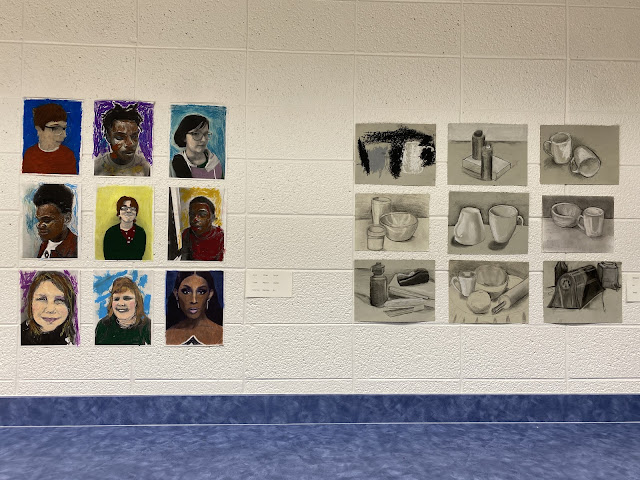
The student art exhibition had to do with subject matter. Students made a lot of Portraits in the style of famous artists like Kehende Whiley and Chuck Close.

Students recreated famous portraits by the masters of Renaissance, Surrealism, and Pop Art.

They created still life drawings using graphite, pastel. And they displayed their 3D model of the campus for the giant wooden map of Macon downtown.
Below is a picture of one blind student showing her blind friend her drawing. The lines of the bottles are raised in hot glue. She found her piece using the Braille tag beside the work.

 The Christmas Art Sale was a huge success as well. I love seeing my students pointing out which pieces they made to faculty and peers. They're almost giddy when they say, "I made this one!"


Thursday, December 19, 2024

Ceramics & Jewelry Projects for an Art Sale


Getting ready for the upcoming Art Sale at my school has been fun. It gives students, who have varied ability levels, opportunities to learn how to make sellable items Some students are able to use wire cutters and pliers to create necklaces and earrings from sea shells, while others can string beads onto pipe cleaners or elastic string to make bracelets. Some can brush glaze on ceramic Christmas tree trays, and others can add details such as dots for ornaments. I love that students are learning skills and exploring a variety of media, while getting a chance to serve our classroom community.


Wednesday, December 11, 2024

Stenciled T-shirts and Aprons


I am really getting some bang for my buck when it comes to the stencils I bought a few months ago. My students have used them to add pattern to large portrait paintings and spray paint ornaments. In clearing out closets at school I found some boxes of unused t-shirts and aprons that we decided could be used for a fundraiser.
Spray worked on the tight weave of the apron, but didn't show up well on the knit t-shirts, so we used acrylic paint on both. We taped the stencils down with packing tape to give a wide enough border for mistakes to be made. A stencil brush is ideal, but a foam brush is the second best thing. The trick is to dab up and down rather than using strokes which cause the paint to be pushed under the stencil plastic and mess up the image. Things really got fun once students started varying the colors within a single stencil, such as adding more red to the orange or a lighter green to the outsides of the stenciled image. It ended up being a project that can be done within an hour, teach medium and contrast, and still have a wow factor.


Friday, December 6, 2024

Festival of Trees 2024

Every year our local Museum of Arts and Science hosts a Festival of Trees, and I like to sign up for my students and I to execute a fresh idea for a tree design.

Trees are an important symbol of Christmas, but they also represent knowledge and growth. Because Georgia Academy for the Blind is a place of growth and learning, GAB Art classes decided to incorporate the elements of trees to our "Festival of Trees" design. Our campus has twenty-two acres of land and 170 trees from which we collected pine cones and sticks. We painted, gllued, wrapped yarn, and strung wooden beads to make these ornaments. All of our students are blind, but the tree incorporates sensory experiences beyond vision: the smell and feeling of the prickly pine cones and sticky sap, the taste of cinnamon and orange, all contribute to the rustic and outdoorsy holiday experience our woodland tree provides.


students explore the museum
Once we do the hard work of making the ornaments, we get to the fun part: the field trip to go decorate the tree. The museum has been so generous in working with our special needs. We always love to explore the minizoo and the artist's loft and the hands-on science exhibits. This time, students got to pet an alligator!
And then there's the Festival of Trees Gala, which is the main event and fundraiser for the museum! It's nice to see all of the community sponsors sharing ideas and the Christmas spirit! I love being part of my school and I love being part of Macon, GA!


the gala food is always to die for!
The cakes hung from the ceiling like ornaments


Ornament of Christmas Tree from Sticks


Who loves the irony of hanging a Christmas tree on a Christmas tree? I do! For this year's woodland Christmas theme, I had students collect sticks from campus to break or bend into a triangle, which I hot glued with a small stick being glued at the bottom for a trunk. 


Students wrapped the tree frame with green yarn and placed wooden buttons to the top. these buttons were decorative, like ornaments on on the ornament, but they were also structural. Gluing them on the corners helped strengthen the entire ornament.

Ribbon or twine, looped, or tied, with our without beads, topped off each tree, as a hanger. Some students used yarn sparcely, while others wrapped and wrapped. Some kept their yarn going zig zagging horizontally, while others went every which way. Every option brought a charming, homey results.

It doesn't take long for young people to make this quick decoration or gift.


Pine Cone Christmas Tree Ornaments


Pinecones are free and abundant in Georgia. My students and I collected hundreds of them just from walking around our campus. Students painted the pine cones with either white or red paint and then used some creativity to decide whether to add stacked wooden beads, ribbon, twine, or silk leaves and flowers to decorate their pinecones and make it possible to hang on the tree. Hot glue is an ornament maker's best friend. Fuzzy twin can fit through wooden beads one you fold  the end of the twine into the fold of a piece of shipping tape (or masking tape) and cut the tape close to the twine and cutting the end into a point. If you want to add bling to a tree or wreath you can spray paint the pinecone with gold or silver paint or brush the edges with glue and roll in glitter. We were trying to create a rustic look and I think it worked well.


Orange Slice Ornaments


 Orange slices are easy to dry and are a fun way to decorate a tree on a budget. I bought four oranges for $4 and was able to get about 8 slices per orange. They should be 1/4 inch thick. They can dry on a cookie tray, and baked in an oven at 175 to 190 degrees for 3-4 hours. Turn every hour. Slow and steady is probably best. If they are not completely dry, you can set them out overnight and if they're still a little sticky, put them back in the oven for another hour, but keep checking on them every 15 minutes because it doesn't take long at that stage for them to start to brown. Once a string is thread through the orange rind,  it's pretty much an ornament but you can get fancy by hot gluing rosemary or cinnamon to the orange, or by adding beads and ribbon to the string. They smell great and when set near a light give a glowing, stained glass affect.

Stenciled Wooden Christmas Tree Ornaments


Wooden ornaments have a warm, home spun feel to them. In the past I've had students paint or draw on wooden discs, but this year, I had stencils that I bought for another project, and realized that a quick few sprays of spray paint could produce 4 or five ornaments in the matter of seconds, which means that 100 ornaments could be made in a morning. The stencils were large enough that it could cover two ornaments at a time to get a less centered design. It only takes a couple minutes to dry so I would rotate a board with about four ornaments being prepped while the last tray was drying. I loved how they turned out!