Monday, September 20, 2021

Painted Photo Project

One week, my students were painting themselves, the next week they were painting photographs of themselves. 


Observational drawing is tough enough for people with perfect vision, but it is especially difficult for my students, all of whom are legally blind. We are using every trick we can to help them make quality artwork, so I don't think using technology as cheating.

Each student, got a print out of a photograph and they were able to fill it in with realistic or arbitrary colors. 

They were also encouraged to find ways to transform themselves.  This week we were studying photographer and artist, Cindy Sherman and learning how she transforms herself with costumes and photography to become different people. Painting offers a chance for students to become something other than themselves, including animals such as the bird and cat below.


Wednesday, September 8, 2021

Alexa Meade Art Project


Years ago, my sister, Sharon, took family pictures in the style of artist, Alexa Mead. (Sharon's image is to the right.) I was so impressed with the results that I swore if my Art students and I would one day tackle a project like that ourselves.


One of my beautiful students with the black bar to provide anonymity

Last week, week three of our photography unit, we  did it! I gave each student a t-shirt to paint. They were tasked of making the brushstrokes visible, barely blending several related colors.  Then they painted large pieces of paper to serve as a back drop. Again, the goal was to make it painterly with loose brush strokes.

Finally, we added the most essential element. The students themselves. Each one took a turn painting their own face or having someone else do it. They picked their colors and poses, trying out various backdrops.

Occasionall, a fresh brush stroke or two would be added to the t-shirt or covering or backdrop to help tie the whole piece together.

A lot of learning came out of looking at the finished images and trying to select the strongest ones. The discussions bring about what makes a one composition better than other? How do the colors in the foreground and background go together? What is the mood presented in the expression, pose, and color combination? This student was pleased to see that the yellow stripe that went across her face at eye level, aligned with the yellow stipe in the back drop. She became the sunset that she was hoping to represent.
My new para pro playing with me

a free period gave me a chance to paint my own face
It was a physically exhausting week, running back and forth from sink to wall with the back drops. Fresh tape, swapped back drops, different color paint, twenty minutes at the sink trying to scrub faces clean. In the end, we were all thrilled with the results. I was so obsessed with the finished products that I ran around school showing my coworkers images of our masterpieces. A couple people asked what kind of filter we used. This was an old school way of working with brush and paint to let our colors show. No filter required.


Baldessari Art Project

John Baldessari is a huge name in the world of conceptual Art. He's most famous for putting sticker dots on the heads of black and white film stills. It deals with anonymity, emphasis, color, and shape. We had so many pictures from our week of walking around campus and documenting what we saw with a camera, that it was easy for my students to find ways to bring Baldessari's work to life in our classroom.

He died last year but his influence lives on.


Photo College Self-Portrait Project


Last week, my high schoolers elevated the idea of "selfie" to abstracted self-portraits. They took printed images of themselves, cut them into strips and created photo collages. The sky was the limit.


Some students used a mix of color and black and white, either by tearing or cutting out parts of of one and gluing it to the other.


Others wove the strips of two photographs together.


It's such a fun and easy project. I always like to demonstrate how to use a glue stick by having a scrap piece of paper for glue application. It helps to drag a strip under a glue stick held in the same place, that way there's not glue all over the place. Another piece of scrap paper can go on top of the collage between each newly added strip to rub the piece down without marring the surface of the image. It is a project that teaches craftsmanship, medium, and techniques. Everyone was so excited with the final results.


Documentary Photography project


Studying photography covers so many art standards:  exploring careers in art, discussing how images tell the story of a time and place, building a repertoire of artists, learning techniques and media. I started this  unit by introducing my students to famous photographers throughout history starting with Alfred Steiglitz, Dorothea Lange, Ansel Adams. Steiglitz elevated photography to an art form by dealing with formal elements and compositing. Dorothea Lange documented the Dustbowl in a way that told stories and put a human face to suffering. She and Ansel Adams showed the world what Japanese Internment Camps looked like, and he was ahead of his time in forwarding conservation with his photos of Yosemite that brought feeling and drama to landscape.

My students walked the campus of the Academy for the Blind, looking for objects that could document what was happening. An empty pool, a Perkins Brailler, stacks of pots, waiting for horticulture students to fill them. We pulled the up on a big screen and discussed how to make compositions stronger, contrast more meaningful. I taught them how to crop and straighten. How to adjust color to change the mood. For those with no vision at all, they would find things on campus, direct the camera, take the photo, and I would then print the photo and outline it in puffy paint for them to discuss compositional issues such as negative space and scale. I'm so glad we started our year with photography, so that we could address formal issues in Art, while learning how to notice the world around us, and appreciate those who went before and taught us how to document time and place.


Tuesday, September 7, 2021

Painting Records


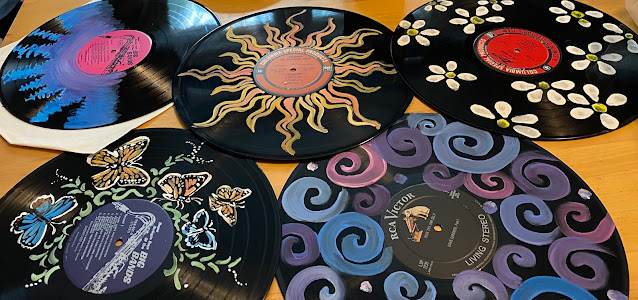
Come paint records with me, Mom! My daughter said during her last weekend before leaving to college last month. She wanted to having something hanging on her dorm room wall, and apparently painting LPs is a thing. We used cheap bottles of acrylic and since she bought her records at a thrift store for a few dollars, the whole project didn't cost much.
When my husband came out of his meeting he was happy to see she had saved a record for him. This is a fun idea for a painting party or dance decorations. I hope her wall o' records reminds her of our love for her.


DYI Spinning Toys

Before the days of Fidget Spinners there were tops and button buzzers (aka whirly gigs). These seemed like the perfect thing to add to my art class "toy-making" unit. Cardboard, makers, and either string or a toothpick is all it takes to make these simple and fun toys.

For the button buzzer we traced a lid or jar to make a circle. We cut it out and then picked two primary colors, knowing that once the circle started to spin, they would blend to create a secondary color. Two holes were poked on either side of the center of the circle. I figure a finger's width is a good measure for how to distance the holes. We cut a piece of string or yarn a couple feet long, then threaded the ends through the holes so that they both came out the same side. I tied a couple square knots before sliding the disc to the center of the loop. Then it's just a matter of holding both ends of the  loop, swinging the disc in a circular motion about twenty times before slowly pulling and releasing, pulling and releasing. When it starts to die down, try nursing it back to motion before giving up right away. The trick is to let your hands get close enough together for the string to wind itself one direction, pulling to spin it the opposite direction and then letting it continue to wind in that direction by relaxing and shortening your distance again. The timing is tricky but if my students can catch on, you can too.

A decorated circle of card stock and toothpick can be used to make a top, but we used cardboard for added sturdiness, and because the toothpick kept sliding, we swapped it out for a thin dowel with the bottom sharpened with a pencil sharpener. Placing the stick in the very center is essential for the top to spin right, and a little glue makes for a good reinforcement. If it seems off balance, it's OK to trim the tiniest amounts at a time to try to get it all balanced. The tops worked well enough once students learned to spin them, but the button buzzers held their attention for longer periods of time. Have fun experimenting with your own spinning toys.


Monday, September 6, 2021

Making Yarn Pom Poms


So many of my students have autism or ADHD which cause stimming behavior such as juggling (tossing a little toy in a hand) or spinning an object. Rather than fight it, I thought I would use the first month of school to have my younger or lower functioning students make something they'd enjoy using. So I planned a toy making unit, starting with puppets. Week two we made pompoms from yarn, like the kind I made as a kid.
I started with "C" or "U" shaped cardboard shape to wrap the yarn around, but it got a little to complicated, so we ended up just wrapping with the right hand around the left hand. When it starts to feel thick, (I wish I had counted the number of rounds), we carefully slide it off the hand and tie a knot around the center to make a figure eight.  We found the balls were fuller and stronger if we did this a couple times and tied the two figure eight together. Then it's a matter of cutting the loops to make loose ends and trimming it quite a bit to even things up and it look rounder.


Because my students are blind, we usually decided to keep a long tail or maybe even two so that they could sing them around in circles (with one hand or two). A jingle bell tied to the center made for another sensory element for these students, and it also made it easier to spot it's location when I added a little tennis lesson to the unit. We took a dry cleaner's wire hanger and bent it into a paddle, using the cardboard tube at the bottom of the hanger as the handle.  I stretched some pantyhose over the hanger to make a bouncy and soft tennis raquet. Then I held the end of the string with a yarn ball at the end of it in front of the paddle and had students practice their forehand and back hand motions as they hit the "ball". It worked even better with the jingle bell announcing the moment of contact to the rest of the class. With students who had perfect vision, there wouldn't be need for the long string, and students should be able to bat the pom poms back and forth with a couple of paddles.


Puppet Making Projects for Kids


I like to do at least one puppet making project a year with young children. It gives us as chance to invent a character and practice communication with fun, silly voices.

This year I dedicated a week of art classes to playing with the idea of students making puppets in a variety of ways, including cup puppets. a small hand can fit inside a cup, so why not tape, paint, or glue features to it and bring it to life. This purple bunny cup was made from pipe cleaners, pompoms and contruction paper. I had to use hot glue to get it to stick, but students would pick out what they wanted and place it where they wanted before handing it to me each time I needed to tack something in place.

Rod puppets are popular in some African countries. Wooden spoons can be the start of rod puppets. Someone handed me a package of spoon bunny kits. I hate to do projects made from kits because there's little room for creativity, but my students made costumes by cutting out fabric and gluing them to the handle. One even made a giant top hat shaped foam pocket, so the magic show rabbit can pop out of the the inside of the hat and then slide back inside.

Hand puppets can be made from socks, mittens, paper bags or just pieces of construction paper folded in half and cut out in the shape of a robot or alien. Finger puppets are always the easiest way to start with a puppetry unit, especially for me, because I have bags full of basic rounded bodies as a foundation for kids to glue features. The trick is to have lots of options in terms of materials: tape, beads, buttons, beady eyes, foam, paper, markers, paint, yarn, etc. You want them to decide who to make and how to make them.  Then sit back and watch the show biz magic happen.