Showing posts with label clay lesson plan. Show all posts

Thursday, March 22, 2018

Clay Masks


The first time I'd heard of Julie Taymor was when I saw an exhibition of her work at the Wexner Center in Columbus, OH decades ago. Yes she's a theater person, but I've always loved the relationship between visual and performing arts,so  I showed my students  videos and a slide show of her amazing costumes from "The Lion King," It just so happens that the Chorus took a field trip to see "The Lion King" the week before so the timing of this lesson was perfect.  And then we saw her actual Scar and Mufasa masks at the Center for Puppetry Arts in Atlanta,

My students each made sketches, newspaper forms, and then used clay slabs to create their own mask.  These are much too heavy to be worn, but holes were made on each side for wire, which makes it easy to hang on a wall. It was so gratifying to see them fired, glazed and displayed within two week's time.


Monday, April 4, 2016

Wall Vase Craft

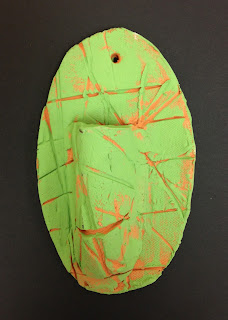
A few weeks ago, my little artists were each given a chunk of clay to run through the slab roller before choosing a shape to cut from the slab. This was the first step in their wall vase project. Then they created texture by pressing objects into the clay. Pockets were cut and textured before the slip and score technique was used to attach them to the original shape. Holes at the top ensure that these wall vases or wall pockets can be hung by a nail or a ribbon.


I made a small clay wall vase in elementary school, but I don't remember ever explicitly being taught about elements of design: line, shape, color, texture, and value. Simply by talking about these elements with my students, helps them recognize that they have choices. They can decide the shape of their slab. Not everyone has to make an oval. They can choose what kind of texture they make. It doesn't just have to be the first tool they come across. There are options. Some chose not to even make pockets, just shapes to hang on the wall.


Finally, students chose the color paint to use for the surface, after the pieces were fired. Some students used multiple colors; some used thick paint to fill in the bumps; others dried brushed color on top of dried thick paint to show contrast and expose the texture.


I don't know if any of these projects will survive the bus ride home, but I like to think of children hanging it on a bedroom wall and keeping tiny treasures or dried flowers in them and remembering art class.

Tuesday, March 1, 2016

Clay Bead Necklace


 Beads! I have found that even my students who are totally blind and have severe cognitive impairments, can string beads. It's one of the few assignments that almost everyone can do independently. I have a giant bin full of tiny plastic beads waiting to be strung on thin wire or pipe cleaners.


But I asked the students, who are ready for more aesthetic ownership, to make their own beads. This also worked for the students who completed their clay assignment early and had a couple days to do a project on their own.

The processes was very simple. They rolled little balls of clay and poked a thick gaged wire through each one. The clay (and the holes in the clay) shrink with drying, so some of the beads had closed up and were useless. If there is just a tiny piece of clay blocking the hole, a heavy wire and a little work can open the hole again, but it's best to just be sure they are big and straight enough when they are first made.

After firing, the beads were colored with Sharpies or painted before being strung on thin. Many of the beads were fairly large so the results were heavy, Wilma Flintstone style necklaces, but my students didn't mind. They were so pleased with the results, I may need to come up with a paper bead lesson for them.