Sunday, February 26, 2017
Screen Printing Camp T-shirts
My school stayed open last weekend for students who wanted to participate in a "short course weekend" experience. Orientation and Mobility was the official course focus since it is part of the Extended Core Curriculum for students who are blind. But music came into enough of our activities that we titled the weekend "Moving and Grooving." Activities included learning how to call and take a cab, taking a downtown walking tour of all the important music sites in the area (like where Little Richard, James Brown, and Ottis Redding got their start, or where Gregg Allman proposed to Cher), Kamikaze Karaoke, learning line dancing, and going on a scavenger hunt.
Our budget kept us from ordering pre-printed t-shirts, so I used the art budget to buy a $4 long-sleeve t-shirt for each student. We organized students into 4 teams, so I got a different color shirt for each team. My husband helped me design a logo, which I sent to my friend, Matt Forrest. He not only got a mini grant to buy a T-shirt press, but he processed the screens, and brought 3 college students as volunteers to help my students print their own shirts. We used hair dryers to dry the ink. It was a great project for a great weekend!
Sunday, February 19, 2017
Clay Rattles
Even little kids can learn out to make a pinch pot from a small ball of clay, and a pinch pot is just a couple steps away from making a clay rattle or shaker. The first step (after rolling clay into a ball) is to push a thumb into the center the clay. I recite the Little Jack Horner nursery rhyme as I do it. Demonstrations are hard to do for blind students. So much of what is learned is learned from observation.
I have students pretend their hands are hand puppets that they make talk with their fingers close together, fairly straight and pushing against their thumb, that way I can see if they're ready to start pinching the edges of the clay to stretch the walls thinner and make a bigger hole.
Once the pot is big enough, they can add tiny balls of clay made the day before by a previous class. I find that dried out pieces of clay are much less likely to stick to the fresh clay, but another technique involves wrapping balls of clay in some newspaper inside the rattle to prevent sticking. The paper will burn in the kiln, freeing the balls to rattle. If the students didn't make the pot opening small enough to easily pinch close and smooth out, a small lid can be used and blended into the edges.
The first batch ended up looking like a bunch of rocks, waited to be painted after firing. But by the second class, I figured out that students enjoyed carving a little texture, or adding small ornaments like a clay worm, a bee, a butterfly, a heart, a flower, or a favorite letter. A few added handles, but the shaker fits so nicely in the palm of the hand, that almost everyone felt happy with their little treasure. The fact that it makes sound adds another layer of pleasure, especially for my students, who hear much better than they see.
Saturday, February 18, 2017
Braille Name Plaque Craft
This week my school hosted a statewide competition call Braille Challenge, where kids were able to show off their Braille reading and writing skills. This was my third year making crafts with the Braille Rookies. These are the youngest group of blind students who are just starting to learn their alphabet and they are adorable!!!
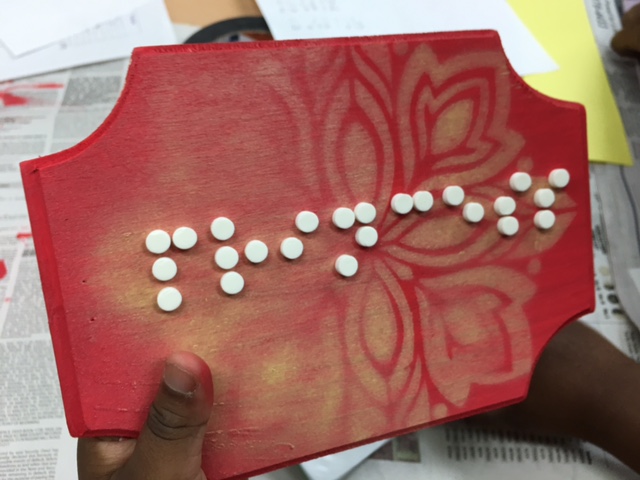
This year, I thought it would be fun to make name plaques that could be hung on a bedroom wall or door, something that they could be proud of and that would encourage them to continue to learn braille. I bought wooden shapes at Wal-mart for about a buck each, and had them paint them with acrylic. It didn't take more than a few seconds before one little boy complained that the girl next to him had painted his hair, by accident of course. Thank heavens for large, cover-up t-shirts, aprons, and wet paper towels. The plaque drying processes was sped up with a heat gun.
We took the painted plaques outside where each Rookie chose a color spray paint and a stencil to create a background for their name. I helped them use the spray paint, which dried almost instantly. And then they used large foam sticky dots for their initials or small ones to braille their name or nickname. They chose and cut a piece of ribbon for me to hot glue to the back, and viola! It took 45 minutes for them to finish the product. I look forward to see these students back at the school in upcoming years as they go from rookie status, to apprentice to master. Braille on, young Rookies, braille on.
Sunday, January 22, 2017
Chinese Calligraphy on Paper Lanterns
Each student learned to make vertical strokes to represent bamboo stalks, and triangular strokes for bamboo leaves. These brush drawings help everyone feeling successful the first day of trying. They used black watercolor paint since ink stains are impossible to get out.
Then, each student chose a character to learn. They could also learn their name in Japanese katana. Visually impaired students used a close circuit TV to magnify the writing enough to practice his name many times, first with a marker, and then with a brush.
Once students were ready, they wrote their name or character on a paper lantern. Several students who were completely blind, needed me to guide their hand, but we had repeated the process enough times that they would say, "over, down, across..." just as we were about to make each mark. Lanterns rested in #10 cans to dry and then they were hung from the ceiling.
I wish we still stressed penmanship in our culture the way that calligraphy is still valued in Asian countries. My Korean friend once told me that if you didn't have good handwriting, you couldn't get a girlfriend where he lived. I'm glad my students got a feel for how language and writing is different in different parts of the word, and can appreciate the art form of Chinese writing.
Thursday, January 12, 2017
Monochromatic Compositions
I didn't study color theory until college, but it turns out color schemes aren't difficult for children to learn, if you start simply. For a recent monochromatic color scheme assignment, I had each student make a composition. They each started with their marker (a pencil would work fine for students without visual impairments) at the edge of the page and move it through curved straight, curly or zig-zag lines to another edge. They continued doing this with lines crossing over one another until the page was divided into large, medium, and small shapes.
Then they picked a color, and painted several of the shapes, throughout the composition in that color. Tints were made by adding the chosen color to white. Shades were made by adding black to the original color. the shades and tints of the color are spread throughout the picture plane to make it a strong composition, one that leads your eye around.
I used a large hot glue gun for students who couldn't see their original lines and had to feel the edges of the shapes. We used tempera, which leaves a chalky feel when it dries, so students could feel which shapes had already been painted. Here is one made by a student who is totally blind. The only thing he wasn't able to do independently is trace the shapes in hot glue, and mix the various tints and shades.
Thursday, January 5, 2017
Color Wheel
The color wheel consists of 12 colors (3 primary, 3 secondary and 6 tertiary) Primary colors are red, yellow, and blue. Secondary (purple, green, orange) colors are made when you mix two primaries. Tertiaries come from mixing a primary with a secondary. Making a color wheel teaches children how to mix paint, and better understand the relationships between colors. It is very difficult for children to make a well crafted color wheel, however, since one one blob of paint can ruin the whole thing.
I have found that the trick to a really good color wheel is to paint each color on a separate piece of paper, Even 3 X 5 cards work as long as it's the side without lines. I start by having students paint each of the primary colors on separate cards. Then they pick two of the primaries to make a secondary: yellow and blue make green. The green should be a perfect blend of the two colors, not more blue than yellow, nor visa-versa. The green is added to yellow to make a yellow green and blue is added to the medium green to make the blue green. The same thing is done red and blue making purples, and yellow and red making oranges.
The tertiary color names are easy, they are just a list of the two other colors that were used to make it. The trick is to always put the primary name first and the tertiary second, yellow-orange for example. You'd never have an orange-yellow, because once a primary color is contaminated with anything other than itself, it is no longer the primary. It may be a very yellow orange, but it is still an orange.
If they lay out their colors in order, they should be able to tell if their colors progress in even steps. If there is a sudden jump, students try to mix a color that would be a better blend of the 2 colors it falls between.
Once the cards are dry, students come up with a template of their own shape: hearts, triangles, circles, arrows, starts, etc Then make 2 marks on a piece of paper in a circle, as though it is the hour marks on a clock, so that each piece will be glued in the right position.
All of these steps make for a more professional looking color wheel, that can be used not only to teach primary, secondary, and tertiary colors, but later be used to refer to to teach complimentary, triadic and analogous color schemes. (P.S. I don't exempt my blind students from this project. Although I help in mixing the colors, they are responsible for telling me which colors to mix to make the desired color. They paint (sometimes braille) and glue the cards themselves.
Monday, January 2, 2017
T-shirt Quilts
My husband's dad died last November unexpectantly. As I watched him deal with the plans for funeral and inheritance with my two sister-in-laws, I was impressed at how selfless and cooperative each of them was. There was a question of what to do with "dad's clothes" since they wouldn't fit anyone in the family. I offered to make quilts for each daughter. Little did I know what a learning curve I'd have, and how long it would take.Justina (younger sister-in-law) sent me a text, once the shirts had been chosen, packed up and sent to Georgia. Minutes later I got a second text, frantically explaining that the cat was also accidentally packed up and shipped. I can only imagine what a cozy and welcoming place a box of shirts would be for a family pet. Luckily, UPS was able to find the cat before the box left the Chicago area, and made it home within an hour or two.
Each quilt was queen size, consisting of 20 squares (4 columns of 5). Ten squares were solid 16" X 16" which become 15"X15" after the seams were sewn. Ten squares were made of 9 smaller squares. Each of the smaller squares was 6"X6", which ended up as a 15" square. The strips of fabric on every side of the square were 6" wide, which allows a .5" seam allowance. The end quilt size was 85" X 105". That's a little big for me to maneuver and I was wishing I had a quilting machine at more than one point in the process, but a sewing machine quilting foot did help. And by using thinner batting, there's less to try to wrestle.Since most of the shirts were knit, an iron on interfacing backed each square. This kept the fabric from stretching and becoming mis-shaped.
Part of the reason this project took over half a year to complete is because I wanted my 12-year old daughter to participate, not only to learn how to quilt, but to have her hands on family history, and be able to show love to her aunts.

Despite our months of working together, the end results are far from perfect. Still, I hope that each time these quilts are used, two sweet daughters can feel a hug from their dad.
Subscribe to:
Posts (Atom)