Thursday, December 31, 2020

A 2020 Teacher's Year End Review

 This has been the hardest year of teaching for so many people, myself included. We left our classrooms last March (Friday the 13th/ full moon and all that) expecting to come back in two weeks after the whole Coronavirus scare was supposed to have died down. We never came back...

...At least not until the next school year, and even that started started a month later than normal, thanks to COVID. Teachers were trained virtually about virtual teaching, and then our students at were given a choice. Half of mine opted to stay home, half of mine were in the classroom. So I've been logging on to Teams meetings for students around the state, while simultaneously sitting in a room with a few masked students. I've been sending home packets of supplies, and asking for emails of finished work or taking screen shots as they hold it up for me to view and critique. It has not been easy, or very fun much of the time. 

When you feel like 2020 was a wasted year and no progress was made, do what I just did and take inventory. Write down all of the little or big accomplishments. Even holding your ground and maintaining 2019 goals counts in this year when extra doses of grace are needed. Here are some of the things that I could still do despite this crazy year...and some of the things happened because of this crazy year and access to zoom.

As an educator I was able to:

  • Present at the Aspiring Educators Summit, a national conference in North Carolina.
  • Attend  a meeting with the GA Teacher of the Year and Jill Biden about education
  • Attend the State Superintendent Teacher Advisory Committee Meetings
  • Attend monthly meetings with The American Printing House for the Blind and a handful of art teachers for the blind from New York to California.
  • Be featured in BYU Magazine F2020 
  • Participate in the Museum of Art and Science's Festival of Trees by designing a Helen Keller's garden themed tree with paper flowers made by my students and I.
  • Help Teach the Master of Education Creativity in the Classroom class at Wesleyan College
  • Work as Assistant Director for Wesleyan College's Center for the Arts Summer Intensive and teach Costume Design.
  • Serve on various school committees. 
  • Be the Co-Christmas Party Planner for our school-wide, staggered time, social distanced party.
  • Put together a virtual school-wide talent show.

As an artist I was able to:

  • Ship work off for "Print-Making and Impression," Art Exhibition featuring printmakers from around the world, at Elizabethtown College in Pennsylvania. My husband was in the show too which means we now have two copies of the awesome catalogue of work. (Show hangs from October to February.)
  • Participate in Inktober by sharing daily ink drawings on social media based on a given prompts
  • Visit the Detroit Institute of Art and the Heidelberg Project
  • Attend a virtual OSU artist reunion and my graduate school mentor's memorial service in which printmakers from around the country discussed his influence on our work and teaching.
As a human I was able to:
  • Slow down.
  • Start playing the piano again.
  • Start going for daily walks.
  • Work in the garden.
  • Learn new dinner recipes.
  • Lose 20 pounds.
  • Participate in Pensacola disaster relief/ hurricane clean up.
  • Start having bimonthly sibling zooms.
  • Celebrate my 23rd wedding anniversary in quarantine.
  • Watch my daughter turn 16, get her driver's license, get her first job, and get into college
  • Watch my boys go to work and college together.
  • See my oldest son survive a motorcycle accident, learn to drive stick, and finish his bachelors.

So life goes on. Despite cancelled trips to Alaska, New York,  Illinois, and Pennsylvania. Despite cancelled proms and graduation ceremonies. Things are still happening. You are still doing something, still making progress. Notice and celebrate each step you took forward on the slippery slope of 2020.


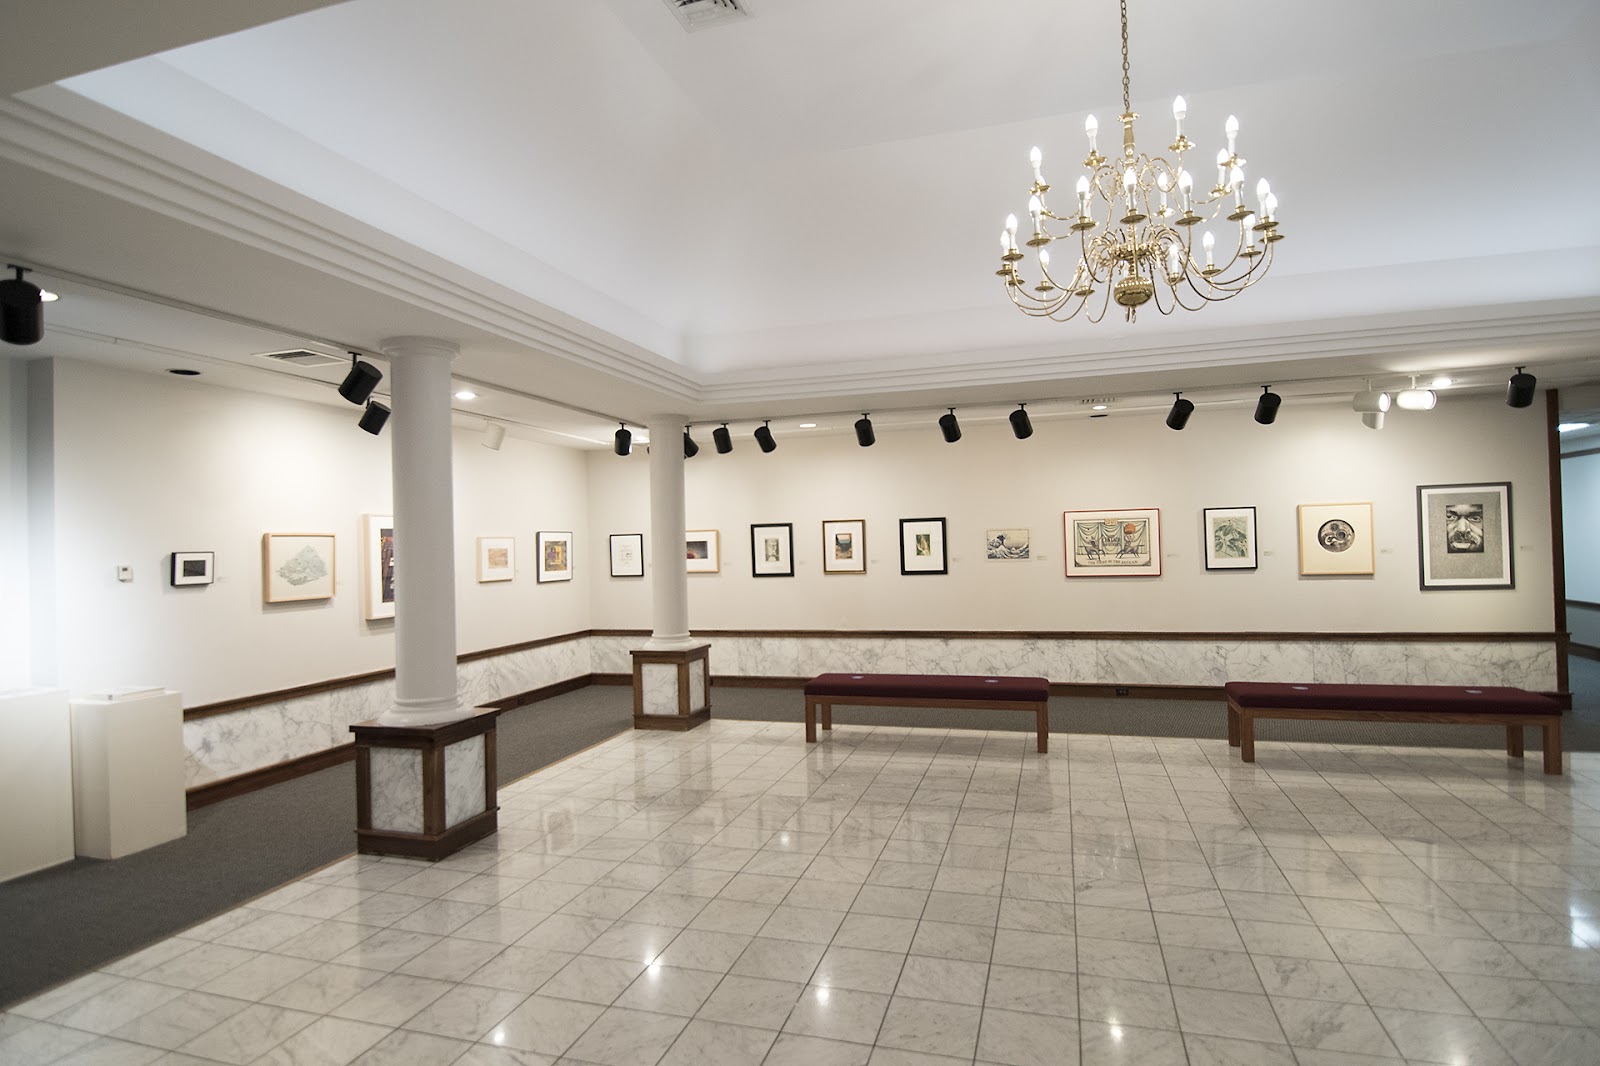
Exhibition at Elizabethtown College, in PA


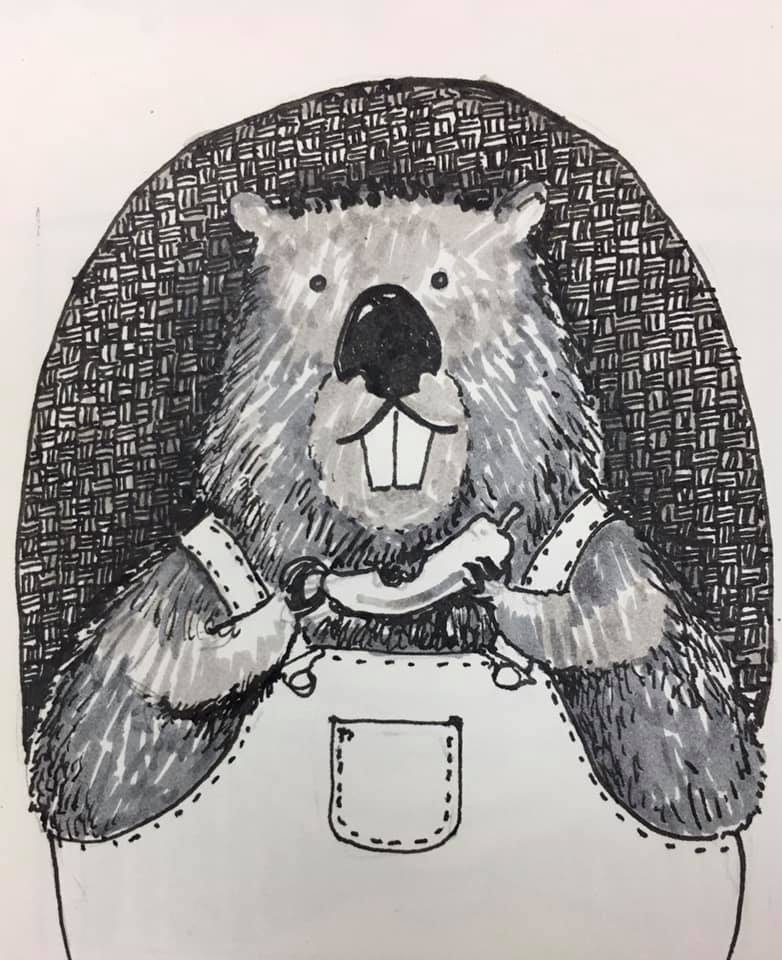
"Rodent" from Inktober: A woodchuck picked a pickled pepper


Homemade Gift Ideas: Clay, Cards, Cookies, Candies


Homemade gifts, big and small help show you care with a personal touch. Every year I try to make something for family and close friends, like a DVD of a reunion, something hand-sewn for the kitchen. Small clay ornaments, like the ones above, can be a gift in itself, or a decoration on the top of a gift. I made these to my kids as a way to help build enough ornaments for when they move out.

Consumables are always popular with teachers and friends who already have everything they need. Sugar cookies are a winner for locals, but they don't ship well. This year I made candied pecans for my family. For every 3 cups of shelled pecans, you'll need one egg white whipped with a drizzle of water, to coat the pecans before stirring in a mixture of 3 cups of sugar, with about a teaspoon of cinnamon and some salt. Bake at 250 for an hour on a large baking sheet, stirring every 15 minutes.

My most popular gift this Christmas was note cards of people's houses It was a trick to get pictures of far flung houses to use as source material. I had to text teenage niece, or brother-in-laws for help on this project for houses outside my town. My sweet husband scanned my pen and ink drawings, added a family name below in Illustrator, and then had them printed at Staples. I'm always looking for new ideas for gifts that might show love for the following year.


Monday, December 28, 2020

Kid Made Christmas Gifts and Decorations: Glitter, Beads, and Lollipops!


A quick and easy kid-friendly craft for the holidays include glitter ornaments. I used small scraps of dark mat board as a base, but you can use card cardboard or even metal concentrated orange juice lids spray painted the color of your choice. Glue the ribbon to the back (hot glue is quick), and then draw a picture in glue on the front to cover with glitter. Stars, snowflakes, snowmen, wreaths, trees, angels, ball ornaments, candy canes, menorahs, candles, etc. Just be sure to keep it simple and only do one color at a time. Kids are amazed the first time they shake the extra glitter onto a sheet of paper and their shape is revealed.
Instead of ornaments, you might even make initials of family members to use for gift tags next year.


Pipe cleaners (Am I supposed to be calling them fuzzy craft sticks?) and beads are also easy ways to keep kids busy making ornaments. Red and white alternating beads can be bent into candy canes on half a pipe cleaner. Or white beads, with a figure eight twist in the center could help make a simple snowman shape. Green beads with bends to make a tree shape could also pass for an ornament (maybe a yellow bead in the center with a twist to make the star stay in place would help clarify).

I found that most of my young students were more interested in making beaded jewelry for their moms then ornaments, but either way, you've got a way to keep kids happy, engaged, and thinking of others.

Lollipop decorations are easy for kids to make with paper plates, and wooden dowels. It's just a matter of using markers to draw spirals, pinwheels, stripes or polka dots on the bottoms of the plates and then gluing the tops of the plates together with the dowel inside. Hot glue probably works best for this one too.
Once cellophane is wrapped around and tied with a ribbon or twist tie. the lollipop believability factor goes way up. Pop them in the ground or planters for outdoor events or in vases for indoor parties.

If you're done celebrating for this year, plan ahead for next year by grabbing on sale items now or even making special decorations to be packed up with the magic about to go into the attic until the final months of next year.


Tie Dye project


Art classrooms are like a store for other teachers who are looking for markers, glitter, or paint. They are also like room-shaped garbage cans for teachers who are looking to get rid of old boxes, newspaper, and plastic bottles. Teachers in general, hate waste and so we'll figure out something to do with whatever we get gifted. In this case, I hit the jackpot because my daughter's chemistry teacher sent her home with a bunch of fabric dye that only lasts a few days before it has to be thrown away. Since my students were in the middle of a unit on textile arts, the timing couldn't have been better.

First, my own children practiced at home, on t-shirts, bandanas, socks, and masks. The results were great! Then I took the box to school and let students play around with white fabric. Folding, tying, twisting, and then squirting colors.


The technique that seemed to work the best, was the old-twist from the center, and use stripes of dye for a spiral effect. When we didn't have enough rubber bands, we used string to tie it in place overnight in a plastic bag. The project doesn't take very long and the pay offs can be pretty great, especially when are gifted a bunch of free dye.


Batik Project


 From Tapa cloth in the South Pacific Islands, to West African Kente cloth, to Indonesian Batik. Our textile unit was taking us all around the world and teaching us about different techniques and cultures. Most batik in Indonesia is made in Java, and the process is very long and fascinating. There are lots of videos on Youtube to walk you through the process. Images are drawn on fabric with hot wax to use as a stop out. Or metal stamps are dipped in wax to print repeated patterns onto fabric. Then the fabric is dyed and the wax stop out remains white (or the pre-wax dyed fabric color). In some cases, the fabric is bleached and the wax protects the colors that it covers. There are a lot of options for a lot of outcomes, but the premise is one of wax resist.

Our class used Elmer's glue with varying results. So much of the liquid watercolor came out when the glue was being washed away, even though it dried. So we went back with fabric dye. Probably the best results were drawing with glue, painting the outlined shapes with diluted acrylic and then rinsing the glue out once all the colors were dry and set. (This is what was done with the turtle image above). Occasionally, the student would choose to not rinse the glue at all, so that it could remain tactile. In any case, it was fun to explore how fabric can be used to make art, and to think about how so much of what we wear is being dyed by real artisans on the other side of the globe.

Weaving Project


The Kente Cloth paper weaving assignment from the previous week was good preparation for weaving an actual textile. Students still had to understand warp and weft, and still had to recognize that color choices had symbolic as well as aesthetic consequences. The only differences is that instead of up, down, up, down, students were going under, over, under, over using long plastic needles to snake their yarn across the warp threads on the loom.
Some students were able to fee their way, while other, low vision students preferred to see the process with a magnifier. And others figured out how to weave hot pads with stretchy loops, like they were born doing it. It is a great fine motor assignment and almost therapeutic for students who catch on. I read a book out-loud for those who could work independently and it became an hour of sanity during midterms for other classes.


Kente Cloth Paper Weaving


Kente Cloth originated in Ghana and has been an important part of West African culture for hundreds of years. Each color has meaning. Green for growth and harvest, gold for royalty and prosperity, purple for femininity and sweetness etc. The shapes are also symbolic: triangle represents birth, life, and death, a circle represents eternity, and the idea that there is no beginning or end to the royal lineage. 

For a simple paper weaving craft project, cut strips of construction paper. I cut one inch strips of 8"X11" paper horizontally, and vertically (except the vertical one stopped one inch from the top, so that it stayed connected. I also glued the top of the vertical cut paper to a plastic base, so that it could be shipped easily to my distance learning students without getting wrinkled.

Students lifted the odd number strips up, and glued a horizontal strip of paper to the even strips with glue stick. Then the strips that were up came down and the ones that were down came up before adding another horizontal strip. This is an easy way to discuss pattern in art and life. We repeat, up, down, up, down, up, down, up, down. As we manipulate the vertical strips of paper (this is the "warp" of weaving), then we'd choose the pattern of the "weft" (horizontal strips): such as orange, yellow, red, orange, yellow, red....


Once the weaving is completed, pattern is discussed again as a student decides to place an "X" shape on all of the yellow squares, and diamonds on the green, for example. For students who had fine motor issues or no vision, I offered stencils, and traced what they drew in puffy paint for a tactile finish.

This project can be a part of a social studies unit on West Africa, or it can be an extension of a literature lesson. A Spider Weaver: The Legend of Kente Cloth by Margaret Musgrove is the picture book I shared with my class. Folklore is always a fun way to learn about culture. I brought in some masks and shirts from West Africa for students to try on. Whether you want to teach reading, geography, or art principles, this is a great project for kids.


Tapa Cloth Lesson Project


I first heard about Tapa cloth on a visit to Tonga, where my parents lived for two years. The women in South Pacific countries (like Tonga and Samoa) cut down mulberry trees (3 inch in diameter), strip the bark, soak the bark, strip the inner bark and then pound out the fibers with wooden mallets against a flattened log. This widens the strips, but thins them enough that a second layer of bark fibers need to be pounded together for strength. 


These strips are later combined, with a tapioca flour paste, with other strips to make a larger cloth. Long tables with a village's traditional pattern carved into the top allow the women to do rubbings with brownish pigment. 

They work in outdoor pavilions or in the grass, to enhance the rust brown pattern with by painting black ink onto the cloth.

Geometric patterns, or organic symbols such as flowers or turtles are common. I used this assignment to bring some south pacific culture to a lesson on ART PRINCIPLE: repetition/pattern. It also kicked off our unit on TEXTILE ARTS.


My students made crayon rubbings on fabric with their own design. Thin plastic braille book covers were easy to cut into circular or petal shapes, but mat board ended up working better for the rubbings. Students could tape the shapes they arranged to the table and put a piece of paper on top, before rubbing it with the side of a brown crayon to see if they liked it. Woven fabric (unlike authentic tapa) was a little more challenging since it stretched as it was rubbed.


Then students added black marks with everything from puffy paint (for the students would couldn't see their pattern), acrylic, and sharpie markers, before going back to add some more brown watercolor to accent the color).

Tapa cloth is the most important object to Tongans. The process is handed down through generations of women. The product is one that is fit for royalty and is a gift for very special occasions such as births or weddings. It was fun to share Tongan culture, music, and art with my students, as they explore a new medium and process.


Friday, November 13, 2020

Build a Bug

As my students finished up our Elements of Art (line, shape, color, value, form, texture) Unit and embarked with Principles of Art (specifically symmetrical balance), we bridged the two with animal kingdom content. This week we studied invertebrates through insect documentaries and articles. They learned about the parts of an insect (head, thorax, abdomen, antennae, six legs, wings, compound eyes, etc.)
Did you know that out of every 4 animals on earth, 3 are insects? There are 10,000 species just of ants and probably 10,000 more waiting to be discovered, each as different from each other as a tiger is to a rhino. Some are hunters, some scavengers, some farmers. But all are symmetrical. 

I had images and magnifiers for students with low vision and plastic insect models for my students who are blind to feel. A line of symmetry can be found on each insect.


Everyone wrote 5-10 insect facts to share before trying to build their own kind of bug. 

If they wanted to switch it up and do a spider, or add more legs, that was their choice. I had craft foam, pipe cleaners, egg cartons, clothes pins, puff balls, wood pieces, paint, markers, google eyes, buttons, tissue paper on hand for students to find their own solution.


The end product was not the display cases of tiny, original, detailed, jewel like insects I had hoped for, but special education is about process. And if they are more aware of insects and symmetry in the world around them, then mission accomplished.


Hybrid Animal Taxidermy Assignment


Teaching form and texture can be fun through this interdisciplinary lesson about the animal kingdom. My class and I spent our week studying types of invertebrates: birds, fish, amphibians, reptiles, and mammals. Students were expected to know characteristics of each group and give several examples. Then they were tasked of combining a couple of animals and coming up with a name: a giramingo or a koalasaurus. They were to invent three animals and explain the habitat and diet of each. This is not a new exercise of creativity when you consider creatures from ancient literature such as the gryphon, pegasus, unicorn, and phoenix. (This is a great way to incorporate literature into the week as well.)  

Ideas were shared, critiques were had and favorites were picked. Some of the problems came from students combining two animals that were too similar: possum and armadillo, ostrich and flamingo. Or they would just attach one head to another's body. That's fine, except that we were doing paper mache versions taxidermy that would basically be mounted heads, so you'd have to have characteristics of multiple animals represented in just the head. Some ideas were used to swap the texture of one animal with another, such as a feathered mouse. (Shown above: pandabull, pigacorn, green scaled sand eagle, and glue feathered mouse.)

Students at home had the options of making drawings or creating 3D sculptures using salt dough. I walked them through the process via video meeting and they were to bake and add texture on their own. One student created an image of her hox (hawk-fox hybrid) on her phone using Ibris Paint X.

 The salt dough recipe is easy: 1 cup of salt, 2 cups of flour and a cup of water. Start with dry ingredients and drizzle the water in little by little so it doesn't get too wet and sticky. You might not need the whole cup of water, but clearly this student's dough is too crumbly so I was watching through video and telling him to add a little more. 


Once the animal is formed it can bake at 225 degrees for a couple of hours. One student made a glittery rainbow snake, which opened the door for me to share Australian Aborigine folklore and origin story of the rainbow serpent.


Festival of Trees: Helen Keller's Garden by Georgia Academy for the Blind


The Museum of Art and Science in Macon, Georgia is now having it's annual Festival of Trees. This is a chance for the community to come together to build bridges, while helping raise funds for the museum. I worked with my art students to represent our school by making paper flowers for our Helen Keller's Garden themed tree. Helen Keller was such a gifted writer, so I printed four pages of her quotes to inspire people during this miserable year, and included a range of colors of flowers to represent diversity. I think people with disabilities too often get left out of conversations about diversity in work places and diversity, so this was our way of advocating and showing that everyone deserves a chance to grow in the garden of humanity.

I taught about "form" and "analogous color schemes" during flower week since we were in our Elements of Art unit, so it all come together: standards and application, form and content. 

Happy Thanksgiving, Hanukkah, Kawanza and Merry Christmas everyone!


Thursday, November 12, 2020

Back in School?


Needless to say, this 2020-21 school year has had a rough start for teachers, students and parents across the nation. My daughter's school did 100% online classes for the four weeks of August, and then students, like her, who chose to go back had to wear a mask 8 hours and social distance. She stays home Fridays to take tests and hand in writing assignments online. My husband is teaching his college art classes as hybrids for the first time ever. My sons' college classes have mostly gone online with just a few exceptions, such as art and science labs. For me, teaching art at a school for the blind, was challenging enough; teaching it virtually feels nearly impossible. Hands on experiences are so important. I have a few students coming in person, so I feel like I'm screaming through my mask into the computer to my virtual students, while my face-to-face students sit half way across the room. I've had to create a lot of writing assignments based on videos and slide discussions: big questions like "What is Art?"and "Why do people make Art?" to small questions like, "What is one new thing you learned today?" I've been doing a lot more talking than I'm used to, and my throat can feel it.

We spent the first couple weeks trying to learn the platform: Teams. I posted assignments to Teams, and students could turn their work in there, or to a shared One Drive folder, or email me their work.  A couple of student uses paper and a Perkins Brailler and then read their work to me via video. There are readers on computers to help them navigate and hear the text. I also sent assignments out in Braille. 


Above a student is taking his turn reading (in Braille) a portion of the syllabus while a couple of his peers listen from across the state. 

Putting together weekly care packages of supplies has felt like a part time job. I have to think ahead a couple of weeks and gather materials for several versions of the project, so that students still have choices. And it's been hard to see supplies leaving my room, knowing that I'll never see them again. Plus there's the problem of students who can attend virtual classes from almost anywhere but forget to take their packet of supplies to do projects, or can't figure out where their supplies are or which supplies to use since they're getting materials from other teachers too.

Meanwhile, the students who have come and used the materials I have on the table are able to focus on completing the project and learning the standards without all the distant learning chaos and technical difficulties.

I can't imagine that our schools are going to be functioning full capacity any time soon. Teachers who are feeling end-of-April level of burn out in September have had to push forward, as did the students. But by giving it our best, things have gotten in easier and we're probably better off for having learned more platforms and ways to solve problems.
Above: a virtual student points his lap top camera towards his work so I can walk him through the process of his analogous watercolor composition

It's still not idea, but now that we're in November, everyone has managed
to figure out their own routine. Students have come in and out of quarantine after being in contact with someone who tested positive for Covid, and once the school shut down for 10 days for cleaning and everyone worked from home. The numbers are higher than they were at the beginning of the school year, so we're still taking precautions. Hopefully, everyone will be able to come back for in person school in a couple of months and I can start filling my shelves, and walls and kiln with student work.