 Last week, I had my students decorate their own houses as part of our architecture unit. We watched a video about Frank Lloyd Wright's amazing house, Falling Waters, and discuss the importance of architecture in our daily lives. We talked about the parts of a house (eaves, balcony, columns, etc), and why building designs include floor plans and elevation plans. Each student got a pre-fab house with their own royal icing bag, and candy collection. There were plenty of extra graham crackers for garages, car ports, dog houses, chimney's etc. One student even decided to add on a second story. Experiencing the curriculum in 3D is very important to blind and visually impaired students, and making something edible ups student engagement quite a bit. Happy house building!
Saturday, December 24, 2016
Graham Cracker Houses
I have made graham cracker houses every December since I was a child. These are used as center pieces as well as gifts to be given away while Christmas caroling. In high school, I had friends come for a house building party, and now as a mother of teens we continue to make it an event. There have been several years when I have built 25 houses or so to take into my son's class as a party activity, and once, I think my friends and I assembled about 75 for a church party.
 Last week, I had my students decorate their own houses as part of our architecture unit. We watched a video about Frank Lloyd Wright's amazing house, Falling Waters, and discuss the importance of architecture in our daily lives. We talked about the parts of a house (eaves, balcony, columns, etc), and why building designs include floor plans and elevation plans. Each student got a pre-fab house with their own royal icing bag, and candy collection. There were plenty of extra graham crackers for garages, car ports, dog houses, chimney's etc. One student even decided to add on a second story. Experiencing the curriculum in 3D is very important to blind and visually impaired students, and making something edible ups student engagement quite a bit. Happy house building!
Last week, I had my students decorate their own houses as part of our architecture unit. We watched a video about Frank Lloyd Wright's amazing house, Falling Waters, and discuss the importance of architecture in our daily lives. We talked about the parts of a house (eaves, balcony, columns, etc), and why building designs include floor plans and elevation plans. Each student got a pre-fab house with their own royal icing bag, and candy collection. There were plenty of extra graham crackers for garages, car ports, dog houses, chimney's etc. One student even decided to add on a second story. Experiencing the curriculum in 3D is very important to blind and visually impaired students, and making something edible ups student engagement quite a bit. Happy house building!Friday, December 16, 2016
Quilled Christmas Ornaments
 Paper and glue. Supply lists don't get much simpler than they do for quilling projects. Various widths of quilling paper can be bought online or at craft supply store. I used a paper cutter and cut strips of construction paper 1/4" wide. Rolling the strip of paper around a toothpick makes a tight circle, but if you pull the toothpick out of the center and let it relax, you can determine the size of the circle you want as an end piece. Use a drop of glue to tack down the end and keep it from unwinding too much. Then you can play around with pinching a side to make a tear drop shape, or two opposite sides sides to make an almond shape. Three pinches make a triangle, four a square...you get the picture.
Quilling can be used to make greeting cards, pendants, and earrings, for any time of year. Maybe now's the time you get out your paper and glue.
Gingerbread Themed Christmas Sets

This year, I was given the green light to take the sets for our school winter concert sets any direction I wanted, so I directed myself towards a gingerbread theme. Yum! I had two high school students help me hone the idea, transfer my drawings on to 4 8'X4' panels, and paint the large areas.

Part of this theme came from wondering if there was a way to transform our giant (6 foot tall) Snoopy dog house from "You're a Good Man, Charlie Brown" into a gingerbread house. The top had been flat, for Snoopy to use as a singing platform then; but I talked the set builders (horticulture teacher and two other students) to raise the roof, and close the front and back triangle shaped hole. The wood didn't fit exactly, but a little masking tape was used to cover the gaps, and with enough brown paint, no one can tell from a distance.


It was strange to see our spring musical images covered up little by little and gratifying to see a whole new look.
We also got to paint a Santa Sleigh for a student Christmas party photo op.
 The day we took the panels out of my classroom to go to the stage and lobby was a bitter sweet day. My classroom feels like my house the day on January 2nd: almost naked and stark without all the holiday cheer, but also cleaner and bigger. The program today was wonderful, and I'm so glad I got to help.
 Friday, December 9, 2016
Foam Christmas Ornaments
 When my sister asked our mom for advice on how to choose a preschool for her oldest son, Mom said something to this affect: "Go tour the school and look at the artwork hanging in the hall. If every piece looks the same, then you are in the wrong place." I know what she means. Schools are full of well intentioned, but misguided, parent volunteers (and even some teachers) in elementary schools, correcting children for putting the colored foam feathers on their turkey magnet kit in an order different from the manufacturer's photograph. Of course that's fine if you are raising sweat shop workers, but not if you want to encourage creative thinking skills.
Craft foam is in expensive enough that if one idea is a flop, trying a second and third time is not a big deal. These ornaments were made by some of my elementary students this week and I'd like to think that if a mother were coming to check out our school, that she would notice the variety in every piece of my students' work, whether in the hallway or on the Christmas tree.
Wednesday, December 7, 2016
Squiggly Lines Op Art

Most Op Art projects are formulaic and therefore not hard to do, but they yield a wow factor. Plus it is just fun to talk about optical illusions, even to students with optical challenges.
For the squiggle project, you draw curved lines from one end of the paper to the next. Most of mine went top to bottom for a horizontal piece of paper. Then they drew a curve from the middle of one line to the next, like a smile. When you get to the next line make it a frown, and continue going smile, frown, and switching direction at each line. After that every line above the line will be frown lines, and every line below the line will be similes. This is the same principle that is used when drawing cylinders with the horizon line (eye level) somewhere in the middle.

For my students who have no vision, I used hot glue to trace their initial lines, so they could draw their "smiles" and "frowns" within those boundaries. Then I created construction paper stencils of crescents of various widths and thicknesses. I would have to help pick out the right size stencil, but at least these students could color their piece independently.


It is not only the repetition and color contrast that creates the optical illusion, but the value. By shading the colored pencil on the edges, or the ends of each crescent shape, it gives the illusion of three dimensions. This project took a couple of weeks, but it was well worth the extra time to see the sense of accomplishment in my students' faces for a job well done.


Sunday, December 4, 2016
Pasta Angel Ornaments
Angel ornaments are very inexpensive and easy to make. Once you have the supplies you can make a couple dozen in an evening, which is something I did as a poor newly wed. They hold up fairly well considering the fact that they are made from pasta. The one pictured here has gotten by with just a chipped wing from the 16 years of use.
 Start by gluing a hairline on a small (about 3/4") wooden ball , and filling it in. Elmer's is fine. Dip the ball in a cup of frog eye pasta or couscous. Then take a piece of bowtie pasta to use for the wings. Cut a second bowtie, with kitchen sheers, and use that half for the skirt. Hot glue the head and skirt to the wings, before adding 2 pieces of elbow macaroni coming in towards the center of the wings. These are the arms. Make as many as you'd like before lining them up to spray paint white. A few coats front and back will do the trick. Hot glue a small ribbon bow and craft store flower over where the hands would be a small loop of tiny beads for a halo, and a loop of ribbon to use as a hanger. I still have a couple that I made 17 years ago with my friend Missy Stowell. This isn't a kid friendly project since the hot glue burns, but it makes great gift toppers. I have happy memory of Missy Stowell showing me how to make these, and am happy to share the joy with you.
 Start by gluing a hairline on a small (about 3/4") wooden ball , and filling it in. Elmer's is fine. Dip the ball in a cup of frog eye pasta or couscous. Then take a piece of bowtie pasta to use for the wings. Cut a second bowtie, with kitchen sheers, and use that half for the skirt. Hot glue the head and skirt to the wings, before adding 2 pieces of elbow macaroni coming in towards the center of the wings. These are the arms. Make as many as you'd like before lining them up to spray paint white. A few coats front and back will do the trick. Hot glue a small ribbon bow and craft store flower over where the hands would be a small loop of tiny beads for a halo, and a loop of ribbon to use as a hanger. I still have a couple that I made 17 years ago with my friend Missy Stowell. This isn't a kid friendly project since the hot glue burns, but it makes great gift toppers. I have happy memory of Missy Stowell showing me how to make these, and am happy to share the joy with you.
Friday, December 2, 2016
The Memory Tree

"Where's the glass fish from Chicago?" My daughter asked as we unpacked the Christmas ornaments Sunday. "And has anyone seen the tiny teapot from Chile?" I added. Each ornament carries a memory and so we search, find, reminisce and hang with purpose each year.
The family memory tree tradition, from my childhood, was featured in a 1970's 3/4 page news paper article. (My town was tiny enough for this to count as news). My parent's tradition of buying or finding an ornament on every trip, has now carried on to a third generation and it has been successful for several reasons.

You save money on souvenirs.
My family doesn't feel the need to buy $30 sweat shirts for everyone to prove we've been to Philadelphia. We buy our mini Liberty Bell for six or seven dollars, and treasure it, years after everyone would have grown out of the shirts. We take lots of pictures and video, but in terms of tangible objects, it is usually just something that fits into one pocket. Spend less, travel light and see more sites.The Search is Fun!

The quest for the perfect ornament on each trip feels like a treasure hunt. We look past most of the things in gift shops and focus on something that would work as an ornament, like a small toy or a key chain. We may spend several weeks traveling to many states, but we are in search of thing that will represent our trip, something that we love. We've found a tomahawk from the Smokeys, a tiny sock monkey from Vermont, and a celtic knot from Ireland.
Found objects are our often favorite things. My son found a piece of driftwood on a walk in Niagara Falls, NY that looks like a shepherd's crook. We collected a few sea shells from the beautiful shores of Tonga that now hang on our tree.

Happy memories bring more happiness.
We write the name of place and year on (the back or bottom of) each ornament and so as we decorate the tree we remember and discuss the trips we took. This is not a commercial tree to be admired once or twice for matching glass balls, but a meditative experience. During December, I often find myself staring and reflecting on the time I've spent with family, the amazing things I've experienced, and it brings me a great deal of gratitude and satisfaction.Eclectic Tree give a home to odd-ball ornaments.


The Holidays are about People
My father-in-law died right before the holidays, last year, and we were overwhelmed at the number of collections he had, one of which was a wooden duck collection. Rather than feel the need to keep all of his things, we took a very small duck, put an eye screw on the back, and now each time we see it on the tree, we think of him and remember that "grandpa collected ducks."
My former teacher,and good friend, Jean, made homemade ornaments for my children for years. I think of her every time I look at the tree. Christmas should bring us closer to distant dear ones and their memories. Even if these aren't souvenir ornaments, they're still an important part of having a memory tree.
I create visual unity by by using red ribbon on most of the ornaments. And I use plenty of handmade, repeated ornaments too; (stay tuned for ideas on home made decorations.)
Decorating a memory tree brings more thought and meaning to the season and has become a favorite tradition of mine. In case of fire, I'm grabbing the ornaments.
Friday, November 25, 2016
Popsicle Stick Kazoos
 Making instruments is a favorite art activity for my students with multiple disabilities. Because they are all legally blind, having and end product that makes sound is more meaningful than a drawing that they can't see.
A rubber band, 2 popsicle sticks (tongue depressors), two 2"X3" pieces of construction paper or card stock, and some tape are all that is required for a child to make a simple kazoo.

 The popsicle sticks can be decorated with colored tape or sharpies. Don't use regular markers that will run when they get wet and color the young musician's mouth. Stretch a thick rubber band around one of the popsicle sticks. Then fold each piece of paper 3 times (alternating direction), and tape the paper to the ends of the other stick. Sandwich the two sticks with the paper in-between and wrap tape around the outside two ends.
Hold the kazoo to your mouth like a harmonica and blow. It will sound like a little party horn.
The giggles that come from my students once they figure out how to work their kazoos are even better than the sound from the instrument.
Be sure to have enough supplies on hand for your child to experiment with various widths of rubber bands and thicknesses of paper to get the best sound.
Sunday, November 6, 2016
High Contrast Compositions
 Value subtleties are often lost for people who are visually impaired. The higher the contrast, the easier it is to discern shapes. I thought it would be good to teach about contrast in art by having students limit themselves to white paper and black or a dark color. I had them draw or trace shapes that overlapped. X's were drawn on every other shape to give the composition a checkerboard affect. This process only works as long as 3 lines don't intersect (as in the letter "Y"). It has to be an even number of lines coming together at intersections. Then the students were asked to paint or color the shapes with the X's.
Students with almost no vision, used Wikisticks to trace stencils. The student who made the piece to the right, chose water color as his medium.
Tuesday, November 1, 2016
Wire Elephant Wall Art

I was recently commissioned to make a wire wall hanging, and my wonderful client was very specific. She wanted an elephant with the trunk raised. And a baby elephant. Three Greek letters. And lots of color.
I am always nervous about doing commissioned work because I can't see the imagine in the patron's head and I don't want to disappoint him or her. But when I repress fear, do my own thing, and try to have fun while doing it (which was pretty easy in this case) things usually work out.

I started out with a large drawing (3 foot X 4 foot) and bent the wire to follow the lines. I held the wire in place with tape, until I could use more wire, fabric, and mesh to hold it in place. thinner, plastic coated wire and copper wire worked well to hold glass beads and curls. I used upholstery fabric samples, fabric glue or hot glue to create large areas of color, tissue paper, yarn, pipe cleaners, tiny pieces of painted cardboard, buttons, and foam, add a little variety and activate quieter spaces. A couple hooks on the wall will hold the wooden dowel from which the piece hangs.
It is always gratifying to finish a piece and see a smile on a patron's face.
Monday, October 24, 2016
Assemblage Project

A few weeks ago, my class studied the amazing artist, Louise Nevelson, and each student created their own, Nevelson-inspired, assemblage sculpture.


Saturday, October 15, 2016
Ceramic Lanterns from Slabs
 Every time I think I'm going to run out of ideas for ceramic lesson plans, another idea pops up like a light bulb over my head. Only instead of a light bulb this time, it was a candle light, shining from inside a clay lantern. I recently dusted off the slab roller and students got busy rolling out slabs of clay.
Some of my students created cylinders, in which a candle can be placed underneath a covering or inside a little doorway.
Others created boxes with opened tops, or in the shapes of houses in which the roof could be removed to place a candle inside.
 This lesson is a great way to teach about form and function, as well as negative shape and the technique of slip and score. I just got these babies out of the kiln, but I can hardly wait to see them painted or glazed, and lit up from within.
Tuesday, October 11, 2016
Foil Paper Art
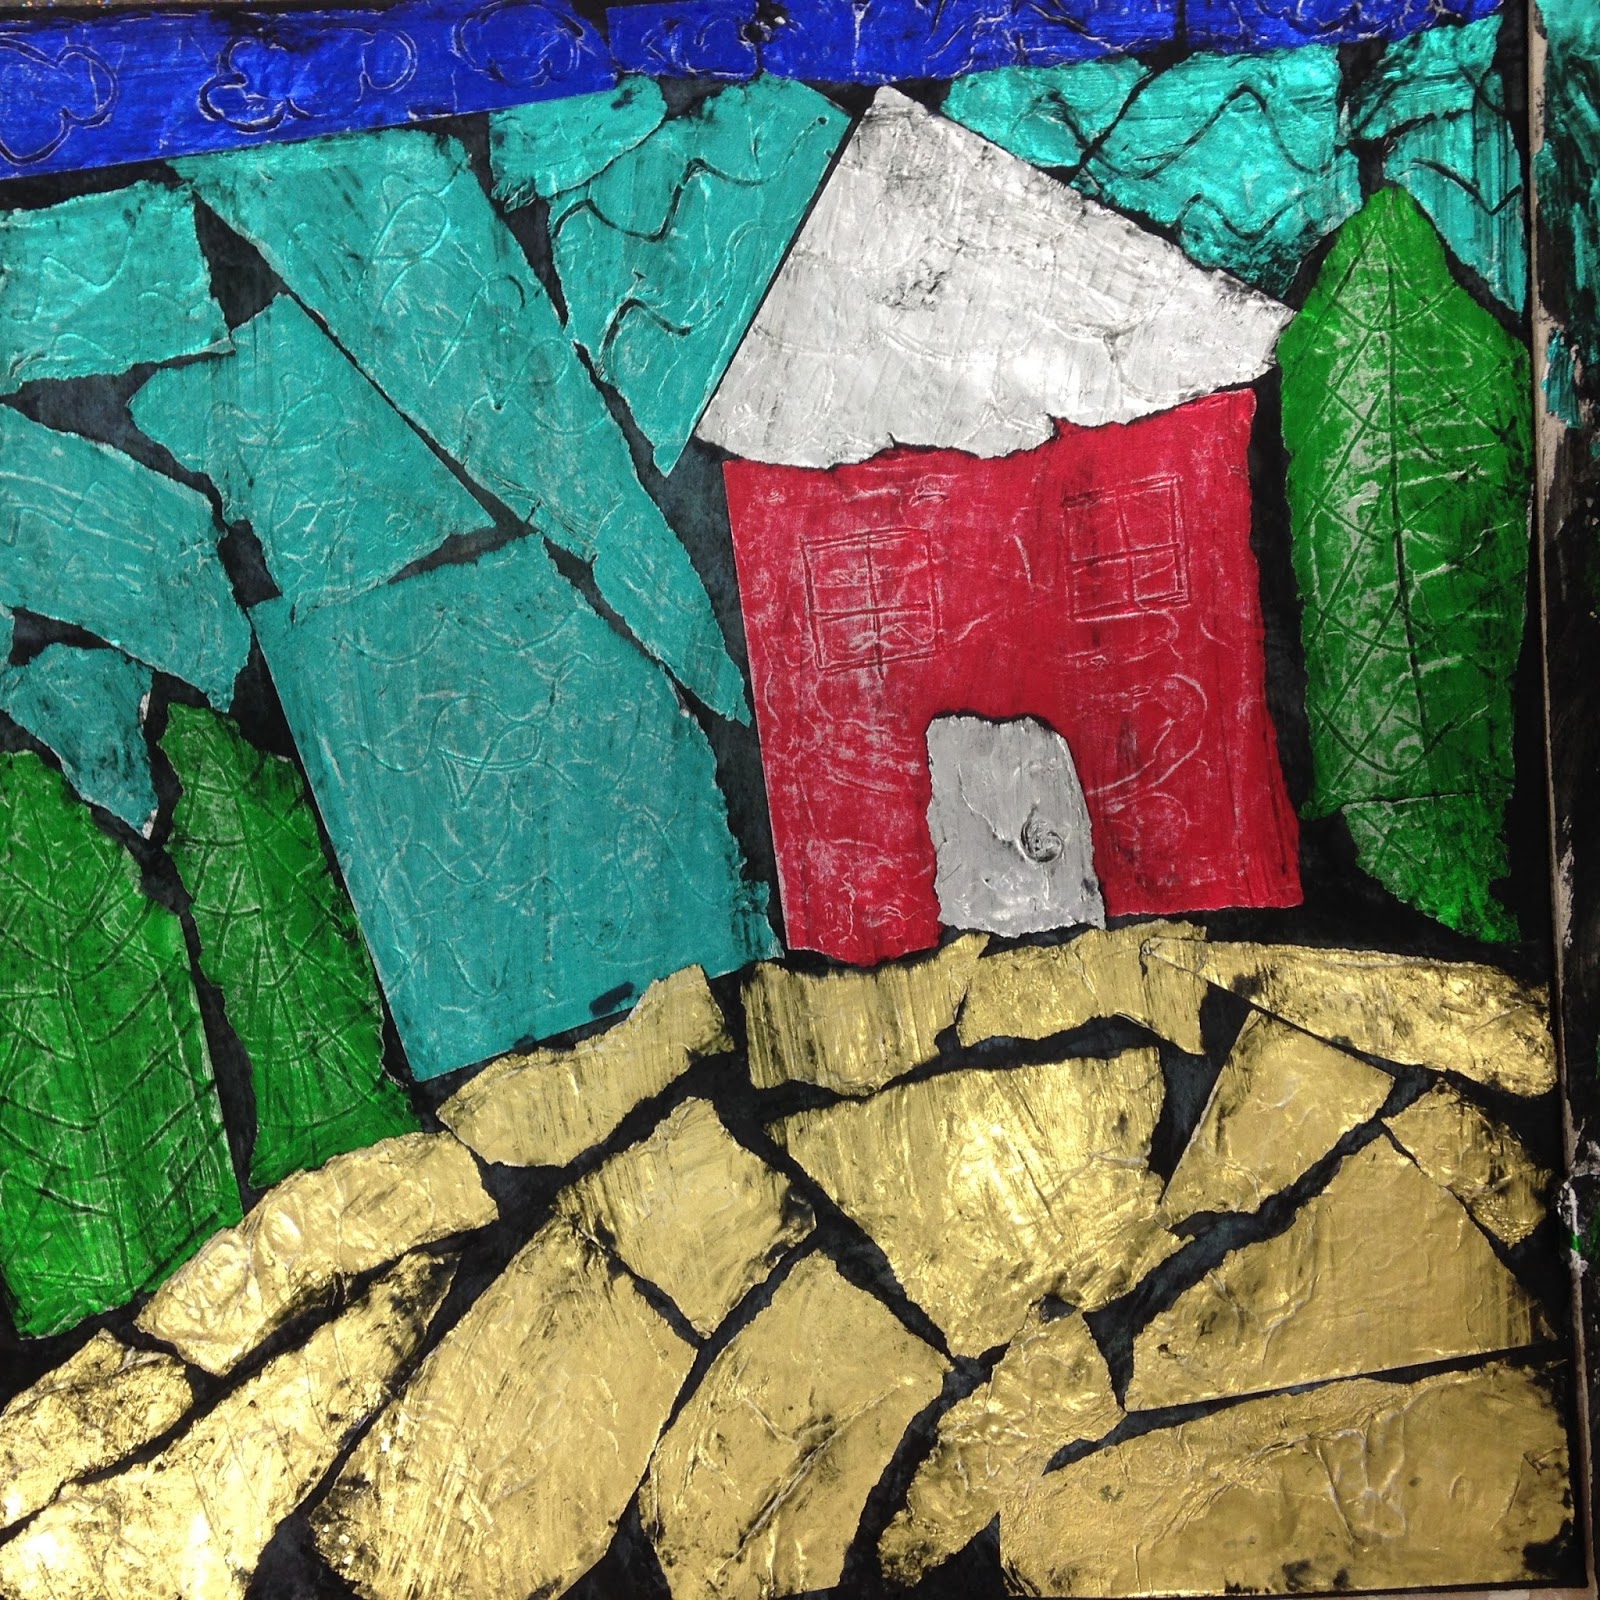 My art class just completed a week dedicated to Austrian symbolist artist, Gustav Klimt, whose use of gold and pattern helped usher in the Art Nouveau movement. Last year's film, Woman in Gold, was about his most famous painting, Portrait of Adele Bloch-Bauer, which is hailed as the "Mona Lisa of Austria. "
 In the spirit of Klimt's metallic looking paintings, we made landscapes and figurative images using foil paper. This lesson plan idea was courtesy of art supply company, Dick Blick. My students each drew an image on chip board (although paper would work as well). Then they filled in each shape with color by gluing torn foil paper onto the board. Little cracks between the paper work well to break up the space. Several students used used plastic tooling tools to emboss a pattern onto the foil. And then they used black tempera to cover the entire image. When the paint was almost dry they wiped the it off using a damp paper towel, which gives a vintage feel to the piece. It was a trick getting the right amount of rubbing, as too much will take the color off the foil, and not enough will keep the color from being revealed.
Some students drew directly from posters I had of Klimt's paintings, while others chose to represent their interests (such as the Nike shoe below).

Wednesday, September 28, 2016
Leaf Stencils
 Fall has officially started and it is the perfect time to explore the many types of leaves before they're gone. I took my students on a "scavenger hunt" last week, for as many different shapes and sizes of leaves as we could find. While collecting leaves took up most of the class period, the art project itself only took a minute. We simply set a few twigs and leaves on a sheet of paper outside, and spray painted them and the paper around them. When we picked up the leaves, the shape was documented as negative space. The documentation of the leaves will last years after the actual leaves shrivel and turn to dust. I love the ephemeral quality of the finished products and the instant gratification of this project.
My friend, Matt Forrest helped me teach the concept of stenciling on a deeper level by making silk screen of a few of our spray painted images. My students learned how to pull serigraphs (screen prints) with textile ink. While the ink was wet, my students dusted the images with flocking which gave a fuzzy texture. The second day and added process was worth it to make the images more meaningful for my students who see with their eyes.
Saturday, September 24, 2016
Foil Relief Sculptures


Sharpies were used to add color, without decreasing the reflective metallic look. It is always my goal for visually impaired and blind students to be able to paint or color independently, and having the raised lines as boundaries allowed them to do that.

Thursday, September 22, 2016
Inspired by Origami
 The Museum of Art and Science in Macon, GA currently has a wonderful exhibit of New York artist, Gloria Finklestein's work from the 80's and 90's. The pieces have titles related to Japanese culture, such as "Obon" (the sash one wears around a kimono) and "Hanabi" (which literally translate's into "fire flower" and means "fireworks"). The title of the show was "Origami Interpretations," so to prepare my students for our field trip, I had them make several origami objects. We started very simply with a cat and/or dog and tried to use tactile methods of making it more believable and meaningful for my blind students. They then chose whatever they wanted to make: boats, cootie catchers, balloons, boxes. We also watched Robert Lang's Ted Talk "Flapping Birds and Folding Telescopes" about new origami methods. https://www.youtube.com/watch?v=UNdD5Kxdkpg


 When a relationship is formed between a teacher and a museum, it can take education to the next level, and make a learning unit more memorable for the students who experience it.
Subscribe to:
Posts (Atom)