Monday, February 22, 2021

Japanese Brush Art

I got my Japanese calligraphy kit in Asahikawa 25 years ago. It is the same kit school kids carry to school to grind their ink and practice their brush strokes to master shodo (the way of writing). My low vision students appreciate the high contrast of black ink on white rice paper. My students were amazed at the fact that there is a phonetic alphabet called hiragana, and a separate one for foreign words called katakana, on top of the thousands of kanji characters. No more complaining about our 26 letter alphabet, which by the way, Japanese kids learn as well. I just wrote each student name in Katakana for them to practice.
Then we learned a few brush strokes for a bamboo ink painting. This was just a tiny sampling, as it would take hours and days for them to get very good at it, but there is something relaxing about repeating lines and trying to make them a little better each time. I brought in a piece of bamboo that is much taller than me and could be used to construct a hut, as well as the thin, leave covered bamboo shoots, cut fresh that morning. I showed them bamboo skewers for kabobs on the grill and bamboo paper fans, which they then used to write their name or paint a bamboo image.

Paper Lanterns

 A student reminded me this morning, during a discussion about Japan, about the type of homemade paper lanterns that I had made in elementary school. It took me back to the night we sang "Sakura" (Cherry Blossoms) in a spring school concert with our 2nd grade faces lit via flashlight through our paper lanterns. As soon as everyone finished  today's art project in my 2nd period class, we got busy doing this as our second since they don't take very long to make.

The lanterns can be made with card stock, construction paper, or copy paper of standard size, any color. 

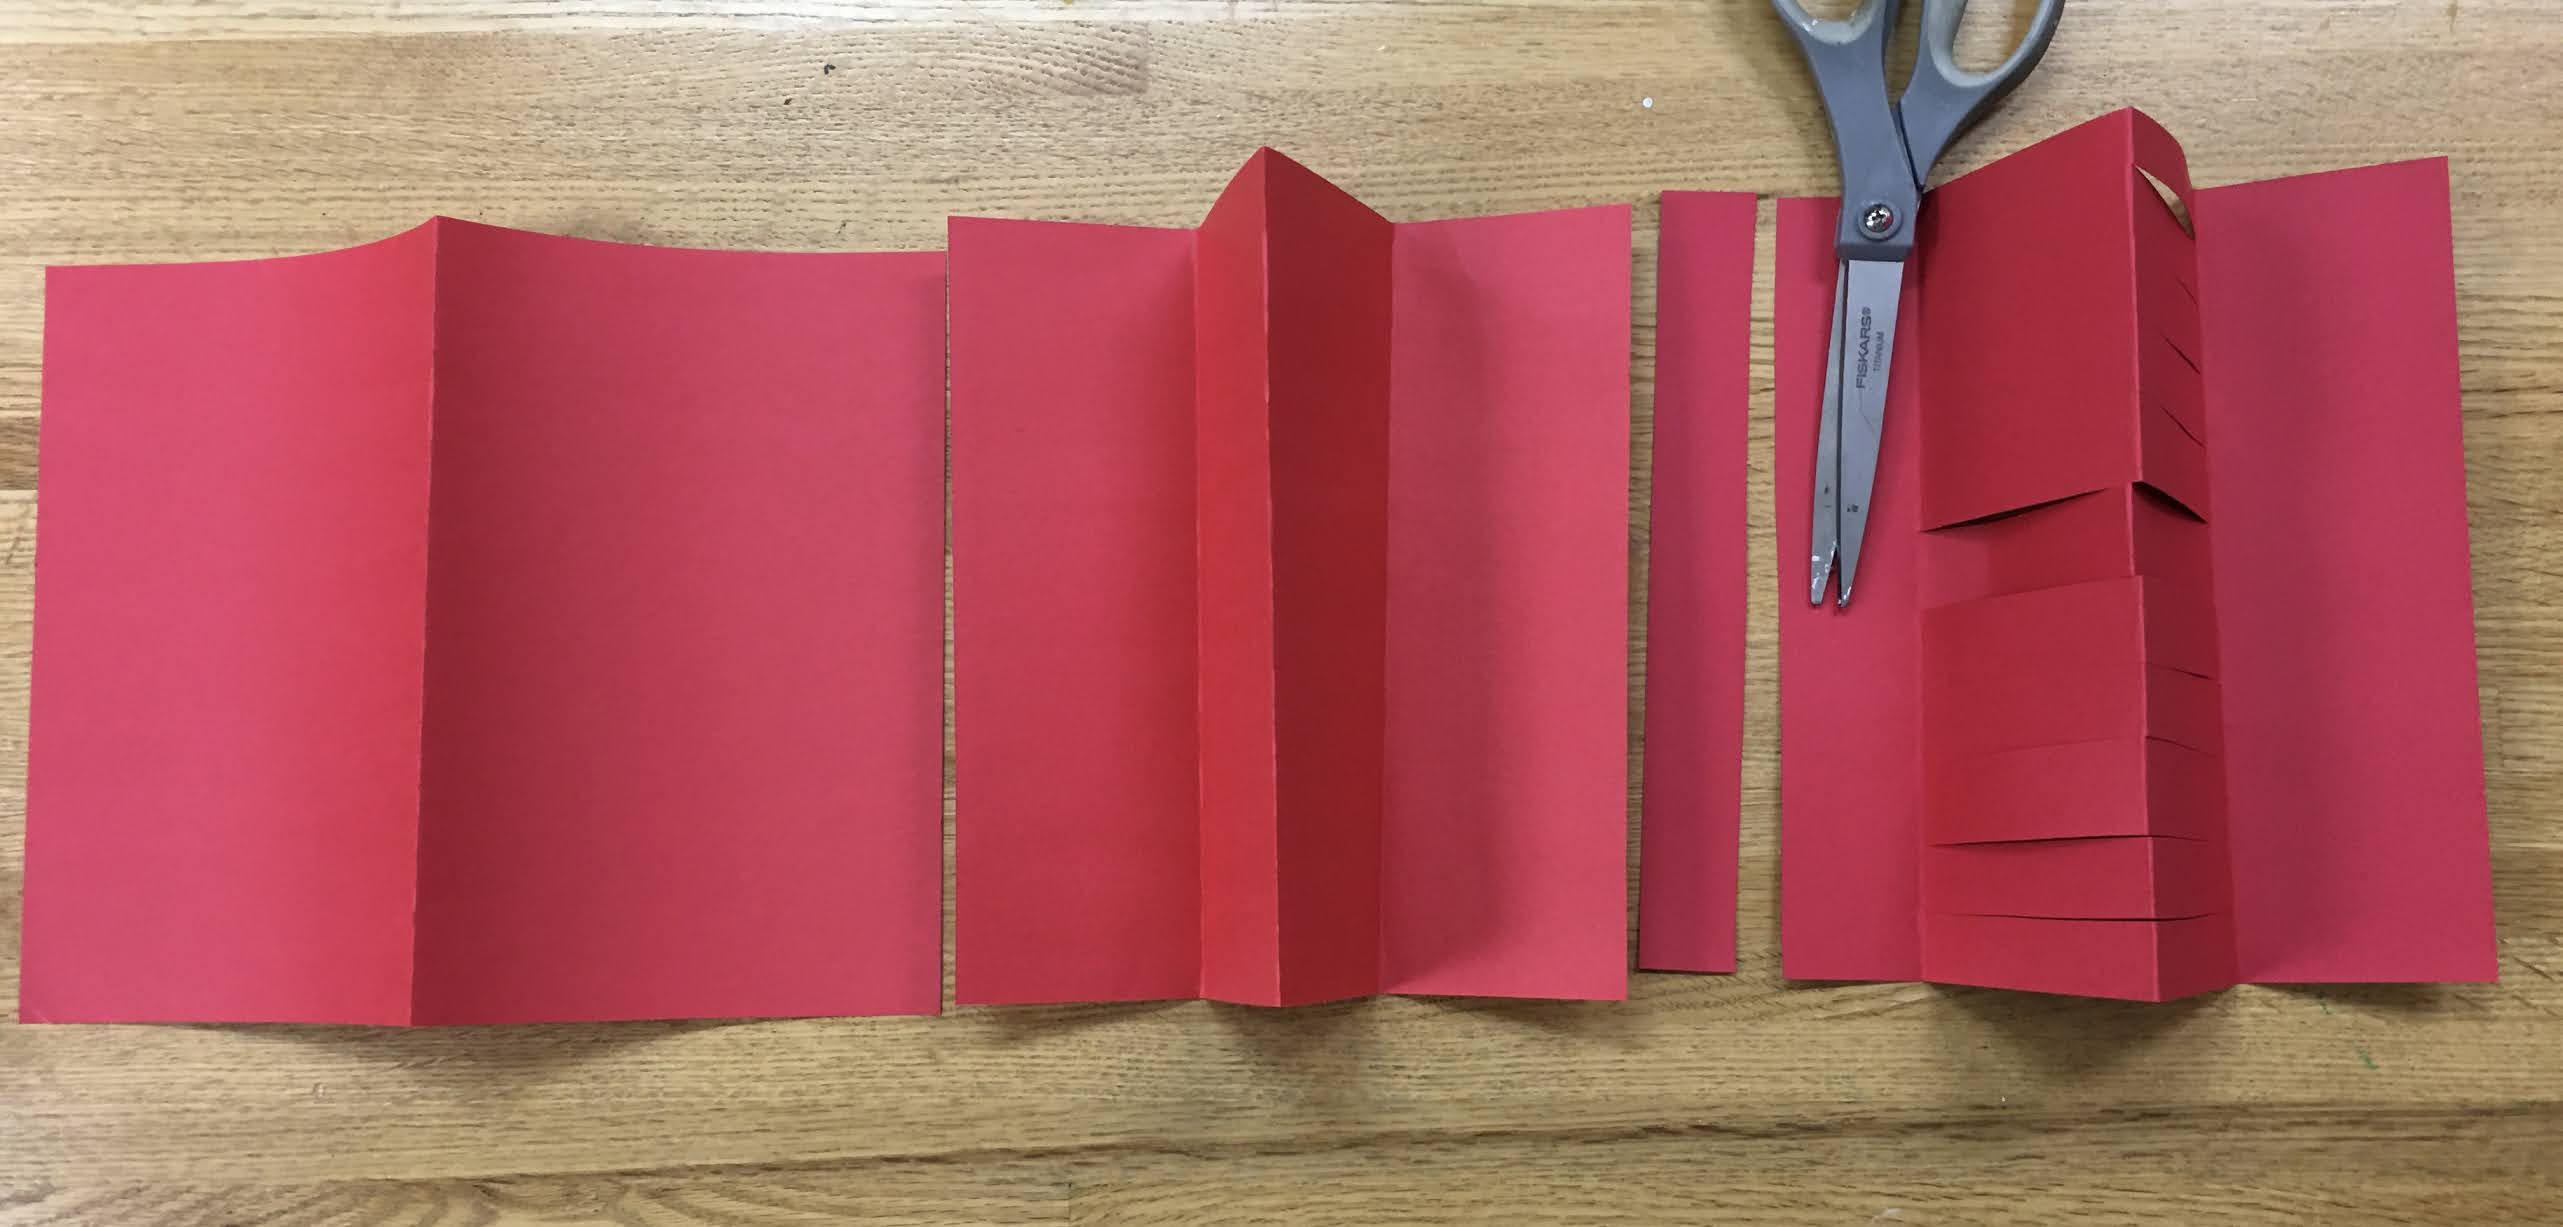
To make one, you fold the paper horizontally and make a vertical fold in the center, then you make two more vertical folds a couple inches from the center going opposite direction from the first fold. Wider folds with make a wider, shorter lantern.Cut slits, 3/4"-1" apart from the center fold to the outer folds. And cut a strip off one of the ends, for a lantern handle.


Then you make a cylinder by turning the paper vertically and wrapping the ends to overlap. Glue the top right to top the left of the lantern,  and bottom right to bottom left.  Add the lantern strip to the top and use a flashlight at the bottom to make the magic. They're not quite the same as the white and red Japanese paper lanterns that you find at celebrations such as the Cherry Blossom Festival, but they're fun to make and use.

One student made a larger version out of poster board. The weight of the top caused the sides to collapse when it sat on the table or to stretch straight when being held by the handle, so a couple of bamboo skewers were hot glued top and bottom to the inside of the lantern to keep the right shape with the slits open all of the time.  I'm glad such a simple activity could provide a chance for creative problem solving and a source of pride.


Origami Puppets


We called them cootie catchers when I was in elementary school, most kids today call them fortune tellers. Eight numbers are written on the outside for a friend to choose from, so you can open up and then out that number of times, then they choose from a color in the inside and the color is spelled out. This time when a friend chooses a color, the flap is opened and something fun is written on the inside such as "Someone in our class thinks you're cute." This can be done to inspire story prompts or even art projects if the inner panels say things like "squiggly lines" or "curvilinear shapes."

We used this simple origami exercise to make puppets. It was part of our week in Japan learning about culture and art forms such as origami, kirigami, calligraphy and brush and ink painting. We took virtual tours of Japan, handled artifacts, and tried on kimonos.

The instructions are simple. You fold your square vertically and then horizontally opening it after each fold to make a plus sign. Then you fold the paper diagonally twice with opposite corners to make a multiplication sign. The third step is to have all four corners come to the center lining up with the lines from the plus sign. Make your creases sharp. Flip the piece with the top side towards the table and then do the same thing on the back: each corner coming to the center.


Flip it like a pancake again and re-crease the horizontal, vertical, and diagonal folds. Then push the corners in to make four diamond (squares with a diagonal vertical fold) sided shape. Carefully pull the single sheet of paper away from the center of each inner fold (I do this by putting my finger down inside the pocket.) and then crease that single paper so that it stays out. After doing it four times you are finished. Your fingers go inside the four divots. To make a puppet you can glue the two top compartments together and the two bottom together. Add eyes, lips, hair, tongue, whatever makes you happy. 


Monday, February 8, 2021

Valentine Mosaics

 After a week of studying about ancient Greece, my class moved on to learn of Ancient Rome. Mosaics weren't invented in Greece or Rome but that's where they were perfected, and Rome is full of beautiful micro-mosaics that look almost like paintings. Rome was home of something else too: a saint named Valentine. As legend has it, he secretly performed weddings for Roman soldiers who were forbidden to marry, and for this he was put to death. Another story of perhaps another St. Valentine (It seems there were a couple martyrs with the same name) says that he visited downtrodden and mistreated Roman prisoners gifting cards... or that he was a prisoner who fell in love with a girl who visited him, maybe the jailor's daughter and that he signed a letter "From your Valentine." The Christian based holiday of St. Valentine's was a replacement for the Pagan mating rituals of February, Lupercalia. Roman's went people being killed for being Christian to being killed for not being Christian. Valentine's Day today has references to both Christianity and Pagan history: St. Valentine, who was a Catholic, the Greek god Eros, whose Roman name is Cupid, and his mother, the Greek goddess of Love, Aphrodite, whose Roman name is Venus, although I'm guessing most people aren't thinking about religion at all when they sign their Valentine's Day card.

To make our Valentine mosaics, my students used hearts that were cut from painted or colored mat board, a smaller heart was cut from within, and smaller pieces of half a small heart at a time were cut and glued. It's too hard to keep track of very many cut pieces at a time, so we focused on 4-8 at a time. The other small half and then the outer heart, half at a time were glued into place leaving little cracks. We talked about the idiom "broken heart" and played a game to try to see how many song titles we could name with the word "heart" in it. Normally, I'm not a fan using art class to make holiday crafts, but it fit so well with the curriculum of ancient cultures and art history that I couldn't resist.  A glued piece of ribbon on the back makes it easy to hang on a wall or on the door nob of a loved one as a gift. Love big everyone!