Monday, April 24, 2017

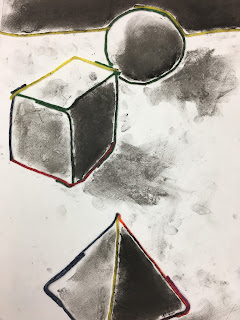
Value Drawing of Geometric Forms


Observational Drawing is probably the greatest challenge for students with visual impairments. If they can't really see what they are supposed to draw, how are they supposed to draw it? And it is especially tricky when the visual illusion of a 3D form is so different from the form itself. Take a cube, which is made up of six squares each with four right angles, but is drawn using three diamonds-no right angles. A cylinder is made with a circle on each end, but the illusion of cylinder requires the only circle included, to be replaced with an eclipse. 

For those who are completely blind, it became more of a lesson in following directions and learning about how sighted people see the three dimensional world with illusions rather than necessarily truth. They could measure size relations between objects with their hands and then try to replicate that with wikisticks.  Then it was a matter of explaining light sources and have them draw with charcoal on one side and smudging on the other.

My students may not become wealthy artists years from now, but they will be able to tell you the difference between a shape and a form (even many adults make the mistake of saying "3D shapes"), that the medium of charcoal is essentially burnt wood, and explain what value is and why it is important. Mission accomplished.

Tuesday, April 11, 2017

Paper Moon Project


The minute I found out that this year's prom was going to be at the Museum of Aviation with a "Fly Me to the Moon!" theme, I knew I wanted to build a paper moon photo booth.  These were popular in the 1920's when people would pay 5 cents to get a picture of themselves sitting on top of the moon.


 I started with an 8' X 4' piece of birch plywood, which costs about $20.  Then I taped a piece of string (about 4' long) to the middle of the board's side, and the other end of the string to a pencil. The string served as a radius, which I used to draw a semi circle.  I moved the tape off the board and changed the length of the string for the inside of the moon.  This took several tries. I added a nose and lips with my pencil.  The moon leaves a lot of empty space on the board, on the inside of the moon, and the corners. I used as much as possible to make various sized clouds and a star.  Then I got busy with a jig saw, cutting out each piece.

I painted the moon and clouds using house paint samples and acrylic. Then I cut small (3"- 5") pieces from a 2X4 piece of lumber, and nailed one or two wood blocks to the front (from the back) of a large cloud, before covering the front of the wood piece with a smaller cloud. This allowed for the clouds to stand on their own and give some dimension. Because I used finishing nails, touch up with white paint was very easy.  The moon was drilled to the front of a backless bench with 2 screws!


We covered cushions with black fabric and set them on top of the bench.  The moon was thick enough to stand on it's own, but we drilled the left over 2X4 to the side of the bench and tacked the top of the moon to it with a finishing nail, just for good measure. 7 ' long black fabric hung from a railing (we stapled it to itself) and then strings of paper stars spray painted gold hung down for bling.


If I had to do it again, I'd probably raise the bench on a little platform, so feet would dangle. I'd paint the support bar black, in case the photographer gets a bad angle and it shows. And I'd find a second light source (we used a shop light) so that there weren't such dark shadows coming form one side.

I used a 2nd piece of 4 X 8 plywood to make two more photo booth type areas, based on the hundred year old French film, "A Trip to the Moon."  I wanted the dance to have a vintage feel. The large man in the moon didn't work as well as I'd thought because people stood in front of it and all you could see was the eyebrows of the face. But the I cut holes for the rocket windows and people peeked out of those for some cute pictures.


For the dance floor I made 6 PVC pipe 8' X 8' squares, with cross bars at the bottom (2' legs coming out each side). We tied tulle around the middle, and strung it with lights. These frames weren't as strong as I would have liked and the logistics of hanging the lights was more complicated than I thought it would be, but it did add a nice visual to the dance floor and since nobody sneezed, they stood all the night.

I was given a decorating budget of $350, including the helium tank and balloons (which took about $100 from the budget).

As a teen, I lived for dances! I was happy with a gym, a handful of friends, good music, and maybe a package of cookies on a table. Although, I still believe that you shouldn't need much to have a good time, every once in awhile it pays to go the second mile and have a little fun with the process. 

Sunday, April 9, 2017

Story Quilt


The thing about quilting projects is that they can be used to teach a wide variety of subjects from Math to Art History and American history.  I grew up in the heart Amish country, Pennsylvania where the quilting tradition runs deep. Here in the south, it seems logical to talk about Freedom Quilts and the role they played in the Underground Railroad, with quilt squares that acted as a secret code to tell slaves follow the geese, the North Star, and pointed out safe houses. Slaves made quilts from flour sacks and used clothes to keep warm, and some times they sold enough quilts to buy freedom. I also taught about quilter Harriet Powers, a Georgian, a freed slave and self-taught artist whose quilt is in the Smithsonian.
We watched videos of the Gee's Bend Quilters and discussed the social and family history aspects of quilting traditions. We talked about how many of these celebrated women artists had the same name (Pettway) because they were descendants of slaves of Mark Pettway.  Pettway bought the plantation from original settler, Joseph Gee, for whom Gee's Bend, Alabama is named.

And since it was Black History Month, and we were on a roll, celebrating quilts by African Americans, we looked at the story quilts of Faith Ringgold, and the impact she had on the New York Art scene in the 1960's and 70's. Ringgold fought for the rights of black artists and women artists who were (and still are) under-represented in major museums and galleries. Her story quilts illustrate aspects of her life as a young girl in New York.

For the art production aspect of this lesson, each student came up with a story from their own life and illustrated it on fabric using fabric markers, liquid watercolor and puffy paint. Oh, did I neglect to mention that language arts was also part of the lesson? Students shared the stories with the class, and we used each block to make a class quilt, creating swatches of patterned fabric to use as boarders-Faith Ringgold style.

For more ideas on quilting projects, see what I've done in the past:
http://kristenapplebee.blogspot.com/2014/09/line-month-in-my-classroom-wire-quilt.html
http://kristenapplebee.blogspot.com/2014/05/mud-cloth-and-kids.html


Thursday, April 6, 2017

Signed, Sealed, Recycled, He's Ours! Trash Collage of Stevie Wonder


It may not look like diaper box and cookie bag at first glance, but look past the surface of this portrait of a star and you'll see hair made from spiral binding and foam, and sunglasses made from comb binding and plastic bag.  This project was born out of my friend and colleague's environmental science unit. Melanie Thompson wanted to show her students how garbage could be reused or repurposed into art, so she asked me to collaborate.  I had a large box, that I cut to make the background. We decided to do a portrait of Stevie Wonder, because all year Melanie has been sending out flat, paper Stevie dolls to friends who traveled to different countries and send pictures back. This has given students an opportunity to study the geography and environment of each place "Flat Stevie" has been. And he has been everywhere!

I printed a photo of the real Stevie Wonder and traced it onto an overhead sheet to project onto the cardboard.  Two low vision students did the bulk of the work, tracing the projection and painting in the general shapes to make the contrast between shapes easier to see.

Then they filled in each shape with pieces of clean garbage. and enjoyed figuring out what food package or discarded book material would work best for which part. I hope the real Stevie Wonder knows how much we admire him and I hope the students will think twice before throwing away something that could be turned into a piece of art.