Friday, March 31, 2017

Field Trip: Printmaking Workshop


Georgia College and State University treated my students like royalty on our recent field trip to their Art Department. We observed a sculpture and painting classes, did a workshop with photography, relief prints and screen prints. When I asked if we could visit, I never dreamed they'd walk away with 3 completed works of art. I am grateful to Matt Forrest for forming a partnership with me and my students. Here's an article and a video where you can see us hard at play:

https://frontpage.gcsu.edu/node/26198


Wednesday, March 22, 2017

Mask Making Mania


Mask making projects cover many important art standards. Through last week's lesson, we touched on the relationship between form and function, with a slide discussion on the purposes of masks (surgeonis mask, ski mask, catcher's mask, masquerade mask etc.). Then my students learned about various cultures as I let them handle masks from Africa, Tonga, Fiji, and Chile and discuss the purposes, characteristics and medium for each.


They learn about contemporary art. I met wonderful artist, Jill Foote-Hutton at her solo show at Wesleyan College. She was generous enough to leave some of the masks from the interactive part of her monster exhibition for me to share with my students. (Shown here). As a class, we discussed her aesthetics and paper mache technique.


My students also relearned to generate ideas through sketching. This student is completely blind and so he used wiki-sticks to convey his ideas.


They learned to build an under-structure, making their sketches into a 3D reality, using old cereal boxes, discarded foam, cardboard, and plastic bottles taped together. This teaches creative problem solving AND environmental issues such as how to reduce waste and reuse clean trash.
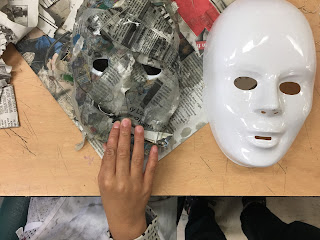
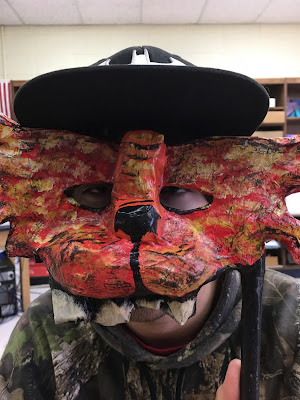
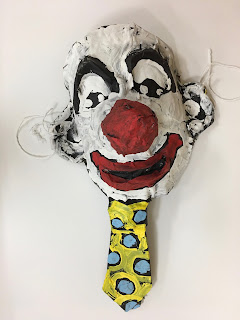
They learned the sculptural technique of paper mache. This is done by tearing newspaper strips with the paper grain, and using liquid starch to dip the strips. My elementary school students used pre-made plastic masks as a mold. Some high school students tried using paper pulp (paper in the blender with water) and glue. If liquid starch is hard to find, a mixture of water and glue or even water and flour will work. About five layers of paper should be enough.
Students learned to paint a 3D object. Most of them used black acrylic or latex underpainting like Jill Foote-Hutton, which sealed, strengthened, and smoothed the surface.  Then they added the color layer, leaving some areas intentionally black. Wiki sticks or tape helped create a barrier for my blind students to know where to paint.


A few of them learned about performance and how to scare other teachers in my hall. So between the interdisciplinary take or the aesthetic take, or the skills and techniques take on this lesson, there's no question that a lot is being learned.


I had two high school boys tell me day one, "This is going to be my favorite project this year!" By the third day, they were going to take zeros because things just weren't working out. But in the end, it was, in fact, their favorite project, which tells me they are learning one of art's most important lessons- perseverance pays.


Saturday, March 11, 2017

Weaving Yarn


As part of a month-long craft unit that included basketry, hypertufa, and quilting projects, I taught my students how to weave yarn. Some loved it, some hated it, but it is a project that doesn't require sight, and provides the crucial fine motor skill practice often neglected in my blind students. The materials are simple:  yarn, a large plastic needle, and a piece of cardboard with slits or notches at the top and bottom.  Thread the loom by going up one to one notch and down through the next one, both on the front of the loom, rather than wasting yarn by wrapping it the whole length on the back. Then just stitch the vertical strings with an under-over-under-over pattern, going from left to right and then back across from right to left. I combined some of the smaller pieces together to make a collaborate textile piece that I am in the process of framing. Textiles are a part of our every day life. It's worth pausing to learn how they are made.


Wednesday, March 8, 2017

Tessellations

Math becomes meaningful for art lovers, during tessellation projects.
I  introduce my students to tessellation project by showing them images of E.C. Escher's amazing work and letting them handle a pop up book of his pieces.  How is it done? They want to know. How does he make black geese fly one direction and white geese fly the other? How are tessellations made. I tell my students I will show them if they can try to figure out how to change the perimeter of a card without changing the area.  We do the math together to find the perimeter and area of a football field or an iphone. I hand them a card: 3"X5" or 3"X3" or 3"X2". They figure out the perimeter and diameter of their card themselves. Then I show them how I can draw a line that starts on one side and ends on the same side.  I cut along the line and then slide the card to the opposite side and tape it to the edge. (This works well with graph paper, for students of vision). Did I change the area? No. I didn't throw any part away, and I didn't add any piece from a different card. Did I change the perimeter? Well if the shortest distance between two lines is a  straight line and my line is now curvy or zig zag to get from one point to another, than I increased the distance, so yes.  I like to encourage my students draw and cut from corner to corner so that students can easily line the edge up to the opposite side without needing to grid card to line it up. The rainbow tessellation at the top is an example of what it looks like with only one shape cut. If you want something less boxy, you can cut a second shape from another straight side before sliding and taping it to it's opposite side.  Now you have a template.


The template can be placed anywhere on a piece of paper (we use 12"X18") and traced, and then slid (not flipped, not turned, but slid) so that the right side of the template fits into the left side of the drawn shape. This repeated pattern fills the page. Some of my visually impaired students use devices to see the edges better, but my blind students had to trace their template using wiki sticks which later served as tactile barriers for coloring with markers. A few students traced with a 20/20 pen and then I went over their lines with hot glue so they could feel their edges.


This is a piece done by a co-worker as I walked her through the process. The element of design we focus on is shape, and the focus principles of design are repetition/pattern and balance (crystallographic). The project is rich enough that there many ways to teach it, and that's important to someone like me, who never wants to live a boring day.


The World in my Classroom


If you can't take the students to Paris, bring Paris to the students. The music classes at my school are learning songs from around the world, so my little mural making class has taken the opportunity to create a backdrop for the program. We have four 8'x4' panels each with a different landmark. The pagoda for Japan and towers from Italy and France were no brainers. When it came to an edifice for various African songs, I was stumped. Lucky for me, my Art History Professor sister, Lynne, focused her dissertation on African architecture. She suggested The Great Mosque of Djenne, which is a huge, 110-year old earthen structure on the flood plain of Mali.

I projected my drawings for low vision students to trace with chalk over last year's spring sets, then we did underpainting and added the final touches. So even though we didn't explore the actual places, there's something to be said about exploring painting techniques.