Sunday, November 19, 2017

Wreath Ornaments

String buttons, beads or bells on wire; close the circle, add a bow, and you've got yourself a wreath ornament for the Christmas tree.  It's the holiday craft that even small children can do.

Other versions of the craft open up once you are old enough to work a glue gun. When my kids were little and I didn't have much money for decorations, I made wreath picture frame ornaments of far flung family so my children would remember their aunts, uncles, and cousins. I started with clean concentrated orange juice can lids. Construction paper on the back, and front (minus a hole for the picture), and red ribbon around the sides to cover the metal and disguise the metal base. Then I hot glued buttons around the edge.  For some other family members, I cut a back and front out of felt, glued it down and stitched the edges with red embroidery floss. Red buttons looked like big berries and red bows and loops finished it off. It was a weekend project that has brought 16 Decembers of enjoyment since. Simple or elaborate, wreath ornaments are gifts, gift toppers, or memory keepers.


Thursday, November 16, 2017

Wire and Bead Ornaments

It is almost December, which is the time of year for ornament making and for fundraising. Last year my students and I made wire ornaments to sell.  I made the basic shapes (star, heart, Christmas tree, dove) from 18-gauge wire, and then offered them beads, pipe cleaners and plastic coated wires called Twisteez,  to twist and zig-zag across the base structure. The more they made, the easier it became for them. I sold them at a community market for $2 each, sent some to Atlanta for another sale, and kept some to sell during our student show. We threw ourselves a pizza party with the profits which made the whole process twice as fun. Try making some yourself. After all,  a little craft and whimsy make for great therapy during this hurried season.

Monday, November 6, 2017

Whirligig Interdisciplinary Lesson

When I asked elementary students at the beginning of the year what kind of things they wanted to make, the most common answer was,  "Fidget Spinners!" Long before the current toy sensation, though there were other kinds of spinners, toys like tops yo-yos, and and whirligigs, so I decided to do a history lesson that included the original Fidget Spinner, as part of our color theory unit.

I began by talking about pioneers crossing the country in their covered wagons or handcarts. Can you imagine moving and having to fit all of your family's possessions in to one car? What if you could only take one thing, what would it be? I shared my childhood road trip game: If I Were Going Across the Plains" We went around the class, and each person filled in the blank, "If I were going across the plains, I would take a......"   I explain that the word they chose is a direct object. The first person then tells what they would do with their object. "I would eat my food." Then we we go around the group with each person using the same verb as the first person, but keeping their original direct object. "I would eat my hat....I would eat my book.....I would eat my sleeping bag" The second person then chooses the verb that makes sense for their object, "I would put my hat on my head." and continues, "I would put my book on my head...." This lead into a discussion about how few toys would be allowed to travel, and what kind of toys the pioneer children actually had.

The type of whirligig, that pioneers used,  is a small, wooden disc with two holes on either side of the center point. and a piece of twine. This is threaded through both holes like a button and tied together at the other end. By holding the ends of the twine loop in two hands and moving the hands in small circles like you would jumping rope, the twine becomes twisted to the point that the hands move closer to the disc. Once the hands are slowly pulled apart, the disc spins and as the hands relax, the disc winds itself up in the opposite direction. So by pulling and relaxing, the whirligig can spin for minutes, or until the string starts cutting off the circulation in your fingers. I used a role of masking tape as a template to trace the circles--wood is much easier to spin, but a couple cardboard circles hot-glued together can work too. The holes are about a thumbs width apart and the string should be about a yard long (18" after it's folded it in half).

Since we've been studying the primary colors (red, yellow, and blue), and the fact that two primaries mixed together make a secondary (orange, green, purple), the students were to pick to primaries for each side of their whirligig. They could do spirals, dots, stripes, star bursts etc. as long as the colors remained separated but close together. The two primary colors visually mix into a secondary color once the whirligig gets spinning.  Playing my childhood game, sharing my pioneer ancestor stories, painting, and spinning whirligigs--there are days my job is so enjoyable that I can hardly believe I get paid.

Friday, November 3, 2017

Zentagle Portraits


My friend, Matt Forrest, who volunteers at my school, got a grant to buy frames and easels for my students to have an exhibit in the community. We sat down with my high school students to brainstorm and vote on a project that interested them. They decided to make portraits that used various patterns.

Once their drawings were done in marker (any color as long as it was dark), I emailed pictures to Matt, who produced the images on plastic and then used photo emulsion and the images on plastic to produce silk screens.  When he came back to the school, my students printed their images with black ink, on to high quality printmaking paper.  The wet ink can be flocked with a powdered plastic that melts when met with a heat gun, making the image tactile. Finally, students colored their prints with water color. I try to have my all my art projects for the year on the calendar before the first day of school, but sometimes, unexpected opportunities and the group decisions make for some nice side trails and beautiful vistas.


Wednesday, November 1, 2017

Instant Ancient Pottery Lesson Plan


In art class we have been studying ancient Egypt and talking about how archeologists dig and discover pottery from lots of civilizations. Unless someone grinds them up, ceramic items last thousands of years. They may crack or break into pieces but the pieces and be put back together for a better understanding of how vessels were used and how people lived.

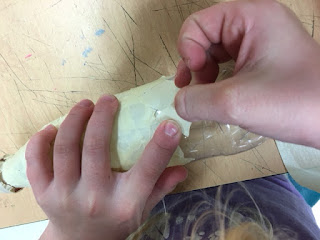
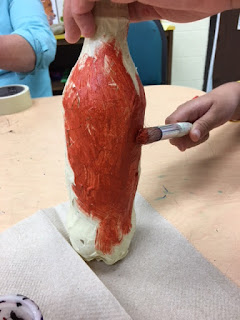
To make pseudo-ancient vases, my students tore hundreds of pieces of masking tape, stuck them onto empty plastic bottles, painted them with a terra-cotta colored paint, and then wiped off the extra with a damp paper towel to expose texture. This was one of the only projects I remember doing in the craft class I took when I was four. Super easy...


...unless you can't tear tape. Those who are born without vision aren't able to learn through observation, an advantage that most of us take for granted. If they are not taught these skills explicitly, they won't learn them, which is why I know adults with visual impairments, who don't know how to tear a piece of masking tape off the roll. When I realized this was an issue, I decided to start  teaching the skill to younger students. We practiced pinching thumb and forefinger, placing two pinching hands together, side by side, and twisting one towards the body. Students felt my hand position, and practiced on paper a few times before getting a piece of large masking tape to tear down into hundreds of smaller pieces. Repetitive tasks are always less tedious when  paired with purpose. In this case, the finished product and sense of pride was a great reward for a polishing a skill.