Monday, April 25, 2016

Personal Symbols Flag

Symbolism isn't just used in literature. Visual art is also full of symbolism. I try to tie my art lesson about symbolism to social studies and U.S. history. I ask students to come up with a list of things that represent America: statue of liberty, the flag, Uncle Sam, the Liberty Bell, a bald eagle, etc. Then we dig a little deeper as to what those specific symbols mean. The flag alone is packed with meaning. I ask. why 50 stars and 13 stripes? Why red? Why white? Why blue?


Then we get personal. What if you were a country of one? What would your flag look like? What are your interests? What colors represent you and why? Most of my students who do this project are functioning at a very low level cognitively, but they still have preferences, whether it be pounding on something, or humming to a favorite song.

We used felt, glue, and puff paint to each make our own flag using personal symbols. My hope would be that each parent could come and pick out their child's flag without being told which one it was. Symbols help us find a hamburger or a hotel from the high way, use an app on our phone, understand a poem or song, and read a map. It's important for students to understand that colors and shapes have meaning in art and know how to read those too.

Wednesday, April 13, 2016

Do It Yourself T-Shirt design

The music teacher, in my school, came to me yesterday, in hopes that I would have an idea on how to get Beethoven's head on a t-shirt. There is special paper for inkjet printers that allows you to iron on an image. That's easy, but it costs about $18.00 for the cheapest package, would mean a trip to the store or waiting for an order to be delivered. Besides, I have a laser color printer, and only found the iron-on sheets for ink-jet printers.

So I decided to paint his head on with black acrylic paint. As I was rummaging through the cupboard for acrylic, however, I came across puffy paint, which does very well on fabrics and was so easy to use, that I had the t-shirt done in 15 minutes, less time than it would take to drive to the closest Staples.


I started by printing an image of Beethoven. Then I traced it onto wax paper with a Sharpie marker, to simplify the dark and light areas. I placed the wax paper inside the t-shirt and traced my tracing with the puffy paint. I used a light box to see, but taping the paper inside the t-shirt and using a widow would work too! In that case, however, I might trace it with disappearing fabric pen or pencil and then use puffy paint on a flat surface so that it wouldn't drip at all.


Viola! It was so easy and fun, that it makes me think about drawing portraits of ancestors on t-shirts for a family reunion or favorite quotes in cool fonts and colors! The sky's the limit.


Saturday, April 9, 2016

Portrait Perfect

One of my art professors told me, "If you can't make it good, make it big." Scale gives some legitimacy to art. Claus Oldenburg's spoon with a cherry, would be far less impressive if it were life size. It's the making it bigger than life that makes it spectacular. Adding a fountain element to the cherry stem is the over-the-top silliness that sells it to even anti-Pop Art grumps. I decided to give my students a larger-than-life self-portrait assignment, and ended up with some really happy results.


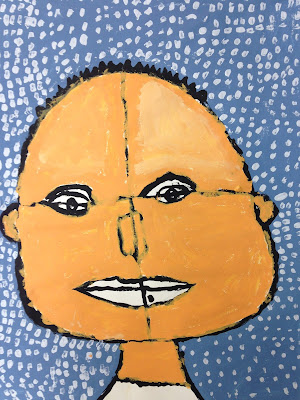
I teach proportions by having students draw a line of symmetry, and find the vertical placement of the eyes on that line. One student kept those preliminary lines, and I love it. This portrait (left) reminds me of Paul Klee.


Because the student, whose paintings are below, has no vision, I would move his hand in the shape the head, four or five times before giving him a brush and having him do it independently, based on muscle memory. Or I would hold his hand over a painted eye and say, the eyebrow goes here, and he'd paint it. I loved these so much that I had him do the assignment four times! Each time, I cut a construction paper head and neck to match his shape, and tape it to his painting, so he could paint the background without any worries of covering the figure. 


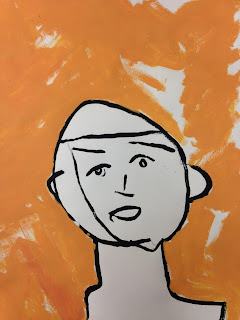
 The student, whose work is shown below was so excited about his image that he decided that he and I should publish a picture book of just this one image. "We'll be rich!" he insisted. He just started art this semester. Fingers crossed that the enthusiasm lasts.


A few students drew in pencil, but could not see their lines, so I traced them in black paint, and that was bold enough to help them paint the shapes.

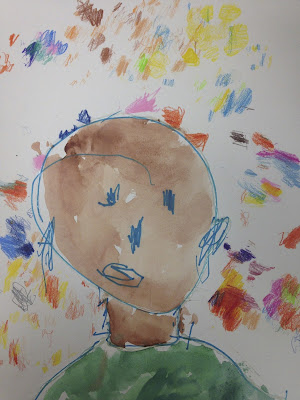
This portrait was done by a cognitively impaired student who is completely blind. I positioned the his  hand and told him what part of the face belonged at that spot. I traced the marker lines with hot glue for watercolor boundaries (the acrylic would have covered the lines). Then I covered the portrait and the student used a stencil and colored pencil to add pattern to the background. It feels simultaneously ephemeral and playful to me.
My advanced students could choose their own medium. This one chose to work in pencil,

and this one used marker and pastel. 

When I look back on an assignment, I can tell if it's a good one or not by how broad the range is in terms of style and interpretation. Everyone definitely was able to show off their skills and reveal their unique style and preferences. Plus they were forced to be bold, by working large. I'll be using this lesson again in the future.


Monday, April 4, 2016

Wall Vase Craft

A few weeks ago, my little artists were each given a chunk of clay to run through the slab roller before choosing a shape to cut from the slab. This was the first step in their wall vase project. Then they created texture by pressing objects into the clay. Pockets were cut and textured before the slip and score technique was used to attach them to the original shape. Holes at the top ensure that these wall vases or wall pockets can be hung by a nail or a ribbon.


I made a small clay wall vase in elementary school, but I don't remember ever explicitly being taught about elements of design: line, shape, color, texture, and value. Simply by talking about these elements with my students, helps them recognize that they have choices. They can decide the shape of their slab. Not everyone has to make an oval. They can choose what kind of texture they make. It doesn't just have to be the first tool they come across. There are options. Some chose not to even make pockets, just shapes to hang on the wall.


Finally, students chose the color paint to use for the surface, after the pieces were fired. Some students used multiple colors; some used thick paint to fill in the bumps; others dried brushed color on top of dried thick paint to show contrast and expose the texture.


I don't know if any of these projects will survive the bus ride home, but I like to think of children hanging it on a bedroom wall and keeping tiny treasures or dried flowers in them and remembering art class.