Thursday, September 21, 2017
String & Nail Craft Project
Three weeks in a row, my art students were able to work with wood and hardware supplies to create art.
I love it because it reinforces basic home improvement skills to help my students become more independent. Visually Impaired students aren't just required to learn the same curriculum as their sighted peers, they are also required to learn an Expanded Core Curriculum that includes life skills that they wouldn't learn unless taught explicitly (from how to use a fork and knife to how to us a hammer and nail).
In terms of Art Standards, this week we focused on "Line as Design Element". Elements of Design or Art are the tools you use to make art. All week we sang a list to the tune of "Oh My Darlin'"/ "Found a Peanut": "Line, Shape, Color, Value Texture, are the Elements of Art. Line, Shape, Color, Value, Texture, Are the Elements of Art." I know, I know, some lists include "point," and "form" (the 3D version of shape), and I talk about how those are valid. But I'm not a big fan of including "space" on the list because how do you create space? You can create a sense of depth or illusion of space, by overlapping shapes, using linear perspective, or atmospheric perspective (value), etc. but you can't do it without using the other elements on our list, so I cover that when we talk about Principles of Design, and stick to the very essentials for elements. My apologies to the people who make the posters that include "space" as an element.
To make this project each student sanded and painted a board. Cut out a shape from a piece of paper and used that as a template to mark where to place nails. Then embroidery floss or yarn was chosen (a contrasting color form the painted board. The end of the string was tied to a nail before "connecting the dots. When a student doesn't know where to begin I have them go around the outline of the shape, wrapping it around each nail as they go along. And then it is just a matter of exploring. If they didn't like what was happening it only took a minute to unwrap it and try something else. Exploring the possibilities of straight lines is a great way to begin learning about the elements of design...and so much more.
Sunday, September 10, 2017
Screw Art
I recently discovered an inspiring 5 minute video called, "Please Touch the Art" about artist, Andrew Meyers making a tactile portrait from screws, for a blind man named, George.
https://vimeo.com/166149898
After looking at more work by Meyers, I decided that this would be something that my blind students could not only appreciate, but create.
They each began by drawing a shape onto a piece of wood, and creating a grid of 1/2" squares.

Then they made holes at each intersection with a drill or nail, before painting the shape black and the background a different color. Screws were drilled into the holes. Some students chose to try to have all the screw heads at the same height, while others tried to create curves or rounded shapes by varying the height.
Finally the heads of the screws were painted. Half an inch apart was not as close as I would have liked to have placed the screws, but each student was allotted about 50 screws, so they did what they could to fill the space. One student who is totally blind, felt a piece progress and said, "There's the 'A'" I didn't even know she knew the shapes of print letters, since she is a Braille reader. It was gratifying to teach my students how to use sandpaper, hammer, and drill, not just once or twice, enough times to actually gain some confidence in a life skill that they wouldn't have learned from observation.
Saturday, September 9, 2017
Collaborate Cardboard Relief Sculpture
I recently revisited a project from four years ago, in which I had each student choose a type of shape (rectilinear or curvilinear) and a set of analogous colors (from yellow to blue, from yellow to red, or from red to blue). After they each painted and arranged their cardboard shapes into a personal relief sculpture, I asked how they would feel about combining them. (They looked so pretty-like a large stained glass window laid out on a large table together). Eight students agreed, so I got out the hot glue gun and combined them into what now hangs from the hall ceiling with 2 pieces of wire. It ended up being 6 foot tall, and there are enough individual personal relief sculptures to brighten our classroom as well.
Wednesday, September 6, 2017
Coil Pots
Coil pottery is an ancient technique and a fun way to introduce functional ceramics to art students.
The process begins by rolling out a "snake" like shape with clay. This is used to coil, or spiral around in a circle to form the bottom of a bowl, or it can be added to a slab (clay rolled out into a shape) to form a small wall. Layers of coils are added using the slip-and-score technique in which the attaching edges are scored with hatch marks and a slimy clan-water mixture is added for glue. If the clay is very soft than the slip and score method isn't needed; as two pieces can be smoothed together.
In the past, I have had assignments in which the students must smooth the inside and outside as they go along building the wall, but for this assignment, only the inside was smoothed so that the outside showed the texture of the coil process. Students were encouraged to use a variety of ways to add coils, in squiggles, spirals, horizontal layers etc. This way the end product makes it possible to see, feel, and remember the process.
Wednesday, August 30, 2017
Caulk Paintings
Sure, you've used caulk to seal around your bathtub and baseboards, but have you ever thought to use it as a drawing medium.

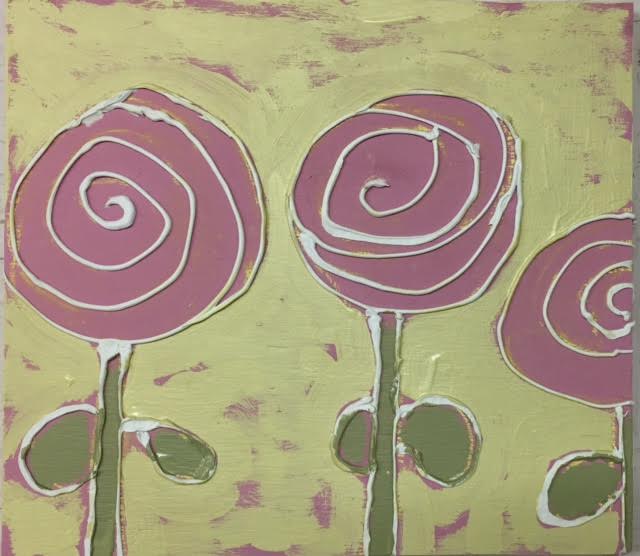
Last week, I brought enough plywood from home, for each of my students to create an image. They sanded and painted the boards a solid color before drawing their image in chalk. This was then traced in caulk.
After the caulk dries (it takes maybe 3 hours, so we waited until the next day), the paintings are ready for more layers of color. Most everyone kept their background color the same as their underpainting, but one student, kept her original pink board color for the flowers and added a layer of yellow latex for the background. I love how the brush strokes create visual texture to compliment with the caulk texture.
Tactile images are great for visually impaired art consumers, but they are also great for visually impaired artists. These students were able to stay in the lines better when there was a little caulk wall to create a barrier for the paint brush. One student was so pleased with her work that she has come into my room the last three mornings, offering the phrase, "Wanna feel my painting?"Thursday, August 24, 2017
Hip to Be Square: Josef Albers Art Project
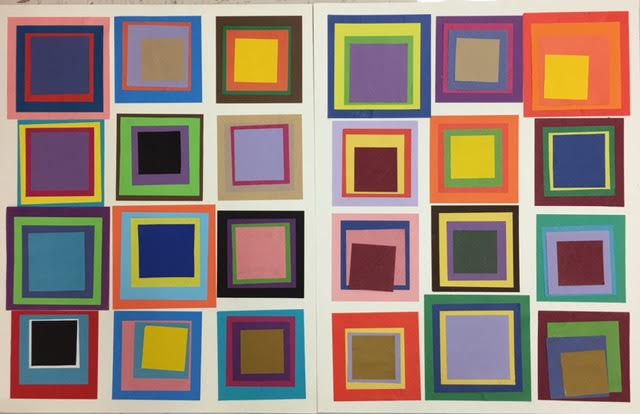
Josef Albers was one of the talented German artists who taught at the The Bauhaus School until the Nazis put pressure on the school to shut down in 1933. Hitler hated modern art. Albers immigrated to The U.S. and went on to teach at the then new Black Mountain Art School. He is most famous for his "Homage to the Square" series, which consisted of hundreds of paintings, each of several squares nestled inside one another. He was very interested in color relationships. A green may look blue-green next to a yellow, but yellow-green next to a blue. A warm color will look like it's coming towards you, but a cool color looks like it's receding in space. This week, my elementary students studied Josef Albers.
Color relationships are an interesting thing to try to teach students who are color blind, or completely blind. We've been reading the picture book about Esref Amarmagan, the blind artist from Turkey, who had to keep his colored pencils laid out int he same order, and memorized the color of objects, so he could recreate them in paint in a way that made sense to future viewers.

When I asked one class,"What color is a watermelon?" A couple girls, with some vision, answered, "Green!" But when I followed up by asking about the color of the inside of a watermelon, a boy, with no vision, eagerly said, "Green!" The only way for kids like him to know the colors of things is to be told.
To avoid gluing the color side down or having to tell each student the color of each square they picked up, I gave them a tool to tell them the color of things, It's the APH Color Test, and you just press it against something and push the button and it will tell you what it is (as shown in the video below). Everyone got a kick out of testing their skin color. Apparently mine is "murky gray beige" or "gray pink" so that information will come in handy next time I buy make up.
Each child also made his/her own, "Homage to 'Homage to the Square'" piece gluing various colored squares together and trying to explain why they thought their combination was working.

Extra time meant gridding another giant piece of graph paper with glue and having students use dot makers to make color clusters and patterns. What a corful way to start the school year!
Color relationships are an interesting thing to try to teach students who are color blind, or completely blind. We've been reading the picture book about Esref Amarmagan, the blind artist from Turkey, who had to keep his colored pencils laid out int he same order, and memorized the color of objects, so he could recreate them in paint in a way that made sense to future viewers.

When I asked one class,"What color is a watermelon?" A couple girls, with some vision, answered, "Green!" But when I followed up by asking about the color of the inside of a watermelon, a boy, with no vision, eagerly said, "Green!" The only way for kids like him to know the colors of things is to be told.
So we talked about the color of things, and then we worked collaboratively to make a giant collage of hundreds of 1 inch squares of color. First, I used Elmer's glue to trace the giant chart paper grid. After it dried, students felt the squares and were able to independently glue and place their pre-cut 1" squares or origami paper.
To avoid gluing the color side down or having to tell each student the color of each square they picked up, I gave them a tool to tell them the color of things, It's the APH Color Test, and you just press it against something and push the button and it will tell you what it is (as shown in the video below). Everyone got a kick out of testing their skin color. Apparently mine is "murky gray beige" or "gray pink" so that information will come in handy next time I buy make up.
Each child also made his/her own, "Homage to 'Homage to the Square'" piece gluing various colored squares together and trying to explain why they thought their combination was working.

Extra time meant gridding another giant piece of graph paper with glue and having students use dot makers to make color clusters and patterns. What a corful way to start the school year!
Wednesday, August 16, 2017
Teaching Linear Perspective to The Blind
In the book, PAINTING IN THE DARK, ESREF ARMAGAN, BLIND ARTIST, Rachelle Burk describes how a blind boy, growing up in Turkey during the 1950's and '60's, wanted to learn about perspective, which is, "creating a three dimensional appearance on a flat surface. This was a difficult concept so he sought the advice of an art professor who explained how size and angles show depth in a picture. The professor drew examples for Esref to feel, demonstrating how a road or bridge appears to narrow to a point as it stretches into the distance. Esref understood applied the methods to his work. He practiced until he could paint in perspective as well as many sighted artist."
All of my art students are legally blind, which means they have 20/200 or worse vision, in their best eye, with glasses. I teach those with a little bit of vision, two-point perspective drawing much as I would a sighted child. We start with a horizon line with two vanishing points at either end (often going off the page onto paper taped underneath) and then determine where the tallest vertical line, the closest corner of a building, will intersect the horizon line. Lines are drawn from top of the vertical line down to each vanishing point and from the bottom of the verticle line up to the points. The width of the front of the building is determined by cutting the triangle made from the building corner to one point, with another vertical line. Another vertical line is used to make the side of the building.
For students with no vision at all, the process was a little more abstract. They followed the instructions using using wiki sticks. I traced their wiki stick lines with hot glue, and then removed the wiki sticks, to make it more permanent and able to withstand coloring.
Some low vision students used a Visio Book, a closed circuit TV, as a magnifier to add details.
Subscribe to:
Posts (Atom)